OpenStack workshop, part 2: OpenStack cloud installation
A Step-by-Step Cloud Setup Guide
Glance Image Automaton
Clouds can't exist without operating system images: To help users launch virtual machines quickly, and without needing specialist knowledge, administrators need to provide matching images; otherwise, you can forget the Cloud. Glance handles this task in OpenStack. The service comprises two individual components: the API (glance-api ) and the registry (glance-registry ). The API provides an interface for all other OpenStack services, whereas the registry takes care of managing the Glance database.
You can start by editing the glance-api configuration file, which resides in /etc/glance/glance-api.conf. Open the file in your preferred editor and look for a [keystone_authtoken] near the end. OpenStack admins will see this frequently – each service needs to log in to Keystone first, before it can leverage Keystone to talk to the users. Also, this is the correct place in glance-api.conf to define the required credentials. One advantage is that the configuration looks very similar for nearly all OpenStack services and is identical in some cases.
In the remainder of this article, you can assume the following: auth_host will always be 192.168.122.111, admin_tenant_name will always be service, and admin_password will always be secret. admin_user is always the name of the OpenStack service logging in to Keystone (i.e., glance in the present case, nova for OpenStack Nova, quantum for OpenStack Quantum, and so on). Some services will ask you for an auth_url – in the scope of this article, this is always http://192.168.122.111:5000/v2.0/
. If your local setup uses different IPs, you need to use them for auth_host and auth_url.
As in keystone.conf previously, the SQL statement in glance-api.conf is in a line that starts with sql_connection. After installing Glance, you now have an SQLite database; in the present example, the SQL connection is:
sql_connection = mysql://glancedbadmin:ohC3teiv@192.168.122.111/glance
Farther down in the file, you will find a section named [paste_deploy]. Glance needs to know which authentication method to use and where to find the setting details. For glance-api.conf, the correct answer for config_file = in this section is thus /etc/glance/glance-api-paste.ini, and a value of keystone will do the trick for flavor=. After you make these changes, the file is now ready for use.
You will need to edit /etc/glance/glance-registry.conf in the same way: The values for the various auth_ variables are the same as for glance-api, and the database connection and the text for flavor= are identical. You only need a different entry for config_file; the entry for glance-registry.conf is /etc/glance/glance-registry-paste.ini. This completes the configuration of the Glance components. Now, it's high time to create the tables in the Glance databases. glance-manage will help you do this:
glance-manage version_control 0
glance-manage db_sync
Next, restart both Glance services by issuing
service glance-api restart && service glance-registry restart
The image store is now ready for an initial test image. Fortunately, the Glance client lets you download images directly off the web. To add an Ubuntu 12.04 Cloud image to the image store, just follow the commands in Listing 4.
Listing 4
Integrating an Image
glance image-create --copy-from http://uec-images.ubuntu.com/releases/12.04/ release/ubuntu-12.04-server-cloudimg-amd64-disk1.img --name="Ubuntu 12.04 cloudimg amd64" --is-public true --container-format ovf --disk-format qcow2
After you've completed this step, glance image-list should show you the new image – once a value of ACTIVE appears in the Image field, the image is ready for use.
Quantum: The Network Hydra
The Quantum network service confronts administrators with what is easily the most complex configuration task. For it to work, you need to set up services on all three hosts, starting with Alice, where you need to run the Quantum Server itself and a plugin. This example uses the Plugin OpenVSwitch plugin; thus, you need to configure the Quantum Server itself and the OpenVSwitch plugin (Figure 3).
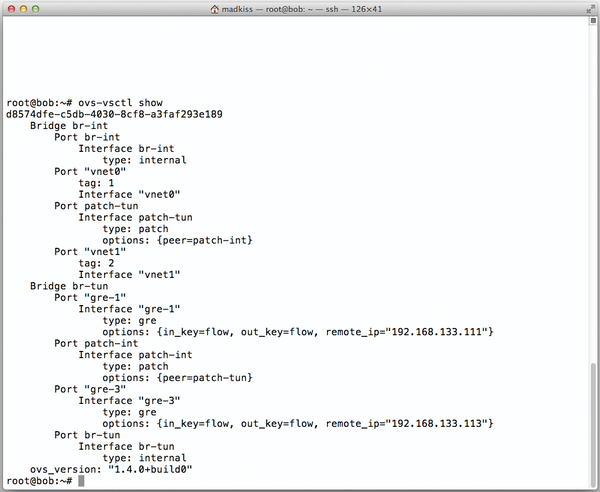 Figure 3: Typing the ovs-vsctl show command shows you what changes Quantum makes to the OpenVSwitch configuration.
After the installation, start by looking at /etc/quantum/api-paste.ini. The [filter:authtoken] section contains entries that will be familiar from Glance; you need to replace them with values appropriate to your setup. The auth_port must be 35357 in this file.
This step is followed by the OVS plugin configuration: It uses a file named /etc/quantum/plugins/openvswitch/ovs_quantum_plugin.ini for its configuration. In the file, look for the line starting with sql_connection, which tells Quantum how to access its own MySQL database. The correct entry here is:
sql_connection = mysql://quantumdbadmin:wozohB8g@192.168.122.111/quantum
For simplicity's sake, I would save this file now and copy it to bob, although you will need some changes for the hosts Bob and Charlie later on. You can also copy /etc/quantum/api-paste.ini as-is to the two nodes.
Next, you can launch the Quantum Server (Figure 4), including the OpenVSwitch plugin on Alice; service quantum-server start does the trick.
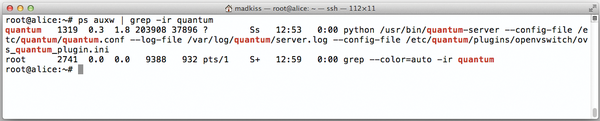 Figure 4: In the default installation, the cloud controller only runs the Quantum Server.
Bob is not running a Quantum server. However, because Bob is the computing node, it definitely needs the quantum-plugin-openvswitch-agent, which is the agent for the OpenVSwitch plugin. Bob will use the agent later to receive relevant network information from Alice (quantum-server) and Charlie (DHCP and L3 plugins) to configure its own network correctly. The package for this agent should already be in place.
The next step is thus the agent configuration, which is in the familiar file /etc/quantum/plugins/openvswitch/ovs_quantum_plugin.ini. Look for the # Example: bridge_mappings = physnet1:br-eth1 line and add the following lines behind it to make sure the agent works correctly on Bob:
tenant_network_type = gre
tunnel_id_ranges = 1:1000
integration_bridge = br-int
tunnel_bridge = br-tun
local_ip = 192.168.133.112
enable_tunneling = True
These lines tell the OpenVSwitch agent to open a tunnel automatically between Bob and the network node Charlie; the hosts can then use the tunnel to exchange information.
After completing the changes to ovs_quantum_plugin.ini, you should make a copy of the file on Bob and paste it to Charlie; you will need to replace the IP address of 192.168.133.112 with 192.168.133.113 for Charlie.
On both hosts – Bob and Charlie – additionally remove the hash sign from the # rabbit_host line in /etc/quantum/quantum.conf and add a value of 192.168.122.111. This is the only way of telling the agents on Bob and Charlie how to reach the RabbitMQ Server on Alice.
Finally, Charlie needs some specific changes because it is running the quantum-l3-agent and the quantum-dhcp-agent. These two services will later provide DHCP addresses to the virtual machines, while using iptables to allow access to the virtual machines via public IP addresses (e.g., 192.168.144.0/25). The good news is that the DHCP agent does not need any changes to its configuration; however, this is not true of the L3 agent. Its configuration file is /etc/quantum/l3_agent.ini.
Creating External Networks
First, you need to add the values for the auth_ variables to the configuration in the normal way. Farther down in the file, you will also find an entry for # metadata_ip =; remove the hash sign and, for this example, add a value of 192.168.122.111. (I will return to the metadata server later on.)
The configuration file needs some more modifications, which you can't actually make right now. To do so, you would need the IDs for the external router and the external network, and they will not exist until you have created the networks. This then takes you to the next step, which is creating the networks in Quantum. You will be working on Alice for this process.
Because creating the networks also involves a number of commands, I have again created a script [3]. It creates the networks required for the present example: a "private" network, which is used for communications between the virtual machines, and the pseudo-public network, 192.168.144.0/25, on which the virtual machines will have dynamic IP addresses ("floating IPs") later on.
After downloading and running the script, you need to discover Quantum's internal router ID for the floating network and the ID of the floating network itself. To display the first of these values, you can type quantum router-list. The value for ID in the line with the provider-router is what you are looking for. You need to add this value to the /etc/quantum/l3_agent.ini file that you already edited on Charlie.
The floating network ID can be queried using quantum net-list – the value in the ID field is of interest here; its name is ext_net. Add this value to /etc/quantum/l3_agent.ini following gateway_external_net_id = . You also need to uncomment the two values you will be changing so that the Quantum agents actually see them.
This completes the Quantum configuration files, and it's nearly time to start up Quantum. You just need the internal bridges on Bob and Charlie that OpenVSwitch will use to connect the Quantum interfaces to the local network configuration. Working on Bob and Charlie, type ovs-vsctl add-br br-int to create a bridge for internal communication between the virtual machines. Charlie additionally needs a bridge to the outside world: ovs-vsctl add-br br-ext and ovs-vsctl add-port br-ext eth2 take care of the required configuration.
At the end of this process, you need to restart all the agents on Bob and Charlie: restart quantum-plugin-openvswitch-agent is required on Bob and Charlie. Additionally, you need to run restart quantum-l3-agent and restart quantum-dhcp-agent on Charlie to tell the agents to reload their configurations.
Buy ADMIN Magazine
US / Canada
UK / Australia
Related content
-
OpenStack workshop, part 3:Gimmicks, extensions, and high availability
 OpenStack has a number of useful extensions that can help admins protect their cloud against failures.
 -
OpenStack: What's new in Grizzly?
 In mid-April, the OpenStack developers published the latest version of their free cloud environment, code-named Grizzly.
 -
OpenStack: Shooting star in the cloud
 OpenStack is attracting lots of publicity. Is the solution actually qualified as a cloud prime mover? We take a close look at the OpenStack cloud environment and how it works.
 -
OpenStack: Shooting star in the cloud

OpenStack is attracting lots of publicity. Is the solution actually qualified as a cloud prime mover? We take a close look at the OpenStack cloud environment and how it works.
-
Simple OpenStack deployment with Kickstack
 Kickstack uses Puppet modules to automate the installation of OpenStack and facilitate maintenance.
Subscribe to our ADMIN Newsletters
Subscribe to our Linux Newsletters
Find Linux and Open Source Jobs
Most Popular
Support Our Work
ADMIN content is made possible with support from readers like you. Please consider contributing when you've found an article to be beneficial.
