« Previous 1 2 3 Next »
Open Source VDI solution with RHEV and oVirt
Production Line Desktop
Building an Environment
In this section, I illustrate how to build a test environment with RHEV. Before starting the installation, you should consider the sizing of the environment. As a rule of thumb in a typical VDI environment with RHEV, you can assume 80 to 120 VMs per server with two six-core processors. Ultimately, however, packing density depends on the applications and user behavior, all of which needs to be taken into account. At least two hypervisor hosts are required for redundancy.
The choice of the storage system is determined by the I/O requirements of the VDI environment. The RHEV-H server network connection depends on the network to which it needs access. In general, 4Gb interfaces (2Gb for VDI desktops and 2Gb for management) are sufficient.
A functioning DNS resolution (A and PTR records) for the RHEV-M and RHEV-H hosts is absolutely necessary for the install. A RHEV desktop environment also requires a directory service. Active Directory, IPA, and Red Hat Directory Server 9 are supported. An administrative user who can perform domain joins and modify group memberships is required to communicate with the directory service. Ideally, you will want to create a new user. More details can be found in the extensive RHEV documentation [3] provided by Red Hat.
Installation
RHEV-H is a Red Hat Enterprise Linux 6 (RHEL6)-based minimal system for hypervisor mode. The RHEV hypervisor supports all processors with a 64-bit address space, AMD-V or Intel VT virtualization extension, and a maximum of 1TB of RAM. The memory requirement for a local installation of hypervisor is around 2GB without a swap partition, which is mainly reserved for logging. The swap partition's space requirement can be estimated according to the formula:
GB swap = (GB RAM x 0.5) + 16
According to the documentation [3], installing the RHEV Hypervisor involves just a few steps.
As an alternative to the RHEV Hypervisor, the hypervisor packages can be installed on a RHEL6 system. Use of RHEL6 in the substructures brings many advantages in terms of hardware support and useful software packages for operating and debugging.
The RHEV Manager is installed on a RHEL6 host. Red Hat recommends the following minimum hardware requirements: dual-core processor, 4GB of RAM, 50GB of local disk space, and 1Gb NIC. The RHEV-M host provides management, as well as the administrator portal, user portal, RESTful API, and ISO domain. The ISO domain is bound to the RHEV data center and includes all ISO images.
After configuring the necessary RHN channel (see the "Required Red Hat Network Channels" box), the RHEV-M packages can be installed:
Required Red Hat Network Channels
The following Red Hat Network Channels are needed for installation:
- RHEV Hypervisor (v6, x86_64):
rhel-x86_64-server-6-rhevh - RHEL Server (v6, 64-bit x86_64):
rhel-x86_64-server-6 - RHEL Server Supplementary (v6, 64-bit x86_64):
rhel-x86_64-server-supplementary-6 - RHEV Manager (v3.1, x86_64):
rhel-x86_64-server-6-rhevm-3.2 - JBoss Application Platform (v6) for 6Server x86_64:
jbappplatform-6-x86_64-server-6-rpm - RHEV Agent (v6 Server, 64-bit AMD64/Intel64):
rhel-x86_64-rhev-agent-6-server - RHEV Management Agent (v6, 64-bit AMD64/Intel64):
rhel-x86_64-rhev-mgmt-agent-6
# yum install rhevm
After installing the software, the RHEV Manager can be configured by the root user:
# rhevm-setup
To complete the installation, then enable the configuration (Figure 2).
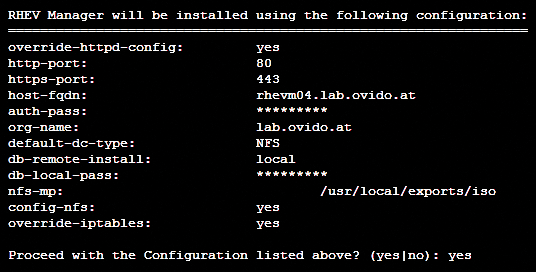 Figure 2: Completing the RHEV-M installation.
Configuring RHEV
You need a supported web browser (Internet Explorer 8+, Mozilla Firefox 10+) to set up and configure the RHEV-M environments. The administrator portal is launched with the command:
# https://rhevm.lab.ovido.at/webadmin
After logging in, a number of tabs are visible in the RHEV administrator portal (Figure 3); details are only provided where necessary for this particular setup. The Data Centers tab is a RHEV-M environment's parent container. It includes a number of clusters, hosts, networks, and storage pools. Only one storage type can ever be used at one time in a data center, so the simultaneous use of NFS and Fibre Channel, for example, is not possible. If you are using several types of storage, you need to operate multiple data centers in RHEV.
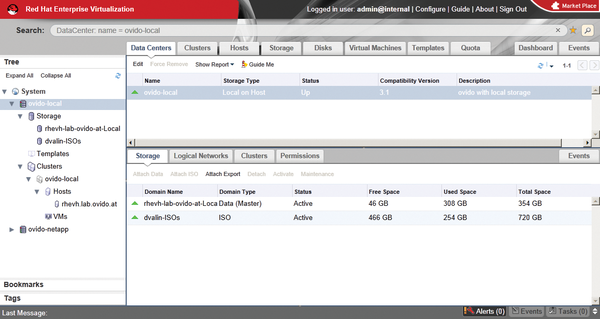 Figure 3: The RHEV administrator portal supports environment configuration.
Other reasons for setting up multiple data centers are different user roles or organizational structures, which could mean, for example, creating one data center each for production and development environments. Normally, however, one data center is sufficient for a VDI environment's use case.
A cluster in RHEV-M combines a number of RHEV-H servers and resources, such as storage and network, into a composite designed to guarantee high availability of virtual machines. In this way, VMs are migrated as required between RHEV-H servers. One cluster is sufficient for a VDI environment. When creating the cluster, you need to choose Optimized for Desktop Load in the Memory Optimization tab for a VDI environment.
The storage systems are configured in the Storage tab. A storage domain must be configured for each storage source. Therefore, a storage domain is, for example, an integrated LUN, an NFS share, or the like. Existing storage domains (e.g., from other RHEV or oVirt environments and test setups) can be imported using the import function.
For each data center, you need to define logical networks, which form the interface between one or more physical networks and virtual machines. VLAN tagging is supported in various standardized types, and interface bonding is possible in four modes: active backup, XOR policy, load balancing, and IEEE802.3ad.
« Previous 1 2 3 Next »
Buy ADMIN Magazine
US / Canada
UK / Australia
Related content
-
Managing Virtual Infrastructures
Version 3.1 of the oVirt management platform for virtual infrastructures has recently become available. On Fedora 17, the new release is easy to install and deploy.
-
Red Hat's cloud and virtualization portfolio
 Red Hat massively expanded its cloud portfolio during 2012. This overview can help you evaluate Red Hat's products in the context of VMware and others.
 -
Red Hat’s Cloud Tools
Red Hat massively expanded its cloud portfolio during 2012. This overview can help you evaluate Red Hat’s products in the context of VMware and others.
-
Live migration of virtual machines with KVM
 Live migration of virtual machines is necessary when you need to achieve high-availability setups and load distribution.
 -
Professional virtualization with RHV4
 New and updated features in Red Hat Virtualization (RHV) 4, along with seamless provisioning of services between traditional and cloud workloads, could help RHV make up ground on VMware and Hyper-V.
Subscribe to our ADMIN Newsletters
Subscribe to our Linux Newsletters
Find Linux and Open Source Jobs
Most Popular
Support Our Work
ADMIN content is made possible with support from readers like you. Please consider contributing when you've found an article to be beneficial.
