OpenLDAP Workshop
Central Register
Hardening the Server
The server is now ready for use but is still completely insecure because it accepts unencrypted requests on port 389. When the manager connects with the server from a workstation, the password is transmitted in plain text. To protect the server against unauthorized access and prevent the password being sniffed off the network, encryption should be configured as soon as possible. You have basically two approaches. The first solution uses a self-signed certificate that is generated using the scripts supplied with the OpenLDAP package. The clients then later trust the server certificate. If you already operate a certification authority, you can take a different approach, but more on that later.
The easy option is to use the supplied scripts, which you must run as the root user. The first script builds a certificate database in the /etc/openldap/certs directory:
$ sudo /usr/libexec/openldap/create-certdb.sh
Creating certificate database in '/etc/openldap/certs'.
The second script generates the required certificate and imports it into the certificate store you just created:
$ sudo /usr/libexec/openldap/generate-server-cert.sh -d /etc/openldap/certs -h ldap.acme-services.org
The OpenLDAP server is set up in the default configuration to use this certificate. The certificate is stored as OpenLDAP Server
in the certificate database. NSS-based certificates distinguish between the common name, which usually corresponds to the hostname of the server, and the readable name. The names can differ. Therefore, in the above command we specified the hostname of the server with the -h ldap.acme-services.org command-line option. This is where a special feature of the LDAP configuration enters the game: If you want to address the OpenLDAP server with both the StartTLS method, and with traditional SSL, the common name (-h) must match the hostname of the server.
After completing this part of the configuration, you only need to add the ldaps option to the /etc/sysconfig/ldap file. Change the SLAPD_LDAPS line, which is set to no in the basic configuration, to yes. After a reboot, the OpenLDAP server accepts SSL connections (SSL and StartTLS):
$ sudo service slapd restart
Now you can use openssl to check the connection. The command does not trust this certificate yet, and identifies it as self-signed; therefore, you need to export the certificate from the certificate database to the system-wide certificate directory and link with the required certificate hash:
$ sudo certutil -L -d /etc/openldap/certs -n "OpenLDAP Server" -a > /etc/pki/tls/certs/ldap.acme-services.org.crt
$ sudo ln -sf /etc/pki/tls/certs/ldap.acme-services.org.crt $(openssl x509 -in ldap.acme-services.org.crt -noout -hash).0
After these two steps, you can check the server certificate with the openssl command, which provides the s_client command for this purpose:
$ openssl s_client -connect ldap.acme-services.org:636
The certificates are output on the console. The decisive thing here is that the last line should read 0 (ok) , given a correct configuration. The command now waits for input. However, since you only want it to test the certificate, you can cancel by pressing Ctrl+C.
This second approach describes the use of your own certificates that will not reside in the OpenLDAP certificate database. It often makes sense not to store certificates there (e.g., if other services need to use them).
CentOS stores certificates in the /etc/pki/tls/certs directory and the keys in /etc/pki/tls/private. It is important to ensure that the group that has access to private keys includes the OpenLDAP server. The OpenLDAP server runs as the ldap user and is a member of the ldap group. It is therefore advisable, to assigned the private key file to the owner root and the ldap group. The permissions need to be set to 640.
Unfortunately, the OpenLDAP server is not aware of this key in the default configuration, so you need to configure this separately. Listing 2 shows a typical configuration. Using the ldapmodify command, you pass the file to the LDAP server, as you do when parsing the initial configuration. Then, for the first approach, set the SLAPD_LDAPS variable in the /etc/sysconfig/ldap file to yes and restart the server. Make sure the private key is not protected with a password.
Listing 2
ssl.ldif
01 dn: cn=config
02 changetype: modify
03 replace: olcTLSCACertificatePath
04 olcTLSCACertificatePath: /etc/pki/tls/certs
05 -
06 replace: olcTLSCertificateFile
07 olcTLSCertificateFile: /etc/pki/tls/certs/localhost.crt
08 -
09 replace: olcTLSCertificateKeyFile
10 olcTLSCertificateKeyFile: /etc/pki/tls/private/localhost.key
For the server to use the new SSL connections, it is helpful to modify the configuration file for the LDAP client /etc/openldap/ldap.conf (Listing 3). When modifying the configuration file, note how to set up SSL encryption. In particular, you may need to adapt the TLS_CACERTDIR parameter to point to the system-wide certificate database.
Listing 3
/etc/openldap/ldap.conf
§nonumber
BASE dc=acme-services,dc=org
URI  ldaps://ldap.acme-services.org
TLS_CACERTDIR /etc/openldap/certs
TLS_REQCERT allow
The server configuration is now complete, and the user database setup can begin.
Directory Structure
In this section, I will be creating the tree for the user data. The top level of this tree has already been established and consists of two domain components (DCs): dc=acme-services and dc=org. All new structures are inserted below this point. The tree should look like Figure 1.
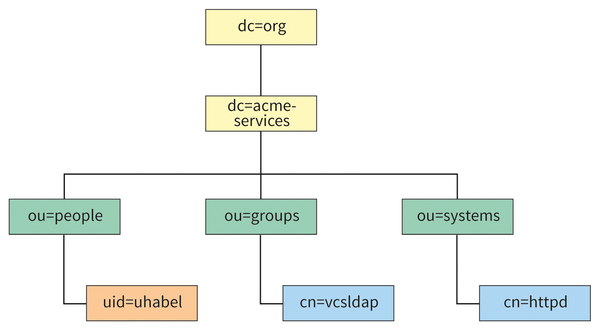 Figure 1: The complete LDAP directory tree.
Now, you need to generate new LDAP objects and assign them the required attributes. Objects are unique nodes that possess specific object classes as attributes. Object classes can be, for example, organizationalUnit, domain, inetOrgPerson, or posixAccount. The available object classes depend on the schemas that the LDAP server has configured. Figure 2 illustrates this relationship.
 Figure 2: Structure of LDAP schemas and object classes.
Built-in Schemas
An OpenLDAP server can manage a wide variety of schemas; 10 are installed by default. Examples of other data models include Samba, YubiKey, DHCP, and so on. In this article, I will be working exclusively with the built-in schemas. You create the user tree with an LDIF file. Listing 4 shows the LDIF file that creates the required data in the directory tree.
Listing 4
base.ldif
01 dn: dc=acme-services,dc=org
02 dc: acme-services
03 objectClass: top
04 objectClass: domain
05
06 dn: ou=people,dc=acme-services,dc=org
07 ou: people
08 objectClass:
09
10 dn: ou=groups,dc=acme-services,dc=org
11 ou: groups
12 objectClass: organizationalUnit
13
14 dn: ou=systems,dc=acme-services,dc=org
15 ou: systems
16 objectClass: organizationalUnit
17
18 dn: uid=uhabel,ou=people,dc=acme-services,dc=org
19 objectClass: person
20 objectClass: organizationalPerson
21 objectClass: inetOrgPerson
22 objectClass: posixAccount
23 cn: Ulrich Habel
24 gidNumber: 100
25 homeDirectory: /home/uhabel
26 sn: Habel
27 uid: uhabel
28 uidNumber: 1000
29 userPassword: {SSHA}f0pv70XFFox5UqKc6A4Uy39NcxkqcJbc
30
31 dn: cn=vcsldap,ou=groups,dc=acme-services,dc=org
32 objectClass: groupOfUniqueNames
33 objectClass: top
34 cn: vcsldap
35 uniqueMember: uid=uhabel,ou=people,dc=acme-services,dc=org
36
37 dn: cn=httpd,ou=systems,dc=acme-services,dc=org
38 objectClass: inetOrgPerson
39 objectClass: organizationalPerson
40 objectClass: person
41 objectClass: top
42 cn: httpd
43 sn: httpd Webserver
44 userPassword: {SSHA}f0pv70XFFox5UqKc6A4Uy39NcxkqcJbc
Unlike before, I will now use the ldapadd command and the newly created manager user for the first time. The following command parses the LDIF file:
$ ldapadd -x -W -D cn=manager,dc=acme-services,dc=org -f base.ldif
Notice that now this command no longer needs the root user for the system; instead, any user can run it. To register, you need a password; in this example, it is secret
. The user is determined by the command-line option -D, followed by the distinguished name (DN) of the user. Because each DN is unique in the system, the user is also unique.
The -x option in this case indicates that no SASL method is used for authentication; the -w option requires a password entry. After importing the LDIF file, the information tree shown in Figure 1 is completely initialized.
Buy this article as PDF
(incl. VAT)
Buy ADMIN Magazine
US / Canada
UK / Australia
Related content
-
LDAP integration with popular groupware suites
 Your LDAP directory holds user data for the whole network. Why not save time and avoid duplication by integrating the LDAP directory with your groupware environment?
 -
Quick and easy SaaS provisioning for OpenLDAP
 Provisioning SaaS apps for OpenLDAP users with Okta Cloud Connect lets you retain control of your users' data and access to applications, yet gives them the tools they want.
 -
Migration from LDAP to FreeIPA
 The change from centralized user authentication on a vanilla LDAP server to the FreeIPA identity management solution is easier than many admins think. Given attention to a few points, the migration takes very little time and effort.
 -
Secure passwordless logins with FIDO2 and LDAP
 Log in to your account securely without a password with LDAP and a schema to establish the objects and attributes required for FIDO2 authentication.
 -
Single sign-on with Keycloak
 Google and Facebook are two of the biggest providers for single sign-on on the web, with OAuth2 and OpenID, but if you don't want to put your customers' or employees' data in their hands, Red Hat's Keycloak software lets you run your own operations with the option of integrating existing Kerberos or LDAP accounts.
Subscribe to our ADMIN Newsletters
Subscribe to our Linux Newsletters
Find Linux and Open Source Jobs
Most Popular
Support Our Work
ADMIN content is made possible with support from readers like you. Please consider contributing when you've found an article to be beneficial.
