« Previous 1 2 3 4 5
Supercharge your Website with Amazon CloudFront
Clear Skies
W3TC Configuration
Once W3TC is installed, the Performance link shows up in the left-hand panel, which allows you to configure W3TC. Before you begin, click on Performance and hit the compatibility check button (Figure 8) to ensure you have the dependencies you might need to deploy various features. Then, simply go to General Settings (Figure 9). Unless you are installing this in a server over which you have full management control (i.e., root access), it is important to research what your provider supports. Taking a moment to speak with a shared or managed hosting provider will help assure that you can configure W3TC as you desire (Table 1). After the core configuration is done, you can set the basic W3TC settings (Figure 10).
Table 1
W3TC Optimization
| Feature | Function |
|---|---|
| Browser caching | Enables HTTP compression that reduces server load and site load time. |
| Content delivery network | Allows hosting of static files in a CDN (Amazon CloudFront, Akamai, MaxCDN, and Rackspace, among others) to improve load time. |
| Database caching | Caches the database to improve post, page, and feed creation time. |
| Object caching | Improves performance of highly dynamic sites that use the Object Cache API. |
| Minify | Optimizes the size of HTML, CSS, and JS, improving site performance. |
| Monitoring | Allows setting up the server and application monitoring via the New Relic service. |
| Network performance and security | Allows configuration of the CloudFlare service to accelerate and protect your website. |
| Page caching | Enables page caching and reduces site response time. |
| Reverse proxy | Supports HTTP reverse cache or Varnish for the web application accelerator. |
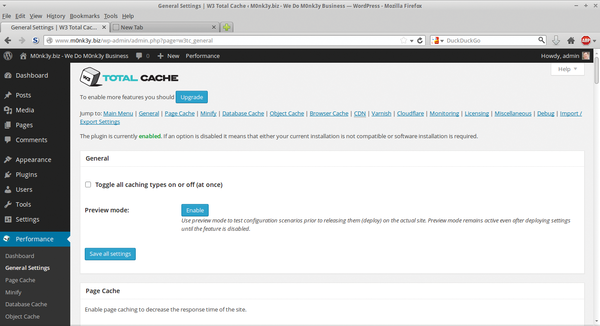 Figure 8: Checking compatibility.
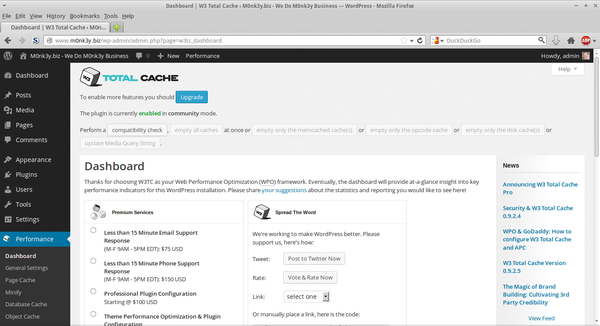 Figure 9: Configuring W3TC.
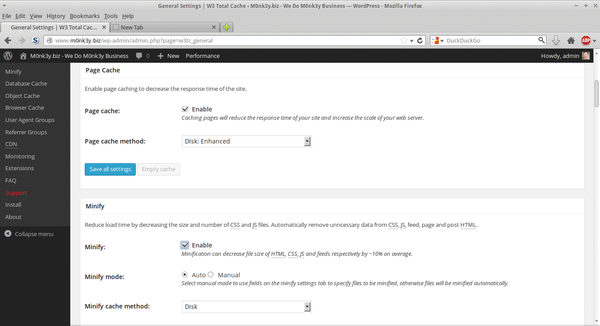 Figure 10: Setting up Page Cache and Minify.
In this example, I enable page caching on the Page Cache screen by selecting Enable and Page cache method:Disk: Enhanced . On the Minify screen, I can optimize the size of HTML, CSS, and JS, improving site performance. Next, enable Minify by selecting the Enable radio button and checking Auto next to Minify mode. Leave all other settings at their default values.
Because you are working in a shared hosting environment in this example, you should disable the Database Cache and Object Cache by making sure the Enable box isn't checked. However, the Browser Cache Enable box should be checked to enable HTTP compression, which reduces server load and site load time. Under CDN, select the Enable checkbox, and for Origin Pull/Mirror, choose Amazon CloudFront from the drop-down box. Click Save all settings to finish (Figure 11).
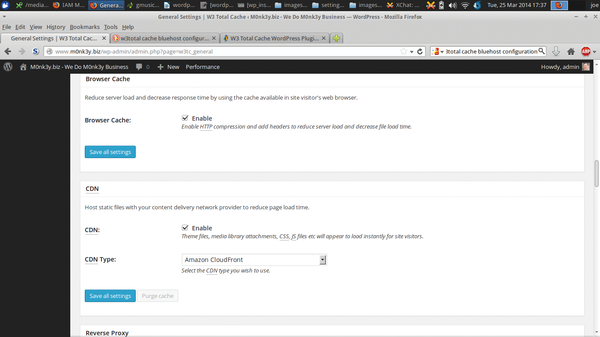 Figure 11: CDN configuration.
You can safely ignore all other options on the remainder of the W3TC page because they are not relevant to the configuration for this example. From here, you move on to finalizing your CDN configuration.
Configuring W3TC
Now that you have enabled your CDN, you need to configure it. Again in the left panel, select CDN and go to the Configuration section: Enter the Access Key ID and your Secret key and CNAME information (Figure 12). Now simply click Test CloudFront distribution , and it should return Test Passed . You are now good to go, so click Save all settings .
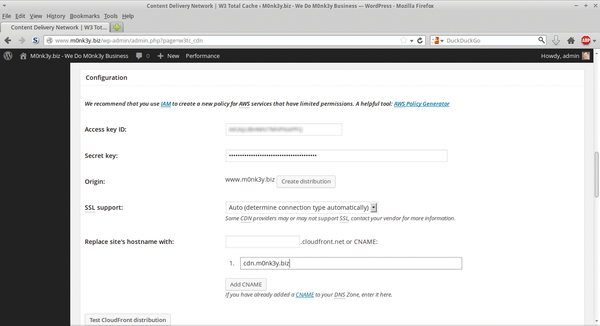 Figure 12: Configuring the CDN.
Now that W3TC is all set up, you need to give your site a moment to copy its contents into the CDN. Have patience because it might take a while for the contents to show in the CDN and for your site to show up properly.
After a few moments, you should open a browser window (clearing the cache is a good idea) and load your website. To validate that your media library images, theme, CSS, and JavaScript are coming from the CDN, view your source in Firefox with (Ctrl+U) or right-click and go to Inspect Element . If you see the address of your previously created CDN CNAME and the images load properly, you are good.
Finally, you should perform a new speed test. In this case, I get the improvements shown in Figure 13. These results look quite a bit better!
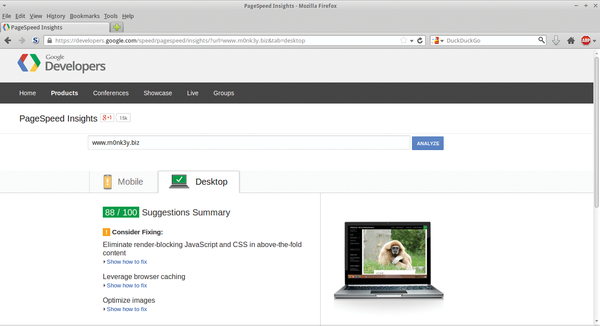 Figure 13: Post-optimized Google PageSpeed Insights site scores: desktop 88/100; mobile 73/100.
Conclusion
You have begun the voyage to improving your WordPress website performance, but like most things, it's an ongoing journey – not a destination. You will always have more to learn and improve upon.
I hope that this article helps you realize you can dramatically improve your website performance without spending an arm and a leg or suffering undue complexity. WordPress with W3TC and Amazon CloudFront can be a winning combination to accelerate your web efforts.
Infos
- Amazon CloudFront: https://aws.amazon.com/cloudfront/
- W3 Total Cache: https://wordpress.org/plugins/w3-total-cache/
- Akamai study on web performance: http://www.akamai.com/html/about/press/releases/2009/press_091409.html
- Google PageSpeed Insights: http://developers.google.com/speed/pagespeed/insights/
- Google PageSpeed tools: https://developers.google.com/speed/pagespeed/
- AWS: https://aws.amazon.com/
- AWS login: https://console.aws.amazon.com/cloudfront/home
- Amazon IAM: http://docs.aws.amazon.com/IAM/latest/UserGuide/IAMBestPractices.html
- AWS IAM policies: http://docs.aws.amazon.com/IAM/latest/UserGuide/PoliciesOverview.html
- IAM users: http://docs.aws.amazon.com/IAM/latest/UserGuide/Using_WorkingWithGroupsAndUsers.html
- AWS Policy Generator: http://awspolicygen.s3.amazonaws.com/policygen.html
- Multifactor authentication: http://aws.amazon.com/iam/details/mfa/
« Previous 1 2 3 4 5
Buy this article as PDF
(incl. VAT)
Buy ADMIN Magazine
US / Canada
UK / Australia
Related content
-
Supercharge Your Website with Amazon CloudFront
Users who lose interest in websites that don’t respond in the expected time take their clicks elsewhere. We look at ways to improve your WordPress website performance.
- Amazon to Offer DDoS Protection of AWS Users
- Amazon Cloud Accelerated with Memcache
- Amazon Cloud Accelerated with Memcache
-
Controlling Amazon Cloud with Boto
 The Boto Python module helps admins manage resources in the Amazon Cloud. We introduce you to the tool.
Subscribe to our ADMIN Newsletters
Subscribe to our Linux Newsletters
Find Linux and Open Source Jobs
Most Popular
Support Our Work
ADMIN content is made possible with support from readers like you. Please consider contributing when you've found an article to be beneficial.
