Supercharge your Website with Amazon CloudFront
Clear Skies
Set Up a CNAME Record in Your DNS Server
At this point, you need to go to your DNS server and add a CNAME record to map the Amazon CloudFront server (listed in Figure 5 after Domain Name) to the name you specified earlier. Simply copy the full hostname from the Domain Name listed and use this to create a CNAME record. In this example, d3bti9iv8fnppw.cloudfront.net should point to cdn.m0nk3y.biz .
Because of supernumerary DNS servers, as well as cloud or hosted DNSs, I'll assume you added a CNAME record as needed in your DNS server; note that it could take time for these changes to propagate. Then, to validate that your DNS changes have been made, simply dig for that record. If you see that it points to the correct location, you are ready for the next step.
Amazon IAM
Amazon Identity and Access Management (IAM) [8] allows you to control access to all your Amazon Web Services (AWS) [9] services and resources. You can use IAM to create users and groups, just as you would in any operating system, to control access to services and resources.
The rule of least privilege is a maxim for a reason. Just as on a Linux server you generally don't log in as root (or run services as root), so too with your Amazon AWS root account. Your AWS root account credentials are for managing your AWS configuration and not for access to the APIs, CLI, or, in this case, your AWS CloudFront bucket. Here, you are going to create a specific user for accessing your bucket.
To add an IAM user [10], go to the upper right-hand portion of the AWS console and click on <your username> | Security Credentials ; then, on the far left, go to Users then Create New Users . Name the user whatever you would like and click Create (Figure 6). Once the user is created, go to the bottom of the page and click on the Permissions tab. Under User Policies, click Attach User Policy and select your desired policy template or create a more granular one with the Policy Generator [11]. If you don't already have multifactor authentication (MFA) [12] set up for your AWS root account, you should set it up immediately.
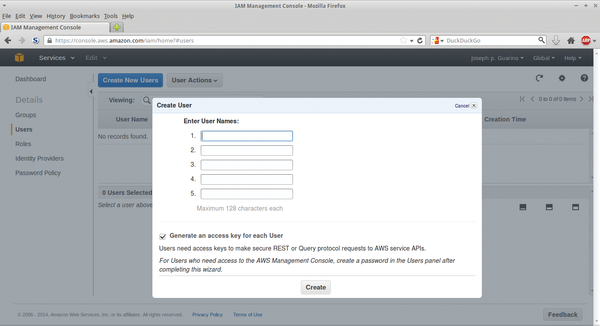 Figure 6: Creating a new user.
You can use virtual MFA applications such as AWS MFA or Google Authenticator. Even better, use a hardware MFA key fob. Either way, I hope you are using 2FA/MFA everywhere at this point. Once AWS CloudFront is all set up, you can log in to WordPress and install and configure W3TC.
Installing W3 Total Cache
Installing a plugin in WordPress is as easy as pie, but this one has some tricky aspects, so follow along carefully. First, if you have any other caching plugin, you should disable and remove it – no need to create conflicts or other issues with multiple plugins stepping on each others' toes. Next, you temporarily need to
chmod 777 wp-content/
chmod 777 wp-content/uploads/
via FTP, SSH, or cPanel. From the dashboard, go to Plugins |Add New , type in W3 Total Cache , and click Install Now (Figure 7). Last, you need to activate the plugin and go back via FTP, SSH, or cPanel to change the permissions with:
chmod 755 wp-content/
chmod 755 wp-content/uploads/
If you forget to reset the permissions to 755, expect to be hacked or defaced or to become part of a cybercriminal's bot network: rwx for everybody is a recipe for disaster.
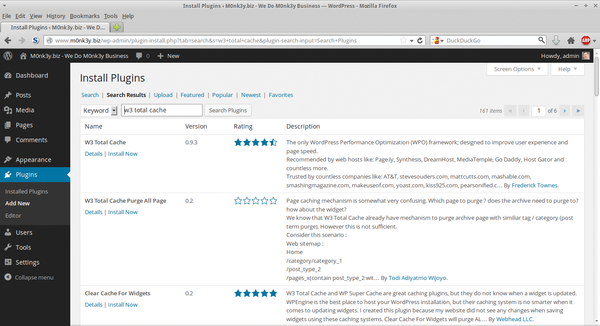 Figure 7: Installing the W3TC plugin.
Buy this article as PDF
(incl. VAT)
Buy ADMIN Magazine
US / Canada
UK / Australia
Related content
-
Supercharge Your Website with Amazon CloudFront
Users who lose interest in websites that don’t respond in the expected time take their clicks elsewhere. We look at ways to improve your WordPress website performance.
- Amazon to Offer DDoS Protection of AWS Users
- Amazon Cloud Accelerated with Memcache
- Amazon Cloud Accelerated with Memcache
-
Controlling Amazon Cloud with Boto
 The Boto Python module helps admins manage resources in the Amazon Cloud. We introduce you to the tool.
Subscribe to our ADMIN Newsletters
Subscribe to our Linux Newsletters
Find Linux and Open Source Jobs
Most Popular
Support Our Work
ADMIN content is made possible with support from readers like you. Please consider contributing when you've found an article to be beneficial.
