« Previous 1 2 3 4 Next »
Automating development environments and deployment with Otto
Ottomatic
Cloud Formations
Normally, to transfer a finished application to production operation, an admin would need to launch a virtual server in a cloud, set up an appropriate Ruby environment on the virtual server, and install the web application (deploy). Otto also handles these steps, although version 0.1.2 only supports Amazon's AWS Cloud. Other clouds and target systems will follow in later versions, and the plans also include publishing in Docker containers.
To launch your own application in the Amazon cloud, Otto first needs to set up your application. The command for doing this is simply:
otto infra
The tool first prompts you for your access and secret key (Figure 6). As an Amazon user, you are given both on registering with the service [12]. Next, click on your own name in the top right corner, select Security Credentials , and click on Access Keys and Create New Access Key .
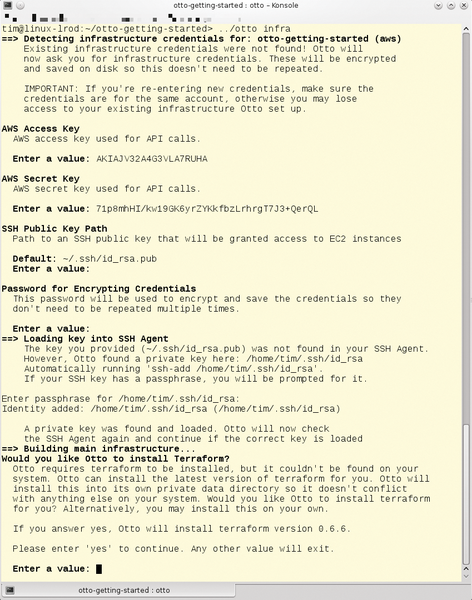 Figure 6: The first time you commission a web application in the Amazon cloud, Otto prompts you for all this information.
Later, Otto uses SSH to access a virtual machine in the Amazon cloud. To do this, the tool uses the key, which can you generate yourself, if needed, by entering ssh-keygen. You will need to tell Otto the path to the file with the public key – typically, ~/.ssh/id_rsa.pub.
To avoid having to retype all the data entered thus far, Otto saves the data in an encrypted file. The next step involves entering a password to protect the data. You need to know the password to be able to upload the web application to the cloud.
Finally, Otto tells its helper, Terraform [13], to prepare AWS for running a web application. If Terraform is not available on the system, Otto offers to install it. If you mistyped one of the details, you can delete the project file in the ~/.otto.d/cache/creds/ subdirectory (this is otto-getting-started in this example) and then call otto infra again. The ~/.otto.d file stores all the details about the cloud and its settings, so you should not make any changes here.
Cloud Cuckoo Land
The otto status command shows details of the current deployment status. If the Infra
line shows READY
, as in Figure 7, then the cloud is set up to run your web application.
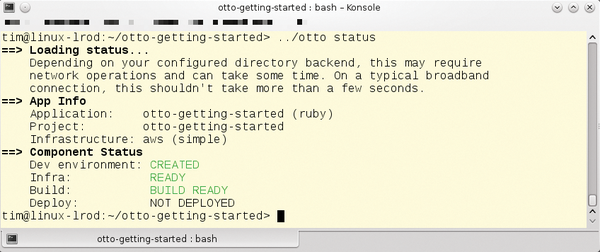 Figure 7: Here, the Amazon cloud is set up (Infra: READY), the matching virtual machine is built (Build: BUILD READY), and the user only needs to let Otto upload it.
The next step is for the otto build command to prepare the web application for deployment. In the case of the AWS cloud, Otto packages a web application in an Amazon Machine Image (AMI) and thus in a virtual machine that can be started in the Amazon cloud. The image is created in the background by the Packer [14] tool, which HashiCorp developed for precisely this purpose. If the current Packer version is missing from your system, Otto will retrieve it.
The tool automatically installs a web application and the programs required to execute it on the AMI. For the sample application, this means the Ruby environment and an Nginx web server. The otto status command should then report BUILD READY
, as the Build
status shows in Figure 7.
This means that the web application is finally ready to enter the cloud, which is precisely what otto deploy initiates. At the end of the process, Otto reveals the URL for accessing the web application in a neon green font. And if you do forget the address, otto deploy info will remind you.
Setting up and deploying can take a while, even for small web applications; for several minutes, you might think that nothing is happening. In future Otto versions, the Nomad [15] tool will handle both composing the AMI and the deployment itself, drastically accelerating both of these processes.
The otto deploy destroy command lets you stop and destroy the virtual machine in the cloud; then, otto infra destroy destroys the infrastructure and releases the resources you reserved on Amazon. Finally, otto dev destroy removes the local development environment.
Manual
In the future, developers only need to type otto dev to fire up the development environment, and when done, to type otto build to create a virtual machine for production operation, which is then bundled off into the cloud by typing otto deploy. Otto takes care of everything else from now on – or at least if everything worked properly.
You might want to avoid automation in some cases. For example, the web application might need Ruby version 2.1. In this case, you could use the configuration file to manage Otto. The file is named Appfile and resides in the project directory for the web application.
Its structure follows the HashiCorp Configuration Language (HCL) [16], which in turn follows the JSON format. Listing 1 shows a simple Appfile example. Note that the Otto developers point out that the structure could change.
Listing 1
Example of an Appfile
01 application {
02         name = "otto-getting-started"
03         type = "ruby"
04         dependency {
05                 source = "github.com/hashicorp/otto/examples/mongodb"
06         }
07 }
08
09 project {
10         name = "my-project"
11         infrastructure = "my-infrastructure"
12 }
13
14 infrastructure "my-infrastructure" {
15         type = "aws"
16         flavor = "simple"
17 }
18
19 customization "ruby" {
20         ruby_version = "2.1"
21 }
The application section assigns a name – in Listing 1 this is otto-getting-started. The type line specifies the application type or the programming language. In addition to Ruby, Otto currently supports Go, PHP, and Node.js, with more languages to follow. Additionally, docker-external is a special type that simply launches a prebuilt Docker container, which can be useful to launch a service that has already been completed, such as an Apache web server.
Most web applications require a database. Dependencies of this kind are noted in the dependency block, where the source is a URL that points to the directory with the Appfile. The mongodb Appfile accessible in the Otto example directory shown in Listing 1 simply points to a Docker image with the MongoDB database, which Otto would pick up and launch. All you need to do is to pass in the URL for the required application; Otto resolves the dependencies for MongoDB itself.
The URL can also point to the application on the hard disk (with the syntax file:///home/tim/<myapp>/ ). In this way, you can easily integrate someone else's application. The makers of Otto are also planning a public directory with frequently required Appfiles.
Resolving and integrating dependencies still causes Otto v0.1.2 some problems. If you feed Listing 1 to Otto, the tool wants to set up a Docker container with MongoDB, but in this case, it reproducibly canceled the action, purportedly because of a lack of SSH access. That said, we were able to access the unfinished virtual machine manually by typing:
otto dev ssh
If installation of the dependencies is successful, the services in question should be given individual DNS names according to the Otto documentation. For example, you would be able to access the MongoDB database as mongodb.service.consul. In the background, the Consul tool set up in each virtual machine takes care of the name assignments.
« Previous 1 2 3 4 Next »
Buy this article as PDF
(incl. VAT)
Buy ADMIN Magazine
US / Canada
UK / Australia
Related content
-
Vagrant, Serf, Packer, and Consul create and manage development environments
 Four open source tools – Vagrant, Serf, Packer, and Consul – facilitate a developer's work by each handling one specific task elegantly.
 -
Docker and Podman environments on Windows and Mac machines
 Develop container applications on a Windows or Mac system with Docker Desktop or Podman.
 -
Magnum: Exploring OpenStack's Container API
 The Magnum project brings Docker container technology to the OpenStack cloud.
 -
Automated orchestration of a horizontally scalable build pipeline
 A Jenkins build pipeline frees developers from repetitive manual build tasks by facilitating automation and provides broad traceability with continuous logging and feedback.
 -
Setting up DevOps Orchestration Platform
 DevOps Orchestration Platform open source framework was developed in Golang and can be used to bootstrap an IT infrastructure dynamically or import details of an existing IT infrastructure locally on VirtualBox or in the Cloud.
Subscribe to our ADMIN Newsletters
Subscribe to our Linux Newsletters
Find Linux and Open Source Jobs
Most Popular
Support Our Work
ADMIN content is made possible with support from readers like you. Please consider contributing when you've found an article to be beneficial.
