« Previous 1 2 3 Next »
Roll out hybrid clouds with Ansible automation
Mixing Allowed
Two VMs
Now, you need just two VM instances to do the work. The intended software is installed and configured on each: socat as a service on the external VM and OpenVPN as VPN software on the internal VM.
To create a VM, you need an image ID (ami-id in AWS-speak) and an instance size. The small t2.micro instances are perfectly sufficient for the setup here, because the performance is sufficient for the Internet connections of most companies. If you have a 10Gb Internet connection, you should adjust the instance's size accordingly. Then, assign the correct VPCs and subnets, as well as the previously set up security groups, to both instances.
Both VMs are based on an Ubuntu 16.04 server image (Figure 4). socat is assigned to the front VM as a port forwarder; it launches systemd as a daemon. This would be enough for the VPN, but the internal VM has no Internet access, so it needs a proxy to install the packages. Therefore, the front VM is assigned a Squid web proxy, which is restricted so that only internal subnet clients can use it. To match this, you need to extend the security group to include port 3128/TCP from this network.
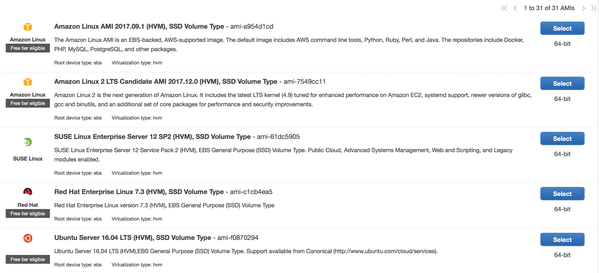 Figure 4: Both VMs are based on an Ubuntu 16.04 server image provided by Amazon.
OpenVPN is installed on the inner VM in server mode. VMs on the inner network need a route through the OpenVPN gateway to the local data center network.
Ansible
If you want to configure all of this manually, it would require some work in the AWS web GUI. Additionally, the parameters must all match, such as the IP addresses of the networks and the corresponding entries in the routing tables. Later, the addresses are also included in the configuration of the services on the VMs. This leaves the admin with many opportunities for errors, especially since asking "What was the address again?" interrupts the workflow in the web GUI.
Ansible's cloud modules, on the other hand, cover everything necessary for the configuration. When creating one component in the playbook, always store the results, because the IDs of the individual components are required to create the next one. For example, you also need to enter the inner VM IP address assigned by Amazon in the socat configuration on the outer VM.
Thanks to Ansible, the configuration is a holistic process resulting in fewer errors. The whole ensemble has two roles for configuration on the inner and outer VM. Initially, the playbook builds the entire infrastructure.
Some data is parameterized, like the AWS region, the address space for the inner VPC and the subnet, and the subnet on the local LAN so that the VPN configuration can be generated. The playbook reads this data from a YAML file at the outset.
To allow the playbook to access AWS at all, you need either a file in ~.aws/credentials containing the aws_access_key and aws_secret_access_key entries, or you can set the values in the playbook as variables (or preferably via Ansible Vault for security reasons) or store them in environment variables. The cloud module documentation [4] explains the variants.
The only way to access a VM in AWS is with an SSH connection. Unlike other hosting service providers, there is no console. Therefore, the admin SSH key also needs to be stored in AWS. Listing 1 shows the list of tasks that upload the key (only do this if the key is not already in place), create the VPCs with one subnet each, and generate the VPC peering.
Listing 1
Base and Network Tasks
01 - name: Load Data
02   include_vars: "{{ datafile }}"
03   tags: getdata
04
05 - name: SSH Key
06   ec2_key:
07     name: ansible-admin-key
08     key_material: "{{ item }}"
09     state: present
10     region: "{{ region }}"
11   with_file: /home/user/.ssh/id_rsa.pub
12   register: sshkey
13   tags: sshkey
14
15 - name: Create VPC INT
16   ec2_vpc_net:
17     name: "{{ netname }}-int"
18     cidr_block: "{{ cidr_master }}"
19     region: "{{ region }}"
20   tags: create_vpc_int
21   register: myvpcint
22
23 - name: Create Subnet INT
24   ec2_vpc_subnet:
25     cidr: "{{ subnet }}"
26     vpc_id: "{{ myvpcint.vpc.id }}"
27     region: "{{ region }}"
28     state: present
29   tags: create_subnet_int
30   register: mysubnetint
31
32 - name: Create VPC Ext
33   ec2_vpc_net:
34     name: "{{ netname }}-ext"
35     cidr_block: 172.25.0.0/28
36     region: "{{ region }}"
37   tags: create_vpc_ext
38   register: myvpcext
39
40 - name: Create Subnet Ext
41   ec2_vpc_subnet:
42     cidr: 172.25.0.0/28
43     vpc_id: "{{ myvpcext.vpc.id }}"
44     region: "{{ region }}"
45     state: present
46   tags: create_subnet_ext
47   register: mysubnetext
48
49 - name: Create VPC Peering
50   ec2_vpc_peer:
51     region: "{{ region }}"
52     vpc_id: "{{ myvpcint.vpc.id }}"
53     peer_vpc_id: "{{ myvpcext.vpc.id }}"
54     state: present
55   register: myvpcpeering
56   tags: createvpcpeering
57
58 - name: Accept VPC Peering
59   ec2_vpc_peer:
60     region: "{{ region }}"
61     peering_id: "{{ myvpcpeering.peering_id }}"
62     state: accept
63   register: action_peer
64
65 - name: Create Internet Gateway
66   ec2_vpc_igw:
67     vpc_id: "{{ myvpcext.vpc.id }}"
68     region: "{{ region }}"
69     state: present
70   register: igw
71   tags: igw
At the end of each ec2 instruction is a register block that stores the operation's result in a variable. To create a subnet, you need the VPC's ID in which the subnet is to be located. The same thing happens starting on line 49, first to create and then accept VPC peering. The final task creates the Internet gateway.
Creating Routing and VMs
Listing 2 shows the second part of the playbook. The Gather Route tables task searches the routing table in the internal VPC to enter the route on the outer network. Then, the playbook sets the route from the inside out and in the opposite direction. The next two tasks create the security groups for both VMs.
Listing 2
Routes and Filter Rules
01 - name: Gather Route tables
02   ec2_vpc_route_table_facts:
03     region: "{{ region }}"
04     filters:
05       vpc-id: "{{ myvpcint.vpc.id }}"
06   register: inttables
07   tags: gatherroutes
08
09 - name: Set Route out
10   ec2_vpc_route_table:
11     vpc_id: "{{ myvpcint.vpc.id }}"
12     region: "{{ region }}"
13     route_table_id: "{{ inttables.route_tables[0].id }}"
14     tags:
15       Name: "{{ netname }}-int"
16     subnets:
17       - "{{ mysubnetint.subnet.id }}"
18     routes:
19       - dest: 172.25.0.0/28
20         vpc_peering_connection_id: "{{ myvpcpeering.peering_id }}"
21   register: outboundroutetable
22   tags: routeout
23
24 - name: Set Route in
25   ec2_vpc_route_table:
26     vpc_id: "{{ myvpcext.vpc.id }}"
27     region: "{{ region }}"
28     tags:
29   name: "{{ netname }}-ext"
30     subnets:
31       - "{{ mysubnetext.subnet.id }}"
32     routes:
33       - dest: "{{ subnet }}"
34         vpc_peering_connection_id: "{{ myvpcpeering.peering_id }}"
35       - dest: 0.0.0.0/0
36         gateway_id: igw
37   register: outboundroutetable
38   tags: routein
39
40 - name: internal Secgroup
41   ec2_group:
42     name: "{{ netname }}-int-secgroup"
43     vpc_id: "{{ myvpcint.vpc.id }}"
44     region: "{{ region }}"
45     purge_rules: true
46     description: Ansible-Generated internal rule
47     rules:
48       - proto: udp
49         from_port: 12345
50         to_port: 12345
51         cidr_ip: 0.0.0.0/0
52       - proto: tcp
53         from_port: 22
54         to_port: 22
55         cidr_ip: 0.0.0.0/0
56       - proto: tcp
57         from_port: 443
58         to_port: 443
59         cidr_ip: 0.0.0.0/0
60   register: intsecg
61   tags: internalsec
62
63 - name: external Secgroup
64   ec2_group:
65     name: "{{ netname }}-ext-secgroup"
66     vpc_id: "{{ myvpcext.vpc.id }}"
67     region: "{{ region }}"
68     purge_rules: true
69     description: Ansible-Generated internal rule
70     rules:
71       - proto: udp
72         from_port: 12345
73         to_port: 12345
74         cidr_ip: 0.0.0.0/0
75       - proto: tcp
76         from_port: 22
77         to_port: 22
78         cidr_ip: 0.0.0.0/0
79       - proto: tcp
80         from_port: 443
81         to_port: 443
82         cidr_ip: 0.0.0.0/0
83       - proto: tcp
84         from_port: 3128
85         to_port: 3128
86         cidr_ip: "{{ subnet }}"
87   register: extsecg
88   tags: externalsec
89
90 - name: Update Auto
91   ec2_auto_assign_public_ip_for_subnet:
92     subnet: "{{ mysubnetext.subnet.id }}"
93     region: "{{ region }}"
94     state: present
The last task in Listing 2 (line 90) is necessary because of an Ansible peculiarity – according to the AWS API, this task is unnecessary without Ansible. The API can tell a subnet whether hosts on this subnet should always be assigned a public IP automatically and is only possible in Ansible with the added task shown in Listing 2.
Listing 3 creates the two VMs. The tasks create the VMs and add them to a group. These groups will immediately use the following plays to install and configure the software via SSH. The last task of the first play now waits until the external VM is accessible via SSH.
Listing 3
Rolling Out the VMs
01 - name: Deploy Backend
02   ec2:
03     key_name: ansible-user-key
04     instance_type: t2.micro
05     image: ami-d15a75c7
06     region: "{{ region }}"
07     wait: yes
08     id: test-backend
09     assign_public_ip: no
10     vpc_subnet_id: "{{ mysubnetint.subnet.id }}"
11     group_id: "{{ intsecg.group_id }}"
12   register: backendvm
13   tags: createbackend
14
15 - name: add frontend to group
16   add_host:
17     hostname: "{{ item.private_ip }}"
18     groupname: backend
19   with_items: "{{ backendvm.instances }}"
20
21
22 - name: Deploy Frontend
23   ec2:
24     key_name: ansible-user-key
25     instance_type: t2.micro
26     image: ami-d15a75c7
27     region: "{{ region }}"
28     wait: yes
29     id: test-frontend
30     assign_public_ip: yes
31     vpc_subnet_id: "{{ mysubnetext.subnet.id }}"
32     group_id: "{{ extsecg.group_id }}"
33   register: frontendvm
34   tags: createfrontend
35
36 - name: add frontend to group
37   add_host:
38     hostname: "{{ item.public_ip }}"
39     groupname: frontend
40   with_items: "{{ frontendvm.instances }}"
41
42 - name: Wait for ssh of frontend
43   wait_for:
44     host: "{{ item.public_dns_name }}"
45     port: 22
46     state: started
47   with_items: "{{ frontendvm.instances }}"
« Previous 1 2 3 Next »
Buy this article as PDF
(incl. VAT)
Buy ADMIN Magazine
US / Canada
UK / Australia
Related content
-
Hybrid public/private cloud
 Extending your data center temporarily into the cloud during a customer rush might not be easy, but it can be done, thanks to Ansible's Playbooks and some AWS scripts.
 -
The AWS CDK for software-defined deployments
 Cloudy with a chance of better provisioning tools: The new Amazon Web Services Cloud Development Kit adds a powerful new tool to the DevOps toolkit.
 -
Multicloud management with Ansible
 Remain independent of your cloud provider by automatically rolling out virtual machines and applications with Ansible neutral inventory files.
 -
Automated orchestration of a horizontally scalable build pipeline
 A Jenkins build pipeline frees developers from repetitive manual build tasks by facilitating automation and provides broad traceability with continuous logging and feedback.
 -
Setting up DevOps Orchestration Platform
 DevOps Orchestration Platform open source framework was developed in Golang and can be used to bootstrap an IT infrastructure dynamically or import details of an existing IT infrastructure locally on VirtualBox or in the Cloud.
Subscribe to our ADMIN Newsletters
Subscribe to our Linux Newsletters
Find Linux and Open Source Jobs
Most Popular
Support Our Work
ADMIN content is made possible with support from readers like you. Please consider contributing when you've found an article to be beneficial.
