« Previous 1 2
Five graphical database front ends
Knowledge – Managed
MySQL Workbench
MySQL Workbench [4] is a MySQL front end developed by Oracle. Its functionality includes modeling and database design, among other things. The software is available under a proprietary license in Standard, Enterprise, and Cluster versions, each with different features. The Community Edition, on the other hand, is released under the GPL and is available from the software archives of most popular Linux distributions.
During the install, the routine creates a matching starter in the respective desktop's menu hierarchy. MySQL Workbench requires a running MySQL server, which you might also have to install.
In the first step, you need to connect the front end with the database server. To do this, select the Connect to Database option in the running application's Database menu. A successful connection opens the management interface (Figure 7).
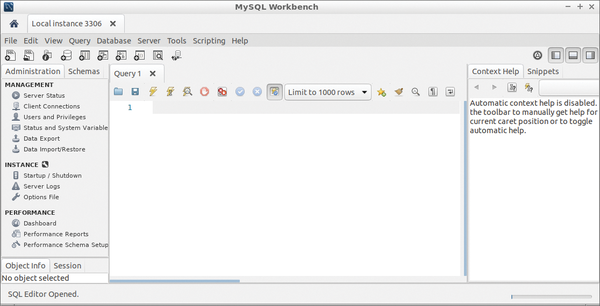 Figure 7: MySQL Workbench is completely tuned to the capabilities of MySQL.
To create a table for your database, first select Create a new schema in the connected server at the top of the Workbench buttonbar. A dialog opens in the center window pane. Enter a name for the new project, and define the character set. After you press Apply , Workbench displays an overlapping window showing the SQL code. You can modify the code manually before you click on Apply to save the changes.
The next step is to create the database. Go to the Schemas tab to the right of the Administration tab, where you will find the names of any existing databases.
To create a table, right-click on the Tables option and select Create Table from the context menu. MySQL Workbench displays the table editor, which lets you define the data fields, including attributes and field types (Figure 8).
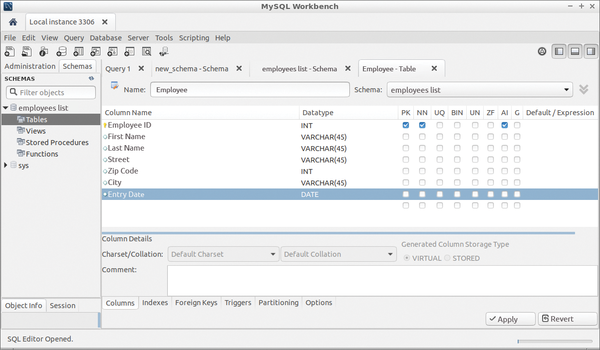 Figure 8: When creating tables, many options must be specified.
Workbench is based strictly on SQL nomenclature. You won't find a Text field type; instead, you need to select the VARCHAR type in the case of text input; you can also specify the length of the text field in parentheses. After creating the table, finish by clicking Apply .
Workbench again shows you the window with the SQL commands. Check the data, make further modifications, if necessary, and complete the process by clicking Apply .
The table name appears on the left in the Administration tab. Right-click to display the context menu and select the first option, Select Rows – Limit 1000 , to display the table, which appears in the center pane with all columns. Workbench displays the SQL code above the table.
You can start typing records at the bottom of the table. If you choose the Date data type, you need to enter the date in US notation. Otherwise, the routine will display errors when saving.
To start queries, you need to design an SQL script. Press the button labeled Create a new SQL tab for executing queries in the buttonbar. In the middle pane, enter the SQL commands and parameters. You are supported here by a selection function and a code check, which displays errors in the form of red crosses in front of the code line. When you are done, you can display the results by selecting Query | Execute in the lower part of the window. Save the query by selecting File | Save Script .
To replace the tabular view with a more sophisticated form, click on the Form Editor to the right of the table in the script editor. Instead of the table, Workbench now displays a ready-made form with a single view of the existing data records (Figure 9).
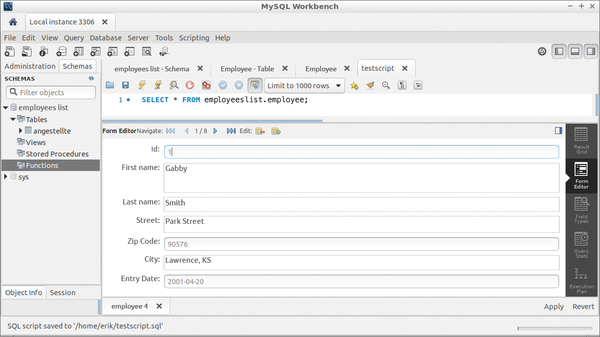 Figure 9: The MySQL Workbench form displays individual datasets.
Valentina Studio
The Valentina Studio [5] database administrator software developed by US-based Paradigma Software is available under a proprietary license. The vendor [9] also offers the software free of charge for non-commercial use after registration.
Valentina Studio works with numerous database systems, but it can also use its own server locally [10]. Valentina Studio can also be used in heterogeneous operating system environments. Paradigma Software requires the user to activate both packages by email and activate them with a license; otherwise, they will only run in demo mode.
After the install, the server launches as a system service. You can open the graphical front end from the desktop. After the start, you are taken to a very tidy program window that automatically displays the available servers in the left column, Server .
To connect to one of the servers, press the connection and select the parameters for the connection in the selection window that appears.
To create a new database, click on the name of the connected server. Right-click to open the context menu, and select the Create | Database options.
Enter a name for the database in the configuration window. In the main window, a column view appears at the center, with the database name shown in the first column. A small triangle to the right indicates that you can now build the database from left to right in several steps.
In the second column, Tables , you can create a database structure. Right-click on the database name and select Create | Table from the context menu. Enter the table name in an overlapping window. A click on Create copies the table name into the second column from the left, and the Fields category appears in the third column.
Right-click on the table name and select Create | Field from the context menu. Enter field name, type, and attributes in the field definition dialog.
Open the input dialog by selecting Tools | Data Editor . The program window displays an empty table with individual data fields. Press the Add entry button to enter a data record.
To run queries in Valentina Studio, you need the SQL editor, which requires profound knowledge of the SQL instruction set [11]. In the Schema view, press the SQL Editor button and select the desired table. Enter the SQL commands required for the query. A click on Execute calls up the SQL command sequence and displays the results in table form with an action log (Figure 10). Press the floppy disk button to save the query for later use.
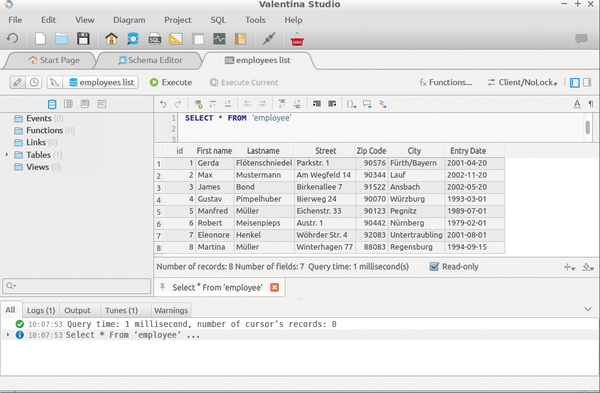 Figure 10: Queries in Valentina Studio are defined in the SQL editor.
Conclusions
The five graphical database management systems discussed in this article (Table 1) focus on different target groups. Glom and Kexi are aimed at users with no previous database administration knowledge. Thanks to their user interfaces, they quickly deliver good results when creating simple databases and evaluating with queries.
Table 1
Database Queries for End Users
| Base | Glom | Kexi | MySQL Workbench | Valentina Studio | |
|---|---|---|---|---|---|
| License | Apache/Mozilla | GPL | LGPL, GPL | GPL/proprietary | Proprietary |
| Functions | |||||
| Own server | Yes | Yes | Yes | No | Yes |
| Database server | PostgreSQL, MySQL, Adabas D, dBase, MS Access | PostgreSQL with restrictions | MS Access with restrictions, SQLite, Sybase, MySQL, PostgreSQL | Sybase, MS Access, PostgreSQL, MySQL, MS SQL Server | MySQL, SQLite, MariaDB, PostgreSQL |
| Wizards | Yes | No | Yes | No | No |
| SQL command set | Yes | No | Yes | Yes | Yes |
| Forms | Yes | Yes | Yes | Yes | Yes |
| Link databases | Yes | Restricted | Yes | Yes | Yes |
| Calculations in fields | Yes | Restricted | Yes | Yes | Yes |
In the case of Base, users already need some training to enter the SQL commands for more complex tables without errors. MySQL Workbench and Valentina Studio, on the other hand, are aimed more at professional users and administrators who want to work simultaneously with a large number of databases and also want to model and link them. The editors also support the visualization of complex relationships. These two professional packages require knowledge of SQL commands, because unlike Base and Kexi, they do not offer table wizards.
Valentina Studio also works with a variety of database servers and simplifies the use of databases in heterogeneous environments.
Infos
- Base: https://www.libreoffice.org/discover/base/
- Glom: http://www.glom.org/wiki/index.php?title=Main_Page
- Kexi: https://kde.org/applications/office/kexi/
- MySQL Workbench: https://www.mysql.com/products/workbench/
- Valentina Studio: https://www.valentina-db.com/en/valentina-studio-overview
- LibreOffice: https://www.libreoffice.org
- OpenOffice: https://www.openoffice.org
- Calligra Suite: https://www.calligra.org
- Download Valentina Studio: https://www.valentina-db.com/en/download-valentina-studio
- Download Valentina Server: https://www.valentina-db.com/en/all-downloads/valentina-server
- Overview of SQL commands: https://www.php-einfach.de/mysql-tutorial/uebersicht-sql-befehle/ (in German)
« Previous 1 2
Buy this article as PDF
(incl. VAT)
Buy ADMIN Magazine
US / Canada
UK / Australia
Related content
-
Uncovering SQL Injections
Hardly a day goes by without reports of hackers breaking into government, military, or enterprise servers. If you analyze the details of the hacker’s approach, you will see that, in 90 percent of all cases, SQL injection was the root cause of a server’s compromise.
-
Discovering SQL injection vulnerabilities
 Hardly a day goes by without reports of hackers breaking into government, military, or enterprise servers. If you analyze the details of the hacker's approach, you will see that, in 90 percent of all cases, SQL injection was the root cause of a server's compromise.
 -
Advantages of data analysis with graph databases
 Analyze scattered but related data in real time with a graph database.
 -
Databases in the Google Cloud
 The Google Cloud Platform offers a wide range of different databases for various purposes.
 -
Unicode migration with an Oracle database
 If your operating system and database work with different character sets, migrating to the common denominator, Unicode, is often the solution. In this article, we consider what to watch out for in migrations with Oracle.
Subscribe to our ADMIN Newsletters
Subscribe to our Linux Newsletters
Find Linux and Open Source Jobs
Most Popular
Support Our Work
ADMIN content is made possible with support from readers like you. Please consider contributing when you've found an article to be beneficial.
