Get Smart with SmartOS
Out of the ashes of OpenSolaris, the SmartOS cloud platform is rising to position itself as a competitor to Amazon EC2. The Unix-like operating system is developed by Joyent, a virtualization and cloud computing company.
After Sun published the source code of Solaris under the name OpenSolaris in 2005 and then Oracle discontinued open development of the software soon after its takeover in 2010, a small OpenSolaris community quickly developed, including companies such as Nexenta, who used the free system as the basis of their products.
Nexenta, a core of Solaris engineers, Joyent, and other players founded and contributed to the Illumos project based on a fork of the free Solaris kernel. The Illumos kernel then became the basis for a variety of free Solaris offshoots, such as OpenIndiana, Illumian, EON, OmniOS, and Joyent’s SmartOS.
Joyent has put much effort into the development of SmartOS to create a highly flexible basis for its own cloud. To ensure this flexibility, Joyent, or more specifically Max Bruning, ported the Linux KVM hypervisor to the OpenSolaris kernel. This project took about six months before Joyent had KVM running on SmartOS and thus able to support any guest systems that work with KVM.
KVM for Solaris
Before the KVM port, SmartOS already had Zones, which originated with Solaris, that offered operating system virtualization with containers and very little ballast.
However, Zones normally restrict you to the host operating system, even through branded Zones with Linux already existed in Solaris. In any case, full virtualization with KVM offers more options for running various systems as guests, including Microsoft.
Another advantage of SmartOS is that it provides complete support for the DTrace tracing framework that can trace kernel and userspace programs at run time with very little overhead (Figure 1).
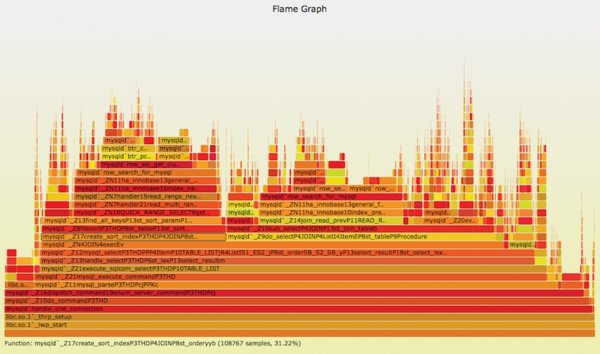 Figure 1: A flame graph created with DTrace visualizes the call stack for MySQL.
Although Linux has similar tools, such as Kprobes and, more recently, a DTrace port, both of these products are still in their infancy compared with Solaris DTrace.
Joyent has written extensive programs based on DTrace that allow customers to analyze their own cloud in detail. Users no longer have to deal with DTrace scripts; rather, they are presented with various graphs that give them an impression of capacity utilization and bottlenecks.
Even ZFS, the SmartOS filesystem, has a special place in the SmartOS virtualization concept. The system benefits from the general capabilities of the Solaris filesystem, such as the possibility to implement RAID systems and extend them arbitrarily. Additionally, virtual machines leverage ZFS features, in that filesystems on VMs are simply snapshots of the VM template, thus saving space.
Using SmartOS
If you want to experience the benefits of SmartOS for yourself, you do not have to be a Joyent customer, because SmartOS is available for free. Among the several download options are various images for CDs, USB sticks, and virtual machines, as well as files for a PXE boot. SmartOS is not installed on a hard disk, because an up-to-date system is most likely to be guaranteed if there are no old files in the filesystem. The operating system is thus always booted from media, whereas the virtual machines are stored permanently in a ZFS storage pool. In the simplest case, you boot SmartOS from a USB stick or CD; in production environments, it is advisable to go for PXE via a server.
Booting SmartOS on a physical computer makes the most sense, because it assumes the existence of the (Intel only) processor features VMX (VT) and EPT (Extended Page Tables), which are not necessarily available on virtualized systems. The install is also possible in VMware Fusion, which passes on those two features to guest systems. VirtualBox also lets you install SmartOS, but the performance is not the best. With nested KVM, Linux at least provides VMX in virtual machines. However, nested EPT support was only introduced with Linux kernel 3.12, so that SmartOS at least installed without error messages, although it would hang if you tried to launch a KVM machine.
Although you don’t have to worry about installation, you do need to set up a few things after booting from CD or USB: the root password, network settings, and storage options. SmartOS requires at least an entire hard disk as storage. With multiple disks in the ZFS pool, you can also implement various RAID setups. Even at this point, Linux users need to adapt, because the devices use typical Solaris-style names. For example, in device c0t0d0 , c0 stands for the first controller, t0 for the first bus, and d0 for the first disk.
After logging in to the Solaris environment of a new SmartOS system, you need to familiarize yourself with a few new tools. Although the well-known Linux tool top does not exist, SmartOS has a program called prstat . A handy SmartOS cheat sheet for Linux users listing the appropriate commands is available online.
The configuration files that SmartOS stores on the ZFS filesystem are located in /usbkey/config . The global zone in which you find yourself after logging in is not persistent; instead, it is on a RAM disk, which means, in particular, that you cannot create users who persist after a reboot; this additionally applies to any files in the /etc , /root , and /usr directories. However, /opt (and /var ) are on ZFS and can thus be used to save files.
If you want, you can even install the pkgin package manager there and upload software to your heart’s content. To download and unpack the tarball for the package manager, you only need to enter:
cd /
curl -k http://pkgsrc.joyent.com/packages/SmartOS/bootstrap/bootstrap-2013Q3-x86_64.tar.gz | gzcat | tar-xf -
To rebuild the package database and update it, enter:
pkg_admin rebuild
pkgin -y up
You can now use the pkgin program to search for packages and install and uninstall them. All packages are stored in the /opt/local directory and survive a reboot.
In the /opt directory, you can also set up services permanently. The Service Management Facility (SMF), which manages services in both Solaris and SmartOS, also checks the /opt/custom/smf directory at boot time; you can store the configuration files for your own services there.
Getting Images
Two simple commands let you manage virtual machines: imgadm manages the virtual machine images that the SmartOS administrator installs with vmadm . By default, imgadm is configured so that it makes use of the image server below https://images.joyent.com , as typing imgadm sources reveals. imgadm list displays the local directory of VM templates; until you have imported at least one template, there is nothing to see.
New servers can also be added using this command. To discover which images Joyent offers, type imgadm avail ; typing imgadm update updates the list. To import an image to your local image store, use imgadm import <UUID> . Basically, you will see two types of images: smartos for Solaris Zones (“Joyent brand” in SmartOS-speak) and KVM images. The Joyent repository currently offers linux and bsd .
As you can see in Figure 2, SmartOS uses confusing hashes to identify images and virtual machines that can be cumbersome for manual administration, but at least you can copy and paste.
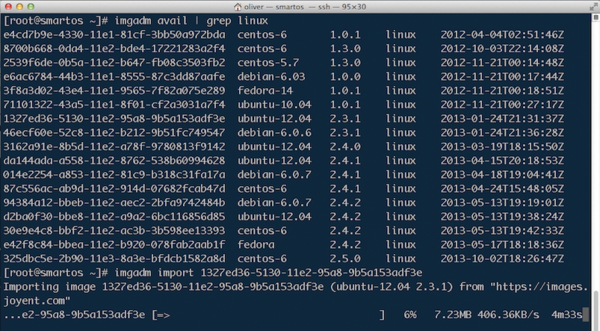 Figure 2: The templates available for virtual machines can be imported to the local store.
After importing a VM template, you can proceed to create a virtual machine. For this purpose, you need both a template and a specification of the virtual machine; this is composed in JSON format and essentially determines the virtual hardware of the VM (i.e., the disks, network cards, and so on).
An example specification is shown in Listing 1. The brand entry specifies the type of virtualization. In the example, it is kvm ; the brand for Zones is joyent . An alias is convenient because you will otherwise find it difficult to locate the machine later. In terms of disk hardware models, the IDE and SCSI standards provide an alternative to virtio, but virtio is still the best solution for Linux.
Listing 1: vmspec.json
01 {
02   "brand": "kvm",
03   "alias": "ubuntu1",
04   "vcpus": 1,
05   "autoboot": false,
06   "ram": 2048,
07   "resolvers": ["192.168.111.254"],
08   "disks": [
09     {
10       "image_uuid": "1fc068b0-13b0-11e2-9f4e-2f3f6a96d9bc",
11       "boot": true,
12       "model": "virtio"
13     }
14   ],
15   "nics": [
16     {
17       "nic_tag": "admin",
18       "model": "virtio",
19       "ip": "dhcp",
20       "primary": 1
21     }
22   ]
23 }
You can use this option for Windows virtual machines, but you need the appropriate driver, especially for the installation. The same goes for the network card, where emulations of popular Ethernet hardware exist as an alternative to virtio.
Make sure in the disks section that you have an image_uuid entry that matches that of the imported templates. Armed with this configuration, calling
vmadm create -f vmspec.json
generates a new virtual machine. If all goes well, its (new) UUID is output. The command vmadm list displays a list with the now active machine (Figure 3). An overview of all options available in the JSON configuration files can be found online.
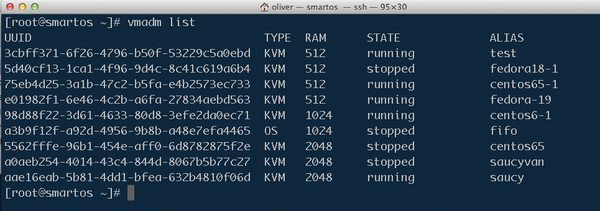 Figure 3: Displaying the installed virtual machines with vmadm list.
Some configuration variables can be customized at run time with vmadm . For example,
vmadm update alias=name
changes the alias of the virtual machine. Alternatively, the command also parses JSON sections and uses them to update the configuration. Thus, you can integrate your own metadata into the configuration. Listing 2 shows the corresponding JSON data and how to load it into the configuration.
Listing 2: meta.json
01 # cat meta.json
02 {
03     "set_customer_metadata":
04          {"opsys": "ubuntu"}
05 }
06 # vmadm update ed9879e8-764a-4c15-a298-6b51e815b68e < meta.json
07 Successfully updated ed9879e8-764a-4c15-a298-6b51e815b68e
You can log into the virtual machine, for example, by calling:
vmadm console <VM-UUID>
However, the guest must then be configured so that a getty (get teletype) process is listening for a login on the first serial port.
Alternatively, SmartOS offers Remote Desktop Access via VNC for each VM; the port is automatically assigned. To find out which port the current machine uses, the vmadm command supports the info option (Figure 4), which also returns the VNC configuration.
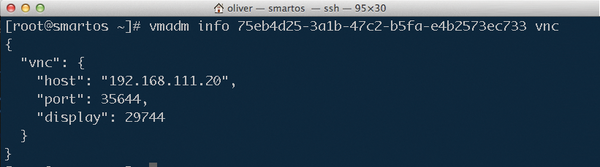 Figure 4: With a call to vmadm info you can find the VNC port for a virtual machine.
Access via VNC
To access the remote desktop on Linux, call the VNC viewer with:
vncviewer 192.168.111.20:43948
In this way, you can use VNC to discover which IP address was assigned by DHCP, if you do not use static IP addresses or have not permanently assigned an IP address for the MAC address on your DHCP server. It makes sense, in any case, to consider a structured solution for managing the VMs’ IP addresses.
Incidentally, VNC access is not safeguarded by default. It is thus not advisable to run a SmartOS host in the default state on the Internet. For individual VMs, a call to
vmadm update <VM-UUID> vnc_password=<password>
sets a password.
If you’re using an non-US keyboard, you might be unable to type important characters in the VNC display because the keymap is wrong. To resolve this problem, you can tell Qemu to pass in the keymap as a parameter. The command
vmadm update <VM-UUID> qemu_extra_opts = "-k <yourkeyboard>"
sets the keymap for a VM. In my case, this was "-k de" .
Installing Operating Systems
As an alternative to prebuilt image templates, you can use your own templates or install operating systems from scratch (e.g., for Windows VMs, for which there are no templates). The recommended approach is first to create a new VM without a template and then boot from the installation medium. The required JSON file looks almost exactly like Listing 1, but instead of the image UUID in the disks section, you enter the size of the virtual hard disk:
"disks": [
  {    "boot": true,
    "model": "virtio",
    "size": 15000
  }
],
For the VM to find the installation medium, you need to copy the ISO image to its root directory, which is located below /zones/<VM-UUID>/root . The vmadm command has special options for booting the VM once only from this image for installation purposes:
vmadm start <VM-UUID> order=cd,once=d cdrom=/centos.iso,ide
Now you can use VNC to install the operating system, as you would on a physical machine, and start the VM from the new system after rebooting the guest.
If you have inserted a CD or DVD into the SmartOS machine, you could also burn an ISO image to it for booting the VM. This is easily done with the Unix dd command:
dd if=/dev/dsk/c0t4d0s2 of=/zones/<VM-UUID>/root/<OS>.iso
The only difficulty is thus finding the device name of the drive: The iostat -En command will help.
To avoid the need to install each guest system individually, you can create your own templates from a system and use them to create new instances. To do this, you need to discover the UUID of the corresponding machine with vmadm list . A call to zfs list shows the ZFS volumes, including the ones on the VM (Figure 5).
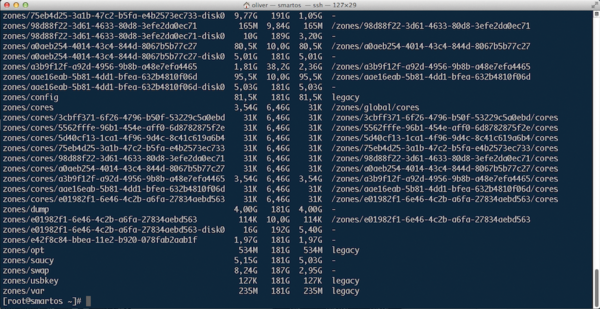 Figure 5: A gaggle of ZFS volumes: SmartOS makes use of the Solaris filesystem’s snapshot capabilities.
After shutting down the VM, you can create a snapshot of the guest volumes using zfs snapshot . In a second step, run zfs send to generate a file from the snapshot and compress the file:
zfs snapshot zones/5562fffe-96b1-454e-aff0-6d8782875f2e-disk0@image
zfs send zones/5562fffe-96b1-454e-aff0-6d8782875f2e-disk0@image | gzip > centos6.5.zvol.gz
A complete VM template is nothing more than a compressed image, together with a file containing the metadata – again in JSON format. An example of this is shown in Listing 3. Most of the entries should be self-explanatory. The UUIDs that you enter (e.g., for uuid , creator_uuid , and vendor_uuid ) can be created with the uuid command. Entering ls -l shows the disk size . The SHA1 hash is somewhat more difficult because you create it with the digest command:
/usr/bin/digest -a sha1 centos6.5.zvol.gz
The timestamps do not need to be accurate. It’s fine just to adjust the date. After completing the manifest file, import the template into your own store:
imgadm install -m centos6.5.dsmanifest -f centos6.5.zvol.gz
and then the template is ready for creating new VMs.
Listing 3: centos6.5.dsmanifest
01 {
02     "name": "centos-6.5",
03   version: "1.0.0",
04     "type": "zvol",
05     "cpu_type": "qemu64",
06     "description": "Centos 6.5 VM 1.0.0",
07     "created_at": "2013-12-04T02:51:46.994Z",
08     "updated_at": "2013-12-04T02:51:46.994Z",
09     "os": "linux",
10     "image_size": 10000,
11     "files": [
12       {
13         "path": "centos6.5.zvol.gz",
14         "sha1": "92a100d8eb2c2fd436db1d2b539aa26894f919cb",
15         "size": 285111272
16       }
17     ],
18     "requirements": {
19       "networks": [
20         {
21           "name": "net0",
22           "description": "public"
23         }
24       ],
25       "ssh_key": true
26     },
27     "disk_driver": "virtio",
28     "nic_driver": "virtio",
29     "uuid": "555793a9-3c32-4eb9-ae81-f60176d8a8e3",
30     "creator_uuid": "352971aa-31ba-496c-9ade-a379feaecd52",
31     "vendor_uuid": "352971aa-31ba-496c-9ade-a379feaecd52",
32     "creator_name": "ADMIN",
33     "platform_type": "smartos",
34     "cloud_name": "sdc",
35     "urn": "sdc:ADMIN:centos-6.5:1.0.0",
36     "published_at": "2013-12-04T02:51:46.994Z"
37   }
Home-Grown Migration
In a similar way, you manage a kind of home-grown virtual machine migration, for which you need to convert the image of the VM to RAW format on the originating host if it is not already stored this way. To do this on Linux, for example, you would use qemu-img convert then copy the RAW image to the SmartOS host on which you create a new VM with the appropriate disk size, as described. The last step is to copy the data directly into the ZFS raw device using dd or cat :
dd if=centos.img of=/dev/zvol/rdsk/zones/<UUID>
This approach is described without any warranty and only recommended for experiments.
Professional
As described so far, SmartOS is ideally suited for testing systems in virtual machines. If you want to build a cloud or use SmartOS professionally in some other way, you will not get far with manual administration. Provisioning and configuration management software is recommended for automation purposes.
The method of booting SmartOS via PXE has already been mentioned, and detailed instructions are available. Programs such as Puppet or CFEngine are useful for configuration management. However, Chef [1] is supported best, with Joyent providing various Cookbooks itself. More experimental, but perhaps worth a look, is the FIFO project, which implements a web-based GUI for managing virtual machines on SmartOS.
Installing Chef is possible in three ways: the Omnibus installer by Chef/Opscode, which is still considered experimental; the fat client by Joyent; or manual installation using PKG-SRC. Monitoring options include a Nagios Remote Plugin Executor (NRPE) for the global zone. Joyent always uses Zabbix [2] monitoring.
Although SmartOS theoretically runs on various server hardware, you would again do well to be guided by Joyent for production use. They recommend, for example, SAS connectivity for storage instead of SATA. Also, a sufficient amount of memory is never a bad thing. More details can be found in a post by Joyent employee Keith Wesolowski.
Conclusions
SmartOS is an interesting platform that combines Solaris ZFS, Zones, and DTrace technologies with the Linux KVM hypervisor. Its use in the Joyent cloud shows that SmartOS is suitable for professional use. Managing SmartOS is relatively simple because it is largely restricted to two commands. The machine-readable JSON format for configuration simplifies the integration of SmartOS in environments with web services. Finally, the system can be centrally administered by configuration management with Chef and LDAP.
Info
[1] “Chef” by Tim Schürmann, ADMIN
, Issue 01, 2010, pg. 68
[2] “Zabbix” by Thomas Drilling, ADMIN
, Issue 07, 2012, pg. 34
Related content
-
SmartOS as a virtualization platform
 SmartOS brings together the best of Linux and Solaris to implement a virtualization platform with ZFS and KVM.
 - SmartOS Weds Open Solaris to Linux KVM Virtualization
- SmartOS Weds Open Solaris to Linux KVM Virtualization
-
Creating SmartOS zones using UCARP
 We show how to create highly available SmartOS zones using UCARP.
Subscribe to our ADMIN Newsletters
Subscribe to our Linux Newsletters
Find Linux and Open Source Jobs
Most Popular
Support Our Work
ADMIN content is made possible with support from readers like you. Please consider contributing when you've found an article to be beneficial.
