« Previous 1 2 3 4 Next »
SSH tools for Windows
Safe Connection
Host Keys
SSH works with host keys by default to ensure integrity. For this reason, any SSH client will show its automatically transferred host key the first time it opens a connection (or the fingerprint belonging to the key); it then uses permanently add 'IP address' (RSA) to the list of known hosts
to indicate that it did not know this key, and thus wants to add the key to its local $HOME/.ssh/known_hosts file. You must then decide whether to trust this server, that is, determine whether it is the server it claims to be. After all, an attacker could theoretically have hijacked an Internet connection.
Integrity could be ensured, for example, by retrieving the fingerprint of the remote server, which you could then compare with the key sent to you. The process is no different when using PuTTY as the SSH client, but PuTTY shows the dialog with the RSA fingerprint graphically (Figure 2) and offers to save the host key in the Windows registry format. At the same time PuTTY, keeps the host key in its cache until the next connection with the same server is opened.
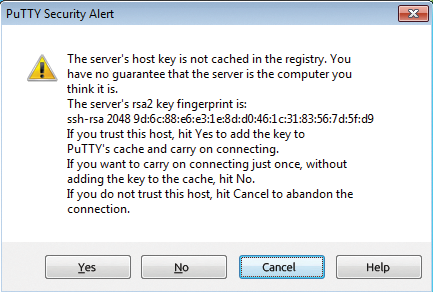 Figure 2: Like any SSH client, PuTTY shows the RSA host key of the remote host.
The PuTTY developers provide a script (kh2reg) on the project site with which the admin can convert existing host keys from the classical (Linux) known hosts format to a Windows *.reg file, if required. On the server side, the host key is stored in the /etc/ssh directory and is named ssh_host_dsa_key by default. Once connected, PuTTY also shows a classic login window for the server, and the admin can log in with a username and password. The server host key's fingerprint can be found by entering
ssh-keygen -f /etc/ssh/ssh_host_rsa_key.pub -l
in the SSH remote shell.
Key Issues
Windows admins and users can use secure public key authentication with PuTTY. The password prompt, which is enabled by default for SSH, is just one of the ways you can handle authentication with SSH. The function is no different from that on Linux, but PuTTY uses different tools and configuration files. Just to remind you: On Linux, the admin uses ssh-keygen -t rsa (optionally, ssh-keygen -t dsa) to generate a new RSA or DSA key pair of public and private keys (Figure 3).
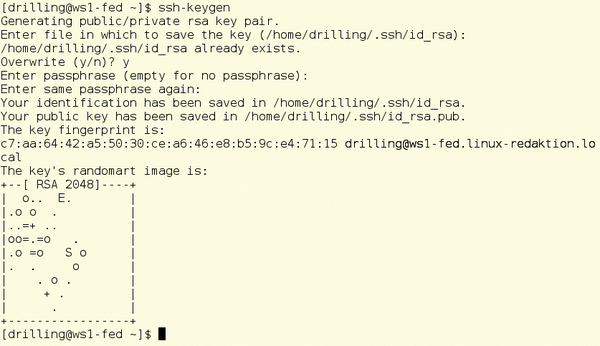 Figure 3: Generating a RSA key pair on Linux.
SSH saves the key files under the name id_rsa/id_dsa and id_rsa.pub in the .ssh subdirectory in the user's home directory. In contrast, the public key is appended to the user's $HOME/.ssh/authorized_keys file. In the opposite direction, you need to copy your own public key to the appropriate user directory on the server, as follows:
ssh-copy-id -i ~/.ssh/id_rsa.pub <remote username>@<Remote IP Address>
PuTTY uses the puttygen.exe (PuTTY Key Generator) tool (instead of ssh-keygen) to generate RSA (default) or DSA key pairs (Figure 4). Although you will find this tool on the PuTTY download page, make sure you have previously downloaded the full install zip file; puttygen should also be available below Putty
in the Windows Start menu.
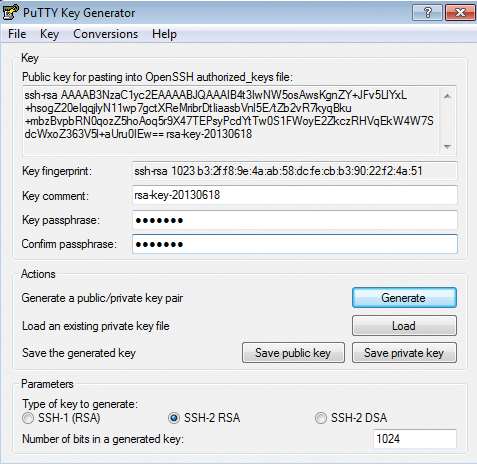 Figure 4: An RSA key pair in PuTTY.
To generate an RSA key pair, press the Generate
button. Admins who need SSH1 RSA or DSA keys can select the appropriate type directly below the dialog. You can ensure the necessary randomness yourself here, by moving the mouse back and forth in the free area of the dialog box while generating the key. Then, you enter the desired key passphrase for Key passphrase
, as with ssh-keygen in Linux.
You can use the appropriate buttons for saving the public and private keys on the client, and you can freely choose the name and path in the file browser. The typical PuTTY key extension is *.ppk, which indicates the deviation from the standard Linux format. PuTTY RSA keys are therefore not compatible with OpenSSH keys. However, you can use Conversions on the menubar to import existing OpenSSH keys or export PuTTY keys.
To transfer your own public key to the server, you can theoretically use WinSCP or psftp (PuTTY SFTP), but it is easier and faster to select the entire key shown in the key field and press Ctrl+C to copy it to the clipboard. Then, you can log in again normally on the remote server using PuTTY, launch any Linux editor (e.g., nano) against the /$HOME/.ssh/authorized_keys file, and paste your key from the clipboard.
Public Key Authentication with PuTTY
If you want to change to public key authentication the next time you log in, enter the address of the desired host on the client-side PuTTY Session page, then – under the Category menu – click on SSH/Auth and enter the file name of your authentication key below Private key file for authentication . You can press Browse to select the file in the file browser (Figure 5).
 Figure 5: PuTTY keys have slightly different names.
Optionally, you can store the credentials for each session in a profile. The authentication sequence is identical on Linux and Unix. When you connect to the remote server, it asks for proof that the user has one of the public keys stored in the authorized_keys file for this user on the server. SSH thus prompts you for the passphrase for enabling the private key stored in the local id_rsa.ppk file. The connection will work only if the two keys match.
« Previous 1 2 3 4 Next »
Buy ADMIN Magazine
US / Canada
UK / Australia
Related content
-
SSH on Windows

For Linux admins, SSH is one the most important tools of remote administration. SSH also works in Windows, with tools such as PuTTY or WinSSH, MobaXterm, WinSCP, or Swish.
-
MobaXterm: Unix for Windows
MobaXterm, a portable X server for Windows, bundles built-in Unix/Posix tools into a single portable EXE file, letting you use a Linux command line and tools on the Windows desktop.
Subscribe to our ADMIN Newsletters
Subscribe to our Linux Newsletters
Find Linux and Open Source Jobs
Most Popular
Support Our Work
ADMIN content is made possible with support from readers like you. Please consider contributing when you've found an article to be beneficial.
