Open Source Security Information and Event Management system
Security Management
Setting Up a Vulnerability Scan
Once you have defined your networks and added in your assets, you can move on to vulnerability scanning. This feature alone is powerful in remediating risk, but OSSIM takes it to the next level by cross-correlating data from what were once separate sources (e.g., IDS and vulnerability scanning) to paint a clearer picture of what threats you need to address.
To set up periodic scanning, go to the web interface by clicking on Environment | Vulnerabilities | Scan Job | New Scan Job (Figure 8). Enter a job name of your choosing, select the server to use (in this case, I have only one), and on the right-hand side, select the Assets or Networks you want to scan. As seen in Figure 9, the scan produced output on current vulnerabilities that need remediation.
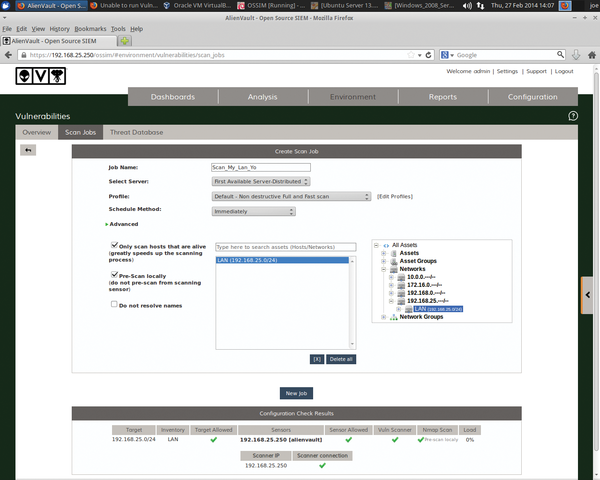 Figure 8: Setting up periodic scanning.
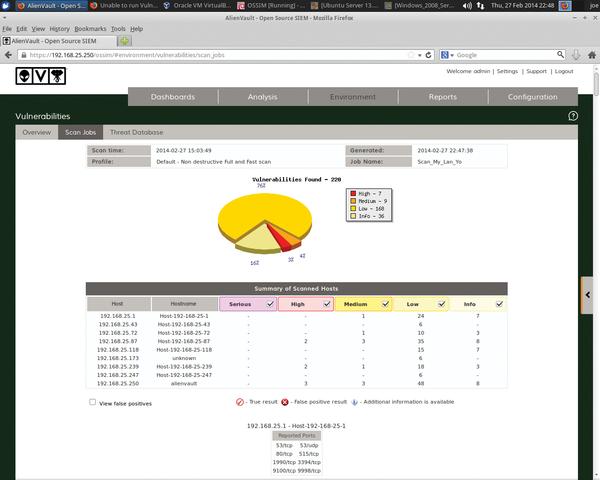 Figure 9: Output of system vulnerabilities.
Note that you should take care when running vulnerability scans so that you don't create problems with production systems or networks. Choosing the "ultimate" profile in a scan job is a bit dangerous during peak system hours.
OSSIM Plugins
Plugins allow OSSIM to translate data from many sources (applications, systems, networks, devices, etc.) and create associated security events in the OSSIM server. Plugins connect of your data source (whatever device you have) to the OSSIM server. According to the AlienVault website, OSSIM comes with plugins for a long list of more than 2,000 well-known devices and technologies.
Both open source and commercial plugins allow great coverage for the vast majority of anything almost anyone might be running. Of course, you can also create custom plugins. Table 1 lists some important plugins that are available.
Table 1
OSSIM Plugins
| Name | Name |
|---|---|
| Apache | P0f |
| Arpwatch | PADS |
| Cisco IDS, Router, VPN | Pam_unix |
| IPTables | Postfix |
| Monowall | Snare |
| Nagios | Snort |
| Nessus | SpamAssassin |
| Netgear | Squid |
| Nmap Monitor | SSH |
| Ntop Monitor | Sudo |
| OpenNMS | Syslog |
| Osiris | TCPTrack |
| OSSEC | Windows WMI |
| Ossim |
Plugin to Collect Syslog from Another Server
Next, I'll show you how to set up a plugin to collect syslog data from your network servers. To accomplish this, go to the web management interface with Configuration | Deployment and select your listed OSSIM server with Sensor Configuration | Collection Link (on the right above the System Status bar; Figure 10).
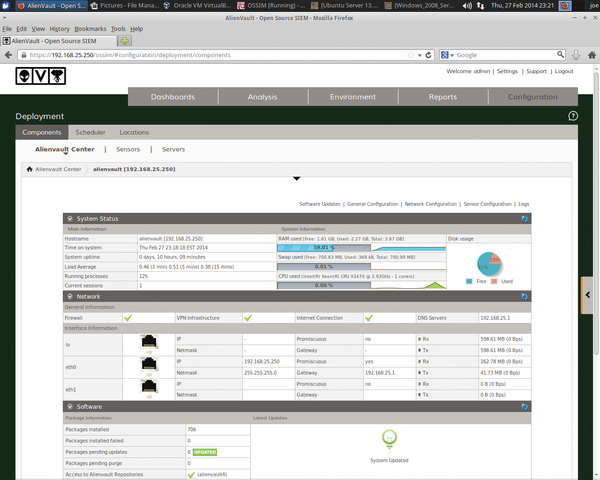 Figure 10: Activating plugins.
You can activate the plugins you need to enable by going to the right-hand column of plugins available. Click first on the plus sign, then click on Syslog and Apply Changes .
Next, I want to set up log rotation on the OSSIM server for this syslog plugin to conserve space on the OSSIM instance. To do so, I create a new log rotation configuration file by opening the syslog for editing,
nano --w /etc/logrotate.d/syslog
and adding the lines in Listing 1 to the file.
Listing 1
syslog Additions
01 /var/log/syslog.log
02 {
03   rotate 4 # save 4 days of logs
04   daily # rotate files daily
05   missingok
06   notifempty
07   compress
08   delaycompress
09   sharedscripts
10   postrotate
11   invoke-rc.d rsyslog reload > /dev/null
12   endscript
13 }
Finally, to see the syslog data in OSSIM, click on Analysis | Security Events (SIEM) . If you see your syslog entries from the device that you just set up, you are golden.
Buy this article as PDF
(incl. VAT)
Buy ADMIN Magazine
US / Canada
UK / Australia
Related content
- AlienVault Virtual Appliance
-
New Products
-
Managing Port Scan Results with Dr. Portscan
Regularly scanning the ports on your own network prevents intruders from sneaking in, but if you have dozens or hundreds of servers, you’ll need professional help: Dr. Portscan to the rescue.
-
Implementing custom security frameworks with Bro
 The Bro security framework takes a new approach to security monitoring, with the emphasis on trends and long-term analysis.
 -
Cloud security with AWS GuardDuty
 AWS GuardDuty uses machine learning and threat intelligence to identify malicious activity for continuous security monitoring in the cloud.
Subscribe to our ADMIN Newsletters
Subscribe to our Linux Newsletters
Find Linux and Open Source Jobs
Most Popular
Support Our Work
ADMIN content is made possible with support from readers like you. Please consider contributing when you've found an article to be beneficial.
