« Previous 1 2
Data virtualization using JBoss and Teiid
Uniformity Drive
Installation and Setup
After so much pure theory, it is time to put it into practice. The example here shows the steps required to install the software components successfully and how to implement a first small project to create a VDB. All the examples presented are based on a Red Hat Enterprise Linux installation, but they should also work seamlessly on other Linux systems such as CentOS or Fedora.
First, you need to grab the JBoss Data Virtualization software [2]. Then, unpack the JAR archive using
java -jar jboss-dv-installer-6.0.0.GA-redhat-4.jar
and run through the graphical installation process. You will find a detailed description of all the configuration options in the very comprehensive installation manual [3]. The installer automatically generates a JBoss EAP instance as part of the setup procedure; you do not need to install this separately.
Once the installation is complete, you will find the data virtualization software within the EAP installation folder ($EAP_HOME). Note that the software is also available as an OpenShift cartridge; therefore, you can install it very quickly in an existing PaaS environment if you have one. You do, however, need to install JBoss Developer Studio [4] for the required design tools. Here, too, you can run the installer using
java -jar jbdevstudio-product-eap-universal \
    -7.1.1.GA-v20140314-2145-B688.jar
and run through the graphical set-up process for the development environment. Once the installation is complete, you need to integrate Teiid Designer after restarting Developer Studio. To do this, select Help | Install New Software from the context menu and enter the link http://download.jboss.org/jbosstools/updates/stable/kepler/integration-stack/ as an installation repository.
You can then select the JBoss Data Virtualization Development option from the list to install the design tools.
Once the installation is complete, you still need to link the development environment to the JBoss Data Virtualization EAP instance. To do so, click on the No servers are available. Click this link to create a new server link in the Server tab and select the previously installed JBoss EAP instance.
This step completes the installation of your run-time environment, and you can now start on your project. You will first need to switch to the Teiid Designer perspective in JBoss Developer Studios. To do this, select the Window | Other Perspective | Other option from the context menu and click on Teiid Designer .
First Project
As a practical example, begin by creating a relational data source as an XML file. All applications should be able to access this data source via a virtual database with a matching model; accessing the actual data source is transparent for the application. Only the virtual database sees this. First, you need to create a model of the data source. You do this by creating a new Teiid project (New | Project ) and then importing a new data source.
Figure 3 shows that Teiid Designer enables access to a variety of different data sources at this point. An XML file will be used in this example. A Git repository from Blaine Mincey [5] is helpful here; it supplies a completed file with fictitious customer data. The repository also includes a JDBC client written in Java that can be used to query the virtual database (VDB) you've created. If you have imported the XML file, you need to create a "relational view" of the data source. You do not do anything else in this step other than present certain elements of the file's XML structure as a virtual relational table.
 Figure 3: Various data sources can be connected using Teiid Designer.
To find out whether the relational view of the XML data source produced in this manner works, you can click on the previously created view and access the Preview function (Modeling | Preview Data ). If everything worked, you should now find the previously selected XML elements as SQL tables listed in a new tab SQL Results (Figure 4).
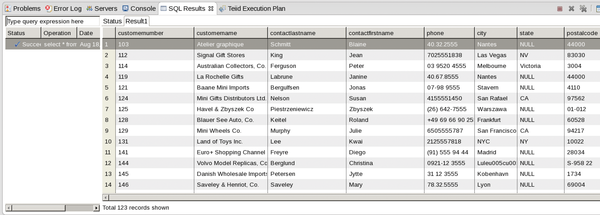 Figure 4: The new view of the XML file works, and the data is now available in SQL tables.
Now you can create a virtual database from this model. To do so, click on New | Teiid VDB in your project and add the previously generated model consisting of an XML data source and a view for the project. This creates the VDB; in the next step, you can adjust the database's properties. Using Data Roles , for example, you can specify whether you want to make a table read-only or also provide write access (Figure 5).
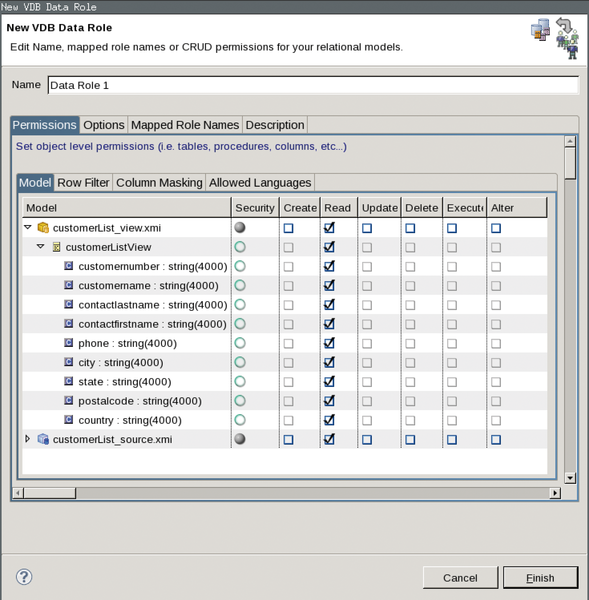 Figure 5: Assigning permissions for a table.
To access the VDB created in this manner, you need to deploy it on the JBoss EAP instance. You can do this very easily outside of Developer Studio by clicking on the VDB within your project and then selecting Modeling | Deploy . You should now see in the Developer Studio console window how the VDB on the Teiid instance of the EAP server is provided. If this works, the VDB should now be enabled so that you can access it.
You can access the VDB using a web service or a simple JDBC query. The JDBC client from the aforementioned Git repository [5] is used for a first test in this example. If you have imported this into Developer Studio, you can edit the source code (in the Java perspective) to adapt the JDBC_ URL to your environment: Enter the name of the project, the EAP server, and the VDB version in the URL. The URL in this example looks like this:
JDBC_URL = "jdbc:teiid:MyFirstProject@mm://\
    localhost:31000;version=1";
Finally, you need to add a JDBC driver to the small Java application. To do this, select the client and click on Build Path | Configure Build Path | Add External JARs and navigate to the folder containing the Teiid instance on your EAP server. The folder contains a JDBC driver, which you can choose at this point.
The small test application is now prepared. If you select it in Developer Studio and click Run | As Java Application , you will now finally see the customer data from the XML data source in the console window.
With this test project, you can access the data in an XML file using a JDBC query to the VDB. If you edit the file, the changes are visible immediately when you make a new request to the VDB. Of course, you can now set up additional models for other data sources at this point and add these to the VDB you just created.
Conclusions
Various data sources can be accessed in a short space of time using a combination of JBoss Developer Studio, the Teiid Designer plugin, and JBoss Data Virtualization. A virtual database is created based on data models, and this database serves as a data source for the actual applications. The underlying sources can be accessed transparently for the applications. Real-time processing of data is worthy of particular mention. The ETL processes can be dropped because the data remains in its original location, and predefined views are used for access.
Infos
- Teiid Designer: http://teiid.jboss.org
- JBoss Data Virtualization: http://www.jboss.org/products/datavirt/overview/
- JBoss Data Virtualization install guide: https://access.redhat.com/documentation/en-US/Red_Hat_JBoss_Data_Virtualization/6/html-single/Installation_Guide/
- JBoss Developer Studio: https://www.jboss.org/products/devstudio/overview/
- TeiidClient: https://github.com/blainemincey/teiidClient/
« Previous 1 2
Buy this article as PDF
(incl. VAT)
Buy ADMIN Magazine
US / Canada
UK / Australia
Related content
- JBoss Vulnerability Could Lead to SamSam Ransomware
-
Exploring OpenShift – Red Hat's next-generation PaaS tool
 Markus Feilner, CC-BY-SA 4.0") Red Hat's OpenShift cloud service helps web developers get websites up and running very quickly. We'll show you how to get started with your own OpenShift website.
Red Hat's OpenShift cloud service helps web developers get websites up and running very quickly. We'll show you how to get started with your own OpenShift website. -
Red Hat's cloud and virtualization portfolio
 Red Hat massively expanded its cloud portfolio during 2012. This overview can help you evaluate Red Hat's products in the context of VMware and others.
 -
Red Hat’s Cloud Tools
Red Hat massively expanded its cloud portfolio during 2012. This overview can help you evaluate Red Hat’s products in the context of VMware and others.
-
Managing Virtual Infrastructures
Version 3.1 of the oVirt management platform for virtual infrastructures has recently become available. On Fedora 17, the new release is easy to install and deploy.
Subscribe to our ADMIN Newsletters
Subscribe to our Linux Newsletters
Find Linux and Open Source Jobs
Most Popular
Support Our Work
ADMIN content is made possible with support from readers like you. Please consider contributing when you've found an article to be beneficial.
