Manage logical volumes with GUI tools
Fair Serving
YaST
YaST (Yet another Setup Tool) [8] has served openSUSE and a wide variety of derivatives for more than 20 years as an installation and configuration tool. YaST presents a sophisticated approach to creating and managing LVM systems. In doing so, it provides for most of the advantages that an LVM system offers, especially with regard to data protection.
Consider, however, that out of the box in current versions, openSUSE uses Btrfs [9] for the LVM root environment and XFS for the /home directory, which makes subsequent changes more complicated than with an ext4 filesystem. However, ext4 can be set as the default filesystem in the installation dialog of the operating system when you configure the LVM group.
To begin, open the YaST Control Center window from the start menu with System | YaST . In the System program group of the Control Center, you will find a Partitioner entry, which brings up a clear-cut Expert Partitioner window (Figure 11). The System View in the left pane is arranged vertically in a tree structure, where it also lists temporary devices. If you click on one of the entries in the System View, further context-sensitive information about the individual drives and partitions appears to the right. Below the information area on the right, YaST arranges several buttons specific to the selected view.
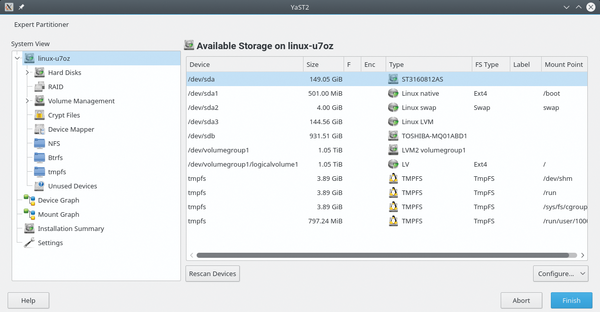 Figure 11: The partitioning module in YaST.
As part of Volume Management , the YaST module supports extensive configuration. YaST – like LVM GUI – does not distinguish between physical and logical volumes and displays all the devices in a table view in the right pane. Mount points and sizes also appear here, but not detailed information such as the size and number of physical extents or the selected drive's UUID.
You can view such details by clicking Edit below the table view. Doing so opens a display with three tabs – Overview , Logical Volumes , and Physical Volumes – and a horizontal bar arranged below that shows the utilization of the individual volumes.
Size Adjustment
To change the size of a volume group, simply click on the Resize button. In the view that now opens (Figure 12), all the unallocated physical volumes appear with their size information in the left pane, and YaST lists the physical volumes with the corresponding volume groups to the right.
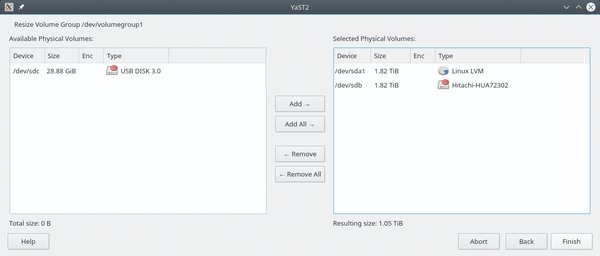 Figure 12: Physical volumes are very easy to manage in YaST.
Clicking on one of the available physical volumes and then on the Add button between the two tables lets you move the available volume from the left view to the right view. You can then add it to the active LVM group with a single click on Finish . The display jumps back to the management view and adjusts the size of the volumes accordingly.
Next, you will probably want to allocate the newly available disk space to the logical volume. To do this, click on a logical volume in the active volume group, and then press the Resize button below the table view. In the dialog box, define the size of the volume or enter a capacity within the available space limits. Clicking OK immediately displays the change in the management display.
In a similarly convenient dialog, you can format existing drives and define mount points by clicking on the Edit button after choosing the desired logical volume. Two small dialog boxes open (Figure 13) in which you specify the filesystem to be created and the mount point of the logical volume.
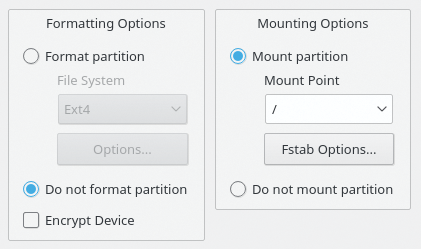 Figure 13: When creating a filesystem in YaST, you can manually change /etc/fstab.
Available filesystems include ext2/3/4, XFS, FAT, and Btrfs. Depending on the selected filesystem, additional parameters can be modified and an encryption algorithm applied. When specifying the mount point, you can manually edit the /etc/fstab file.
To create a new volume group or a logical volume, click Add in the volume manager. In the selection box that appears, decide whether to create a group or volume, and then configure all the necessary settings in a multiple-step dialog. In addition to the volume capacity and size of the physical extents, this includes defining the name of the volume, the filesystem to be used, and the options for mounting.
Before the software changes the system, YaST shows the steps required and only performs them after clicking on the Finish button. Thus, a last checkpoint allows you to intervene in the case of a faulty configuration (Figure 14).
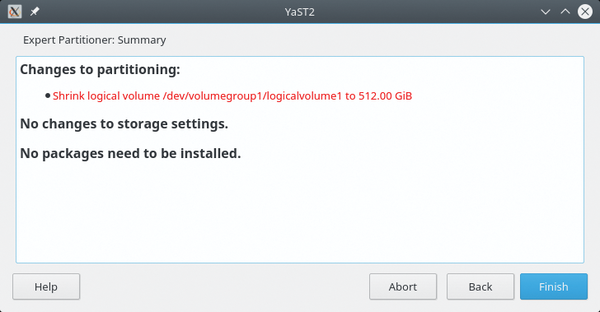 Figure 14: YaST – like other tools – first shows you a summary of the work to be performed.
Using the same approach, you can remove volume groups or logical volumes. To do so, choose the Delete button at bottom right in the manager. If the component to be removed is a mounted logical volume, an explicit warning appears stating that YaST will only let you delete after confirmation. This prevents data loss from operator error.
KVPM
The KDE Volume and Partition Manager (KVPM) [10], released under the GPLv3, was originally designed for KDE4; however, it then entered the repositories of Debian, Ubuntu, and Slackware, so it can be installed easily in the current Plasma 5 variants at the push of a button. Also on the project site is source code for installation on other distributions, along with a guide.
KVPM presents a rather confusing interface after launching LVM Volume And Partition Manager from the System menu (Figure 15). The main area, which lists volumes and partitions in tabular form, comprises two or more windows hidden behind tabs. Storage Devices lists the physical volumes and partitions, their types and utilization, as well as the mount points and flags. Depending on the configuration, additional tabs may exist, each containing information about a volume group.
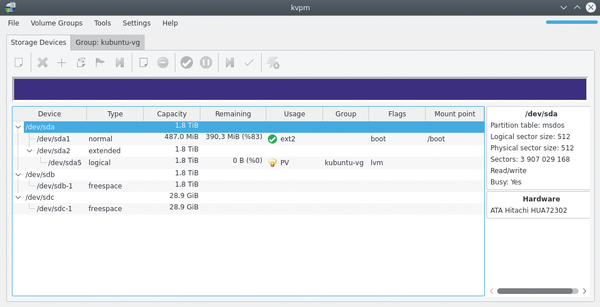 Figure 15: The KVPM interface shows an overview of existing physical devices.
KVPM is one the few LVM tools to provide an extensive Settings menu. In the menubar across the top of the program window, the Settings menu allows you to configure some general settings for the components displayed in the current window, such as Configure kvpm to modify the tabular list of volume groups and logical drives to view or hide information (Figure 16).
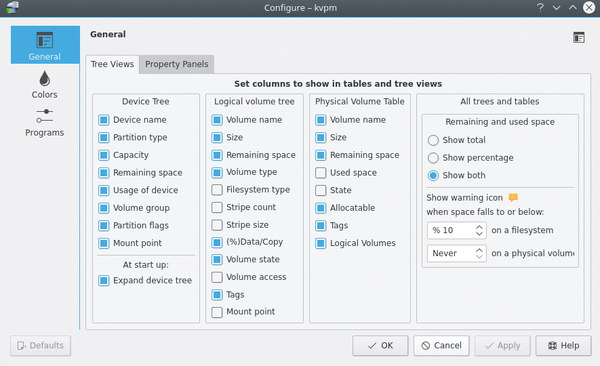 Figure 16: Customizing your KVPM display.
Buy this article as PDF
(incl. VAT)
Buy ADMIN Magazine
US / Canada
UK / Australia
Related content
-
Managing Storage with LVM

Managing Linux storage servers with the Linux Logical Volume Manager.
-
Software RAID in Windows, macOS, and Linux
 If RAID hardware is missing on your server, Windows, Linux, and macOS offer various options for building software RAID.
 -
Fedora 18 for Admins
Fedora is a trend-setting distribution that sets the pace for future developments of Red Hat Enterprise Linux. Administrators, regardless of whether they use Fedora, are well advised to look at the newest innovations of the Fedora distribution.
-
Storage cluster management with LINSTOR
 LINSTOR is a toolkit for automated cluster management that takes the complexity out of DRBD management and offers a wide range of functions, including provisioning and snapshots.
 -
Fedora 18 as a server distribution
 Fedora is a trend-setting distribution that sets the pace for future developments of Red Hat Enterprise Linux. Administrators, regardless of whether they use Fedora, are well advised to look at the newest innovations of the Fedora distribution.
Subscribe to our ADMIN Newsletters
Subscribe to our Linux Newsletters
Find Linux and Open Source Jobs
Most Popular
Support Our Work
ADMIN content is made possible with support from readers like you. Please consider contributing when you've found an article to be beneficial.
