
Lead Image © Federico Caputo, 123RF.com
Environment Modules Using Lmod
Environment Control
One of the key tools for any cluster is Environment Modules [1], which allow you to define your user environment and the toolset to build and execute your application. They provide a simple way to control dynamically the huge number of combinations that result from various versions of tools and libraries.
The original Environment Modules [2], Tcl/C, has been around since the early 1990s. High-performance computing (HPC) sites have been using them to allow users to specify the combination of tools and libraries they want to use.
One implementation of Environment Modules, Lmod [3], is under constant development and has some unique features that can be very useful even on your desktop if you write code and want to use a variety of tools and libraries. I use Lmod on my desktop and laptop to try new compilers or new compiler versions, as well as new library versions.
Environment Modules Fundamentals
Programmers use a number of compilers, libraries (MPI, compute, and others), and various tools to write applications. For example, someone might code with OpenACC [4] to target GPUs and Fortran for PGI compilers, along with Open MPI, whereas another person might use GNU Compiler Collection (GCC) 8.1 with MPICH. One user might use the Portable, Extensible Toolkit for Scientific Computation (PETSc) [5] to solve their problem, and another user might use OpenBLAS [6].
Environment Modules tools allow users and developers to specify the exact set of tools they want or need and is key to operating an effective HPC system. "Effective" can mean better performance (tools that allow your code to run as fast as possible), more flexibility (tools that match a specific case), or ease of environment configuration.
To explain a little deeper, assume you have five versions of the GCC compiler (4.8, 5.4, 6.2, 7.3, and 8.1), the latest Intel compiler, the last three community versions of the PGI compilers, three versions of MPICH (3.2.1, 3.1.4, and 3.1), and three versions of Open MPI (2.1, 3.0, and 3.1). Furthermore, assume your users need two versions of PETSc and two versions of OpenBLAS. Altogether you have 216 possible combinations (nine compilers, six MPI libraries, two PETSc versions, and two OpenBLAS versions). This is a very large number of combinations. Forcing users to configure their environment, primarily paths, to use the combination they want or need borders on HPC torture. At this point, you have two choices: You can reduce the number of combinations (e.g., get rid of some of the compilers and MPI libraries), or you can use Environment Modules so users can choose the combination of compiler, MPI library, and computational libraries they want or need.
As a user, I might build a parallel application using GCC 4.8 (the default compiler for CentOS 7.3) and MPICH; however, the GCC 6.2 compiler has some unique features, so I might want to try building the same application with it. Environment Modules allow me to select the tools used for production and allow me to use a different toolset for development.
The secret to Environment Modules is manipulating the environment variables (e.g., $PATH, $LD_LIBRARY_PATH, and $MANPATH) and make changes to these variables according to the tool combinations desired. Changing the toolset changes these Environment Modules accordingly. It is fairly simple conceptually and just takes a bit of coordination.
You can use either the "classic" Environment Modules Tcl/C or Lmod; they both provide the same basic functionality. For the purposes of this article, I will be using Lmod, because it has some features that I use fairly often.
Lmod
Lmod is an Environment Modules tool that provides simple commands for manipulating your environment for tool and library selections. A set of "modules," which are really just text files, are written to modify $PATH, $LD_LIBRARY_PATH, and $MANPATH and possibly create other needed environment variables for the specific tool or library. A great feature of Lmod is that you can write these modules to define dependencies, as well, so that you do not use conflicting tools. By "loading" or "unloading" these modules, you can change your environment to use what you need. If you "purge" all of your modules, they are all unloaded and your $PATH, $LD_LIBRARY_PATH, and $MANPATH are returned to the values they had when you logged in to the system.
Lmod provides a complete toolset for using and manipulating these module files. For example, you can:
- List available modules (only the modules compatible with the currently loaded modules appear):
module avail - Load and unload modules:
module load [x]andmodule unload [x] - Purge all modules:
module purge - Swap modules:
module swap - List loaded modules:
module list loaded - Query modules
- Ask for help on modules
- Show modules
You can also perform many other related tasks with other commands that are not listed here (and not commonly used).
One of the coolest Lmod features is its ability to handle a module hierarchy, so it will only display or list available modules that are dependent on the currently loaded modules, preventing you from loading incompatible modules. This feature can help reduce unusual errors with mismatched modules that are sometimes very difficult to diagnose. It is accomplished through a "module hierarchy" that I will explain in a later section, because it is a very important and useful Lmod feature.
The first widely used environment module tool was Environment Modules Tcl/C, so called because the code is written primarily in C with the module files in Tool Command Language (Tcl). Lmod is a different implementation of Environment Modules and uses module files written in Lua, a popular language in its own right and an embeddable language for applications. Lmod also retains the ability to read and use modules written in Tcl.
Module files are easy to create with the use of just a few functions for manipulating $PATH, $LD_LIBRARY_PATH, and $MANPATH values for the targeted tool, application, or library. Other environment variables also can be created easily in the module file as they are needed. The module file contains the dependencies, so Lmod can track that information to screen out incompatible modules from being listed or loaded. It is also highly recommended that you include help information in the module along with lots of documentation, such as what version of the tool the module file covers and when the module file was last modified (check the dates on the file to see if they match the modified date in the files).
These module files are placed in a directory hierarchy (tree) in a specific location in the filesystem. Ideally, this filesystem is shared with the other nodes in the cluster; otherwise, you have to copy the module files in the specific hierarchy to all compute nodes and maintain them – including making sure they are all identical.
In the next section, I explain Lmod hierarchical modules, focusing on how to organize module files and how to limit the visibility of dependent module files. I will use an example from my own laptop to help illustrate this process. Additionally, I have tried to add comments about Lmod best practices, some of which I have gathered from email discussions with Robert McLay [7] on the Lmod users mailing list, the Lmod documentation, and Lmod presentations by others.
Lmod Hierarchical Modules
One of Lmod's key capabilities is module hierarchy. Using this capability, Lmod does not let you see or load certain modules based on the modules that are currently loaded, which helps prevent the loading of conflicting modules, resulting in problems. It can also help you understand what module combinations are available, because admins might not build every possible combination. However, if you want to see all possible modules, the Lmod module spider command lets you see all modules.
Figure 1 illustrates the module hierarchy of the module files on my laptop. Anything marked (f) is a file; everything else is a directory. At the top of the diagram, /usr/local/modulefiles is the directory where all module files are stored. This is the default for Lmod, which is fine for single systems. For clusters, the directory /usr/local would need to be NFS-exported to all of the compute nodes, or you could install Lmod to a different NFS-exported directory.
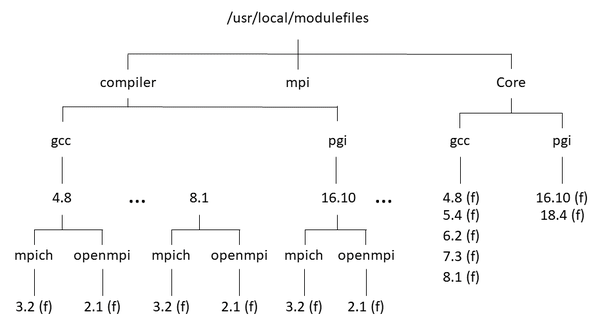 Figure 1: Example module file layout.
Below the root directory are three main subdirectories: Core, compiler, and mpi. These directories indicate the dependencies of the various modules. For example, everything in the compiler directory depends on a specific compiler (e.g., GCC 8.1). Everything in the mpi directory depends on a specific MPI and compiler combination. Everything in the Core directory does not depend on anything except the operating system.
By default, Lmod reads module files in /usr/local/modulefiles/Core as the first level of available modules. It is a best practice to put any module files in this directory that do not depend on either a compiler or an MPI library, which means you also put the compiler module files in the Core directory.
The gcc subdirectory under Core is where all of the module files for GCC compiler family are stored. A best practice from the Lmod developer, Robert McLay at the University of Texas Advanced Computing Center (TACC), is to make all subdirectories beneath Core, compiler, and mpi lowercase. In McLay's own words, "Lmod is designed to be easy to use interactively and be easy to type. So I like lowercase names where ever possible." He continues: "I know of some sites that try very hard to match the case of the software: Open MPI, PETSc, etc. All I can say is that I'm glad I don't have to work on those systems."
The gcc subdirectory has a module file named 8.1, and you will have a module file corresponding to every GCC compiler version that you want to expose to users. (You could hide some versions from users by not having a module file for it.) For example, if you have versions 5.1, 6.2, 7.1, and 8.1 of GCC compilers, then you should have four module files in /usr/local/modulefiles/Core/gcc corresponding to these versions. In the case of GCC 8.1 (as shown in Figure 1), the module file 8.1 (f) is actually 8.1.lua, which contains the details for GCC 8.1 compilers. The extension .lua, although not shown in Figure 1, indicates that the module file is written in Lua; however, it could be written in Tcl and called 8.1.tcl.
Notice that for a different set of compilers (e.g., those from PGI [8]), you would create a directory named pgi under /usr/local/modulefiles/Core and then place the module files corresponding to the specific PGI compiler versions in this subdirectory.
All Lmod commands start with module followed by options. For example, you can find what modules are available with the module avail option (Listing 1).
Listing 1
module avail Command
$ module avail
--------------------- /usr/local/modulefiles/Core ----------------------
   gcc/6.2    gcc/7.1    gcc/8.1 (D)    pgi/16.10    pgi/18.4 (D)
---------------- /usr/local/lmod/lmod/modulefiles/Core -----------------
   lmod/6.5    settarg/6.5
  Where:
   D:  Default Module
Use "module spider" to find all possible modules.
Use "module keyword key1 key2 ..." to search for all possible modules
matching any of the "keys".
Notice that compiler modules are "available" to be loaded because they are "visible." If you load the gcc/8.1 module and use module list,
$ module load gcc/8.1
$ module list
Currently Loaded Modules:
  1) gcc/8.1
you will see that the GCC 8.1 compiler is loaded.
The compiler module files modify the Lmod environment variables to point to the appropriate compiler. It also uses some commands to tell Lmod what MPI libraries are available that have been built with the loaded compiler. Therefore, only the MPI tools that depend on the loaded compiler are available to the user.
If you now type module avail, you get the response shown in Listing 2. Notice the two subdirectories under /usr/local/modulefiles/compiler, one for each compiler "family." Under the GCC compiler family is another subdirectory for each version of GCC that has modules. In this case, it is version 8.1 only.
Listing 2
Viewing Loaded MPICH Module
$ module avail
--------------- /usr/local/modulefiles/compiler/gcc/8.1 ----------------
   mpich/3.2    openmpi/3.1
--------------------- /usr/local/modulefiles/Core ----------------------
   gcc/6.2    gcc/7.1    gcc/8.1 (L,D)    pgi/16.10    pgi/18.4 (D)
---------------- /usr/local/lmod/lmod/modulefiles/Core -----------------
   lmod/6.5    settarg/6.5
  Where:
   L:  Module is loaded
   D:  Default Module
Use "module spider" to find all possible modules.
Use "module keyword key1 key2 ..." to search for all possible modules
matching any of the "keys".
Under that subdirectory lies all applications dependent on the GCC 8.1 compiler. For example, Figure 1 shows two MPI library families, mpich and openmpi. Under these directories are the module files corresponding to the specific MPI library version. These modules are denoted with an (f) next to their name.
Try loading an MPI module to see how Lmod "screens out" modules that are not compatible with the loaded modules. The command module avail lists the modules that are available; however, Lmod is smart enough to show only the modules that are available on the basis of currently loaded modules. For example, you can load the mpich/3.2 modules and then use the module list command on the currently loaded modules.
Loading the mpich/3.2 module should modify the $PATH, $LD_LIBRARY_PATH, and $MANPATH environment variables, as well as add some environment variables specific to MPICH, which you can check by looking at the paths to the mpicc and mpif77 scripts (Listing 3). Notice that mpicc and mpif77 point to the correct scripts (you can tell by the path).
Listing 3
module list Command
$ module load mpich/3.2
$ module list
Currently Loaded Modules:
  1) gcc/8.1   2) mpich/3.2
$ which mpicc
~/bin/gcc-8.1-mpich-3.2.1/bin/mpicc
$ which mpif77
~/bin/gcc-8.1-mpich-3.2.1/bin/mpif77
An important key to making everything work correctly is in the module files. I will take a deeper look at these module files for a better understanding.
Buy this article as PDF
(incl. VAT)
Buy ADMIN Magazine
US / Canada
UK / Australia
Related content
-
Environment Modules Using Lmod

The indispensable Lmod high-performance computing tool allows users to control their build and execution environment.
-
Lmod 6.0: Exploring the Latest Edition of the Powerful Environment Module System

Lmod is an indispensable tool for high-performance computing. With the new release of version 6, now is a good time to review Lmod and look at its new capabilities.
-
Warewulf 4 – Environment Modules

Environment Modules are an indispensable tool for high-performance computing that allow you to switch between and among versions of compilers, libraries, and applications.
-
Lmod – Alternative Environment Modules

Environment Modules are a key tool for any HPC system, or really any server system. It allows you to control applications and tools and improve user productivity. Lmod is a fairly new implementation of environment modules and provides some new, needed features.
-
Managing the Build Environment with Environment Modules

The Modules package makes life easier in the HPC world (and beyond).
Subscribe to our ADMIN Newsletters
Subscribe to our Linux Newsletters
Find Linux and Open Source Jobs
Most Popular
Support Our Work
ADMIN content is made possible with support from readers like you. Please consider contributing when you've found an article to be beneficial.
