« Previous 1 2 3 4 Next »
Automating system configuration with Ansible AWX
Playbook Pal
Creating an Inventory
Next, you need to tell AWX which computers to manage. AWX refers to these in more general terms as hosts. You need to make a note of all the hosts in an organization in an inventory. To create an inventory for your own organization, click on Inventories in the menu on the left. AWX has already created an inventory for you with the smart name Demo Inventory . You can simply ignore this and create a new inventory using Add . The Add Inventory form lets you configure settings for the new inventory (Figure 3). The inventory contains all the hosts of the organization defined under Organization . Clicking on the magnifying glass lets you select another inventory if necessary. Save the new inventory by pressing Save . In the lower part of the page, you will now find a list of all existing inventories. Clicking on a name opens the settings of the inventory in the upper area. At the moment, you should still be able to see the settings of the new inventory.
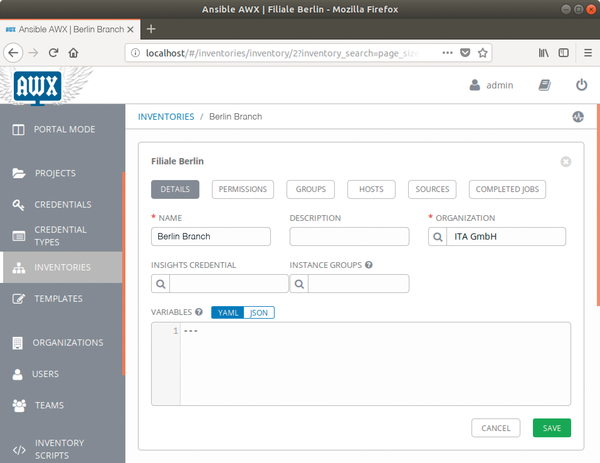 Figure 3: Creating an inventory in AWX.
You now need to add all the hosts to the new inventory. An enterprise can contain quite a large number of hosts. To help you keep track, you can group the hosts. For example, you could put all the hosts from the Accounts department in the same group. To create a new group, click on the Groups button at the top and then click Add Group . Give the group at least one name, such as Accounts , and click Save . In the lower part of the screen, you will now find a list with all groups created in the inventory.
To define the hosts you wish to manage, click on the Hosts button in the top area. Use Add and New Host to add a new host. Enter the hostname. You can use its domain name and IP address. Finally, add the host to the inventory using Save . You can register additional hosts by following the same steps. You can also add a host to other groups once it has been saved. To add a host to another group, call Add in the group, click Existing Host , check the box to the left of the desired host, and select Save .
Unlike early Ansible Tower versions, AWX lets you add a host to an inventory directly. To do so, select Inventories from the menu on the left, click on the desired inventory, activate Hosts in the upper part, and add a new host via Add Host .
The way inventories are represented in AWX is somewhat confusing. Especially if you are using AWX for the first time, you will want to use the menu on the left to call up the inventories, and then click on the desired inventory. In the area at the top, you can now call up the groups and the hosts assigned to the inventory. A click on a group and then on Hosts lists all hosts contained in the group. At the top, you will also find a breadcrumb bar to help you navigate and find your way.
Storing Credentials
AWX, or the Ansible it uses, usually accesses the hosts via SSH. In order for this to work, you need to provide the access data to the hosts. AWX refers to the access data as a Credential . To store the credentials in AWX, open Credentials in the main menu on the left-hand side and click Add . Enter a name for the Credential in the corresponding field, and select the appropriate organization. You can use the name of the computer or computers for which the login data stored below applies.
Then click on the magnifying glass below Credential Type
. Now select a procedure that AWX or Ansible can use to log on to the host. If access is via SSH, choose Machine
and confirm by pressing Select
. Additional fields now appear in which you then enter the login data. In the simplest case, Ansible logs in with the username and the password via SSH. The remaining fields remain empty. Under Privilege Escalation Method
, you specify how Ansible can execute system commands after logging on to the host. With Ubuntu systems, for example, this is achieved with sudo. The username to be entered by Ansible is stored under Privilege Escalation Username
, the password under Privilege Escalation Password
. Press Save
to save the settings. In the area at the bottom, you will now find all the credentials.
Creating Projects
AWX now knows which hosts it can access and how, but does not yet know what actions it has to perform. In Ansible, you define these actions in playbooks. AWX combines a collection of several playbooks to form a project. To create a project, go to Projects in the main menu on the left and click on Add . Enter a name for the project in the field and select the organization. Under SCM Type , select the version control system in which the playbooks are stored. For the SCM URL, enter the URL for the repository and fill out the remaining fields if required. If the repository with the playbooks requires authorization, first create a new suitable credential as described above, and then click on the magnifying glass next to SCM Credential and select the credential. For test purposes, the AWX developers offer a public GitHub repository with a simple playbook. Set the SCM Type to Git and select the address https://github.com/ansible/ansible-tower-samples as your SCM URL .
If you want to save the playbooks locally on your system, contrary to the developer's advice, you have to mount the directory with the playbooks in the ansible/awx_task and ansible/awx_web Docker containers. In both containers, the playbooks must appear in the /var/lib/awx/projects directory and at least be readable by the awx user. Once these conditions are met, set the SCM type to Manual
in the AWX user interface.
Whatever else you do, save the project by pressing Save . If you have selected a version control repository, select Projects in the main menu again and then click on the cloud icon in the line for the project. AWX now retrieves the playbooks.
« Previous 1 2 3 4 Next »
Buy this article as PDF
(incl. VAT)
Buy ADMIN Magazine
US / Canada
UK / Australia
Related content
-
Keeping it simple – the Ansible automator
 The powerful Ansible automator comes without airs and graces, does without complex syntax, self-documents, and has no need to hide its light compared with Puppet and other configuration management tools.
 -
AWX: Web-Based Console Manager for Ansible
 The upstream project of the Ansible Tower enterprise solution is now freely available as AWX. We look at Red Hat’s new web-based console manager for Ansible deployments and discover its capabilities.
 -
Automated orchestration of a horizontally scalable build pipeline
 A Jenkins build pipeline frees developers from repetitive manual build tasks by facilitating automation and provides broad traceability with continuous logging and feedback.
 -
Ansible as an alternative to the Puppet configuration tool
 Automation is part of life in the data center, and Puppet is commonly regarded as the King of the Hill, but some users prefer the lean alternative Ansible.
 -
Automation with Ansible
 Ansible offers automatic provisioning and configuration capabilities similar to that of Chef and Puppet, but it's aimed more at admins than developers.
Subscribe to our ADMIN Newsletters
Subscribe to our Linux Newsletters
Find Linux and Open Source Jobs
Most Popular
Support Our Work
ADMIN content is made possible with support from readers like you. Please consider contributing when you've found an article to be beneficial.
