Setting up an OpenNebula Cloud
New Nebula
Public cloud infrastructure services such as Amazon Web Services (AWS), Google App Engine, and the Rackspace cloud provide affordable access to cheap commodity computing hardware for enterprises and individuals. These large service providers offer cheap access because they make use of spare computing capacity. You, too, can make better use of your computing hardware by deploying a cloud, and efficient use of hardware is not the only benefit. For example, you can scale out some applications to public clouds like Amazon EC2 at times of peak demand, then, when demand subsides, you can then migrate VMs back to your local private cloud.
Many open source technologies power popular cloud computing infrastructures, so it's no surprise that various open source efforts exist to create end-to-end cloud middleware. These efforts include Eucalyptus, OpenNebula, Nimbus, and OpenStack (see the "Cloud Middleware Options" box). These cloud middleware tools fall into the category of Infrastructure as a Service (IaaS) systems, which enable you to use computer hardware as a service.
One popular IaaS system is OpenNebula [4], an open source toolkit for building private and hybrid clouds. Like Eucalyptus, OpenNebula supports Amazon EC2 but adds support for ElasticHosts. Besides allowing the deployment of private and hybrid clouds, OpenNebula also lets you deploy public clouds, where users can access the infrastructure via public APIs. The public API is AWS-compliant. OpenNebula also adds support for a recent standardized API by the Open Grid Forum.
Distributions such as Ubuntu and Red Hat Enterprise have already integrated OpenNebula. As you' ll learn in this article, you can set up OpenNebula by installing a few packages and performing some cursory configurations. OpenNebula supports Xen, KVM, and VMware hypervisors.
Cloud Middleware Options
The following projects all focus on providing a middleware layer for launching conventional virtualization technologies into a cloud setting.
Eucalyptus – Eucalyptus [1] is one of the earliest efforts to create an open source cloud middleware layer. The Eucalyptus environment supports the development of private and hybrid clouds. Eucalyptus implements complete support for AWS APIs; therefore, Eucalyptus clouds can scale out to Amazon EC2. Eucalyptus also implements an Amazon S3-compliant storage component called Walrus. Walrus is primarily a virtual machine repository; however, it can also import and export large amounts of data to and from the cloud. Eucalyptus supports Xen and KVM for virtualization and offers an enterprise edition that comes with enterprise-level support.
Nimbus – Like OpenNebula, Nimbus [2] implements the AWS APIs. Nimbus is specifically targeted to the scientific community. Thus, Nimbus provides functionality that is relevant to the community. For example, Nimbus can be integrated with the Portable Batch System and the Sun Grid Engine. Both of these tools are used widely by the scientific community to compute jobs on large-scale distributed infrastructures. Similarly, Nimbus offers functionality, such as letting you create virtual machine clusters dynamically with a single click. Nimbus supports the Xen and KVM hypervisors and implements an Amazon S3-compliant storage mechanism called Cumulus. Cumulus is primarily designed to be used as a virtual machine repository; however, you can use it in standalone fashion as well.
OpenStack – OpenStack [3] (see article in this issue) was recently launched as open source cloud middleware with support from various enterprises. OpenStack thus avoids the problem of being dependent on a single vendor, although the project was launched by Rackspace and contains lots of code for interfacing with Rackspace's cloud services. OpenStack developers claim the middleware was developed because existing cloud infrastructures were not sufficiently scalable.@KE:
Your Own Private Cloud
OpenNebula is one of the easiest cloud systems to install and configure. Binary packages exist for several distributions, including Red Hat Enterprise Edition, Ubuntu, Fedora, and openSUSE. Distributions like Ubuntu also include packages in their standard repositories, which makes it simple to install OpenNebula. Figure 1 shows the layout of the OpenNebula deployment described in this article.
 Figure 1: The OpenNebula deployment.
An OpenNebula deployment is modeled after the classic cluster architecture. A single gateway or front-end machine, sometimes also called the master node, queues jobs, performs scheduling, and submits jobs to the machines in the cluster. The other machines in the cluster, known as " worker nodes," provide the raw computing power for processing the jobs submitted to the cluster. The worker nodes in an OpenNebula cluster are machines that deploy a virtualization hypervisor, such as VMware, Xen, or KVM.
The master node is also known as the front end, and it runs several OpenNebula services. These services include providing an interface to the user for submitting virtual machines and monitoring their status. The front end also runs services that manage and monitor all virtual machines running on different machines in the cluster. And, it hosts the virtual machine repository. Thus, the front end also runs a transfer service to manage the transfer of virtual machine images to the concerned worker nodes. An important aspect of clouds are virtualized networks. The front end provides an easy-to-use mechanism to set up these virtual networks. Finally, the front end allows you to add new machines to your cluster.
If you migrate from a private cloud to a hybrid cloud, the front end will enable you to send virtual machines to Amazon EC2 or ElasticHosts. This interface with commercial clouds is very useful, especially for organizations that need to address spikes in resource requirements.
Installation
The example described in this article builds a private cloud with three Ubuntu 10.04 machines. One machine will serve as the front end, called nebula-cloud-server. Two machines will be worker nodes deploying KVM. The worker nodes are open-nebula-wn and open-nebula-wn2. VM images of all three of these machines are available online if you would like to work through this example on your own network [5].
To install the front end, you need to install a single package:
sudo apt-get install opennebula
This package installs the daemon oned that manages all OpenNebula services. The installation also creates a new user " oneadmin," which OpenNebula retains for its own use. The installation of this package also produces a new pair of SSH RSA keys. OpenNebula uses SSH to communicate with other machines in a cluster, so a public key is used to identify the front end. All worker nodes need to authorize the front-end SSH key.
After the opennebula package has been installed, the next step is to add worker nodes. Before you add worker nodes, you need to install the worker node OpenNebula package on the worker node machines. At both worker nodes, you need to install the opennebula-node package:
sudo apt-get install opennebula-node
This package installs the necessary worker node packages and creates the oneadmin user.
Worker Nodes
The onehost command performs any operations related to the hosts. The syntax of the command is:
onehost [options] command [parameters]
The command argument specifies what operation you want to carry out (Figure 2). You can add new machines to your cluster, retrieve monitoring information, enable or disable scheduling of virtual machines to the host, and list currently active machines.
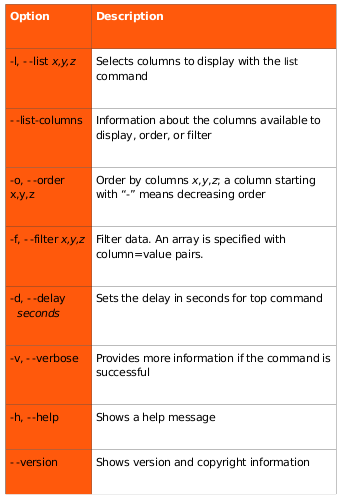 Figure 2: onehost and onevm command options.
The onehost create command assists with adding new worker nodes to a cluster:
onehost create hostname im_mad vmm_mad tm_mad
The hostname argument is the hostname or the IP of the machine; the next three parameters relate to the hypervisor and the transfer manager service. OpenNebula uses different drivers to access different hypervisors. These three parameters essentially tell the front end that the machine you are adding deploys this specific hypervisor, and this mechanism should be used to transfer data to this machine. In this example, I add a host deploying KVM:
onehost add open-nebula-wn im_kvm vmm_kvm tm_ssh
The final arguments relate to the way virtual machines will be transferred to the node. In this example, I don't have global NFS storage, so SSH is used to transfer virtual machines. If you were using NFS, you would specify tm_nfs instead of tm_ssh. Note that the oneadmin user on this host needs to be able to ssh to oneadmin@open-nebula-wn, so on this host, run
sudo -u oneadmin ssh open-nebula-wn
and verify the host's authenticity. On open-nebula-wn, run:
sudo apt-get install opennebula-node
sudo tee /var/lib/one/.ssh/authorized_keys << EOT
onehost add open-nebula-wn2 im_kvm vmm_kvm tm_ssh
Again, the oneadmin user on this host needs to be able to ssh to oneadmin@open-nebula-wn, so on this host, run
sudo -u oneadmin ssh open-nebula-wn
and verify the host's authenticity. On open-nebula-wn2, run
sudo apt-get install opennebula-node
sudo tee /var/lib/one/.ssh/authorized_keys << EOT
The onehost create command will prompt for the front end's key to the authorized key file, which OpenNebula uses internally. So, you have to go back to the worker nodes and add the SSH key to the worker nodes.
If everything goes well, your can check the status of the nodes with the onehost command (Listing 1).
Listing 1
Status of Worker Nodes
01 nebula-user@nebula-cloud-server:~$ onehost list
02  HID NAME                      RVM   TCPU   FCPU   ACPU    TMEM    FMEM STAT
03    0 open-nebula-wn              0    100     99    100 1068948  921356  on
04    1 open-nebula-wn2             0    100     12    100 1173072 1027776  on