« Previous 1 2 3 Next »
Shifting Drupal to Amazon's cloud
Relocating to the Cloud
RDS Database
The first step is to set up an RDS database. The admin creates an external database and connects it with the application created in Elastic Beanstalk later. Beanstalk itself also supports several databases, including MySQL, PostgreSQL, Oracle, and SQL Server. Admins can choose an external database to suit their needs. There is one important thing to consider: External databases do not simply disappear when you remove the Beanstalk application later; instead, you have to delete them separately.
To create the RDS instance, switch to the AWS console, and search for RDS in the AWS services search field, which takes you to a Get Started page. Now press the Create Database button and choose the appropriate engine for the Drupal installation – in my case, MySQL.
Then select a use case for the database. For tests, the Dev/Test option will do fine. If you want to move a Drupal installation (or another CMS with a database), be sure to select the database version that matches the Drupal version – otherwise, errors can occur.
If the database is too large, you may receive a large invoice at the end of the month. Make sure you write down the details, such as the database instance name, the user name, and the password for database access. You will need them later on in Elastic Beanstalk to initiate the integration of application and database.
Next, call the database you created, and then navigate to Security Group | Edit | Add Inbound Rule . As the Type , select the previously determined database engine. This allows the resources gathered in Security Group to receive traffic from other resources on the database port.
On the Beanstalk
First, create the infrastructure for the Drupal application. In Elastic Beanstalk, you need to follow several steps without omitting any of them. The first step is to search the AWS console for Elastic Beanstalk and then press Create New Application . Enter a name and description for the application and then choose an appropriate environment for it. Beanstalk provides several options for this; you will want the Web server environment option.
Elastic Beanstalk then generates Canonical Name (CNAME) records [3] for the application to enable access to the corresponding website via the Internet. The usual format for a CNAME entry is:
.<Name of Region>.elasticbeanstalk.com
The domain name can later be changed via Amazon's Route 53 service.
Then choose the PHP version that matches your Drupal installation. Don't panic if the list doesn't let you select a specific version – this is done in the Configure More Options section.
This is where you can also set up a load balancer. To do this, choose the High Availability option, which automatically sets up a load balancer for the selected environment. Finally, click on Create Environment Option .
Elastic Beanstalk now creates all the resources the application needs. This will take a few minutes. Once the application is running, the corresponding icon turns green (Figure 3); if it stops running, the icon turns gray. A red icon indicates that the application has a problem, for example, database access.
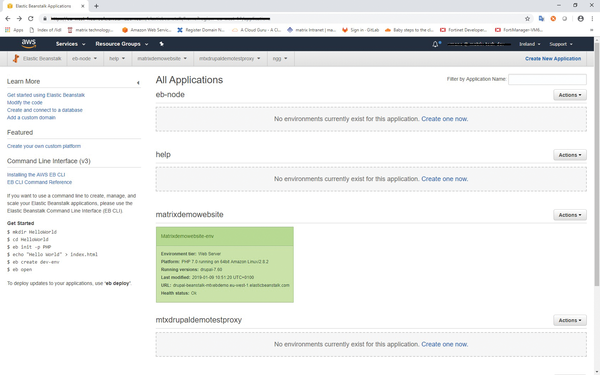 Figure 3: The test application is running, as you can see from the green icon.
If all systems are go, you can now edit the configuration. For this purpose, you need to pass in the access data for the RDS database, as noted above, to the Elastic Beanstalk application. Simply click on the application, and then on the Configuration option to the right. Switch to the Software tab, enter the properties outlined in Table 2, and then press Apply (Figure 4).
Table 2
Database Properties
| Option | Functionality |
|---|---|
RDS_HOSTNAME
|
AWS displays the hostname of the database instance as Endpoint . |
RDS_PORT
|
The port on which the database waits for requests from other resources. The value varies depending on the database engine; here it is port 3306. |
RDS_DB_NAME
|
The name of the database. |
RDS_USERNAME
|
The self-selected user name for the DB instance. |
RDS_PASSWORD
|
The self-selected password for the database. |
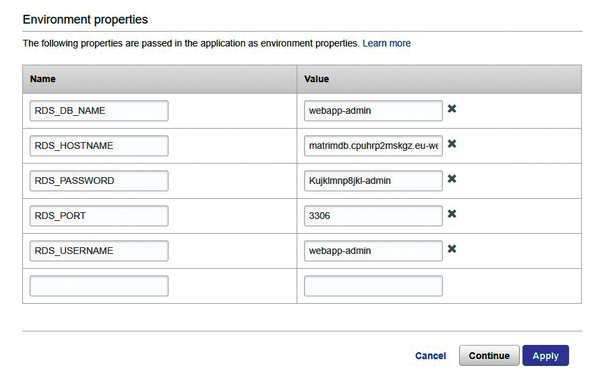 Figure 4: The access credentials are needed to reproduce the database in Amazon RDS.
Drupal Relocates
Once the database is configured, you can install Drupal. To create a Drupal project in Elastic Beanstalk, first download the Drupal source code and combine it with the Elastic Beanstalk configuration files. Since this is an existing Drupal installation, you will first want to back it up with a backup tool [4].
Then move the resulting files, including a dump of the database, to the local computer and unpack them into a folder named my_drupal_backup. Next, retrieve the configuration files offered by Amazon for Elastic Beanstalk for php-drupal from GitHub:
wget https://github.com/aws-samples/eb-php-drupal/releases/download/v1.1/eb-php-drupal-v1.zip
Use these to overwrite the previously unpacked files in the my_drupal_backup directory. This also puts the beanstalk-settings.php file in the folder. It contains entries for the database access data defined in Table 2.
In addition, a hidden folder named .ebextensions also ends up in the Drupal backup folder. It contains configuration files that provide additional resources for the Elastic Beanstalk environment. You need to edit two of them. In .ebextension/dev.config, restrict access to the IP address during Drupal installation. Replace the MyIP entry with the IP address of the EC2 instance created in Elastic Beanstalk.
The configuration file under .ebextension/efs-create.config creates an Elastic Filesystem (EFS) and mount points in each AZ and subnet in the Virtual Private Cloud (VPC) [5]. You can look up the VPCs and subnet IDs used in Amazon's VPC console.
If you have changed the files, pack the corresponding directory my_drupal_backup into a zip file, upload it to Beanstalk, and prepare it for deployment (Figure 5).
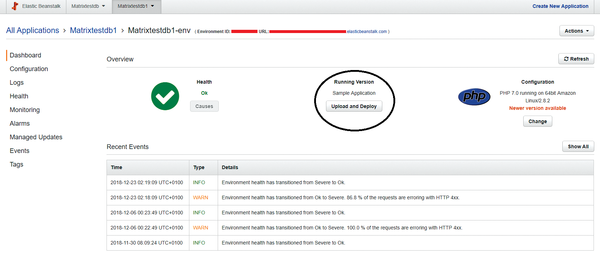 Figure 5: The bundled components are dumped into a zip file and uploaded into the Amazon cloud.
« Previous 1 2 3 Next »
Buy this article as PDF
(incl. VAT)
Buy ADMIN Magazine
US / Canada
UK / Australia
Related content
-
Elastic Beanstalk
A quick and easy way to deploy and manage apps in an AWS cloud.
-
AWS Elastic Beanstalk
 A quick and easy way to deploy and manage apps in an AWS cloud.
 -
Integrating AWS Cloud Services with Your Custom Apps
The Boto Python module helps admins manage resources in the Amazon Cloud. We introduce you to the tool.
-
Controlling Amazon Cloud with Boto
 The Boto Python module helps admins manage resources in the Amazon Cloud. We introduce you to the tool.
 -
Real World AWS for Everyone
 Sure you've heard about Amazon Web Services, but have you tried it? This article shows how to configure a web server and mirrored back-end database for a small-to-midsized business environment.
Subscribe to our ADMIN Newsletters
Subscribe to our Linux Newsletters
Find Linux and Open Source Jobs
Most Popular
Support Our Work
ADMIN content is made possible with support from readers like you. Please consider contributing when you've found an article to be beneficial.
