« Previous 1 2 3 4 Next »
Simplify your migration from Docker to Podman
Contained
systemd and Compose
Docker and Podman also differ in terms of container life cycle management. Because it lacks a daemon, Podman largely relies on systemd. Moreover, Podman can generate systemd service files from the running containers, which means you can let systemd manage your containers when you need to start, stop, and check on various services. Docker internally relies on the daemon to handle all of these tasks.
In terms of orchestration, Docker users generally rely on Docker Compose for local development because it makes it easy to define and manage multicontainer applications; Podman has a similar tool in the form of Podman Compose. Do not forget the pods themselves, which are based on an idea in Kubernetes that lets you manage a container group as a single unit. As far as deployment is concerned, Podman does not have an alternative to Docker Swarm; instead, it relies on external orchestration systems such as Kubernetes.
GUI and Dashboard
To simplify working with containers, the Red Hat development team announced the completion of Podman Desktop [2] in May 2023. Based on Docker Desktop, this environment also facilitates the handling of different types of containers. Podman Desktop also comes with a graphical interface to help you work seamlessly with containers and Kubernetes in a local environment, building a convenient bridge to Kubernetes environments.
The desktop environment comes with a clear-cut dashboard for interacting with and managing containers, images, and pods. You can also run Kubernetes objects locally with Podman or in local Kubernetes clusters, which allows for a seamless transition from development to deployment.
You also need to know that Podman and Docker are not necessarily mutually exclusive. On the contrary, Podman Desktop, for example, works with various container engines, including Docker. The developers describe Podman Desktop as a "multi-engine UI tool" [3]. More precisely, the tool is compatible with the Docker and Podman APIs, which means you can use all of the containers and images belonging to the different engines in parallel, making it easier to migrate from Docker to Podman as a useful side effect.
Getting Started
Podman Desktop is available for macOS, Linux, and Windows in the download area of the project website, with DMG packages for Mac systems, Flatpak packages for Linux computers, and an installer and a portable environment for Windows users. WinGet-based installation is also possible. If you opt for the installer version, the setup wizard offers to set up the Compose extension and the kubectl command-line interface in addition to Podman.
After installing Podman Desktop, you can set about creating your first Podman machine. On macOS and Windows, a Linux virtual machine is required to run the Podman container engine. If Podman is not already installed, you can go to the Resources menu and follow the Setup link. Podman Desktop checks whether Podman is installed. If not, press Next .
After installing Podman, you can immediately start creating your first Podman machine by assigning it a name in the Create a Podman machine box (Figure 1). Root privileges are assigned by default if the Machine with root privileges box is checked: You will want to change this setting. Now press Create to create the container. The User mode networking option lets you forward the guest's data traffic to the host by way of a userspace process. Setting this option to true ensures that virtual private networks evaluate all data traffic from the Podman system as originating from the host and avoids the risk of unwanted blocking.
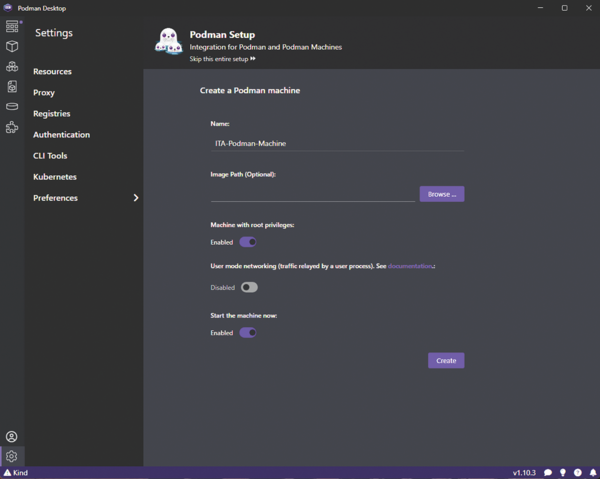 Figure 1: Creating an initial Podman machine with the desktop environment.
If you want to launch the machine immediately after creating it, choose the Enabled option. Finally, click Create to create the container. The new machine now appears on the dashboard. If you switch to the terminal window, you can use the
podman machine list
command to display a list of Podman machines.
To access containers, pods, images, and extensions, use the menubar on the left-hand side of the Podman Desktop window. In a fresh installation, all of these sections begin empty. To retrieve an initial image, go to the Images menu, specify the desired image, and press Pull (Figure 2). Podman Desktop displays a success message after the download. You will then find the new image in the Images menu. You can view the details of an image by clicking on the entry for the image. Besides a summary, Podman Desktop shows the history and details of the image in JSON format. You can also launch the image from the overview.
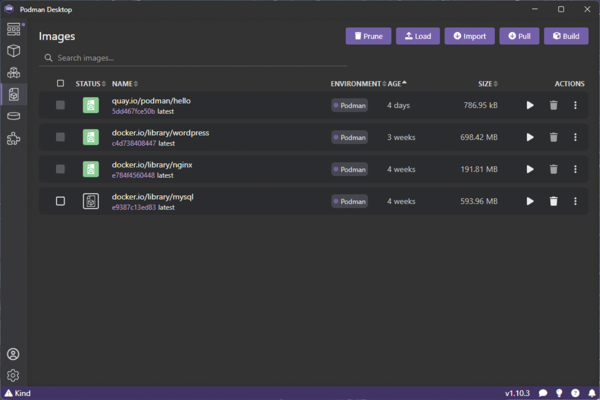 Figure 2: After downloading various images, you can create a matching container with just a couple of mouse clicks.
After pressing the Start button, the tool shows various tabs for configuring the container from the underlying image file. On the Basic tab, you can do such things as specify the access point and configure the port mappings and the container name. The settings in the Networking tab let you specify a hostname. Clicking on Start Container executes the configuration, which generates a matching entry in the Container menu, and you can view the logs on the Logs tab.
All of the container information, including information on the image you used, can be found on the Inspect tab. The Kube tab takes you to the Kubernetes YAML manifest file that the container uses. If you want to pass commands into the container, go to the Terminal tab to do so.
« Previous 1 2 3 4 Next »
Buy this article as PDF
(incl. VAT)
Buy ADMIN Magazine
US / Canada
UK / Australia
Related content
-
Docker and Podman environments on Windows and Mac machines
 Develop container applications on a Windows or Mac system with Docker Desktop or Podman.
 -
Managing containers with Podman
 The Podman container management tool does not use a daemon in the background, like its counterpart Docker, and can operate in non-privileged mode.
 -
Run rootless Podman containers as systemd services
 Running rootless containers is easy with Podman. With Podman Quadlet files, these containers are seamlessly integrated into systemd services.
 -
Integrating Podman and systemd
 With the integration of Podman and systemd, you can put any software inside a container under the control of systemd and see almost no difference between running the service directly on the host or inside a container.
 -
OCI containers with Podman
 The Podman alternative to Docker is a daemonless container engine with a run time that executes on request in root or user mode.