« Previous 1 2
An IP-based load balancing solution
Exploring Piranha
Configuring the Piranha Infrastructure
Piranha [3] is a clustering product from Red Hat that is based on the LVS concept. It includes the IPVS kernel code, cluster monitoring tool and web-based cluster configuration tool. The Piranha monitoring tool has two main features:
- Heartbeating between active and backup load balancers.
- Checking availability of the services on each of real servers.
Configuring the Piranha infrastructure starts with a decision about your design approach. Although a single LVS router can be a good starting point , it is very important to start with cluster of two LVS routers. If you start with two LVS routers, one of them would be active LVS router, while the second one would remain passive all the time. The whole Piranha infrastructure comprises two LVS routers (active/passive cluster configuration ) and two web servers; it is shown in Figure 2.
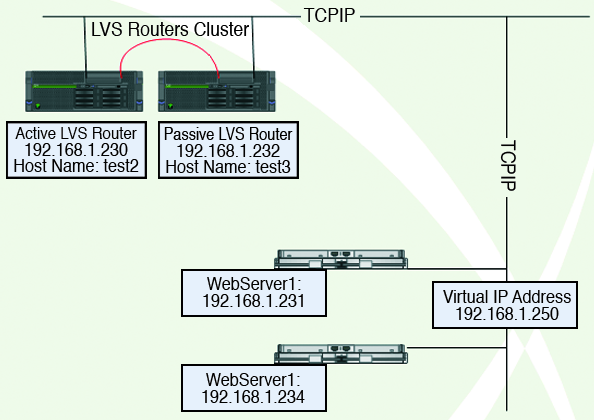 Figure 2: The Piranha infrastructure.
It is also important to understand the entire infrastructure from daemons' point of view, because some unique daemons are running on the LVS routers as well as the real servers, which are constantly communicating with each other to guarantee proper load balancing and high availability. These components are shown logically in Figure 3.
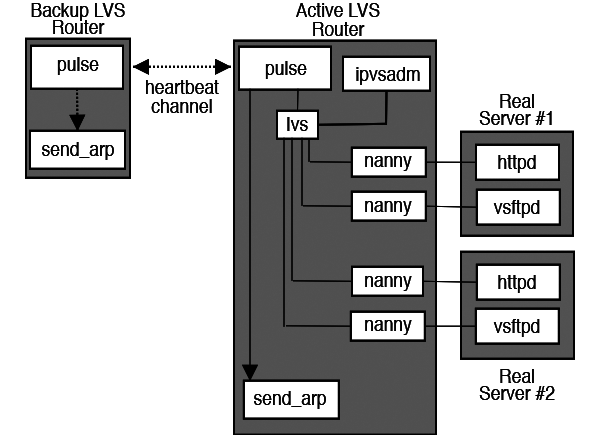 Figure 3: LVS routers.
A basic requirement of a Piranha infrastructure is that all servers, including real servers and primary/secondary load balancers, should be able to ping each other by name.
Now, you can begin configuration with your primary Piranha server. This server will actually act as the primary or active LVS router. Also, the whole Piranha configuration must be done on this server. You can start with installation of two major RPMs (RPMs belonging to Piranha and LVS configuration, piranha-0.8.4-16.el5.i386.rpm and ipvsadm-1.24-10.i386.rpm) using the yum command as shown in Figure 4.
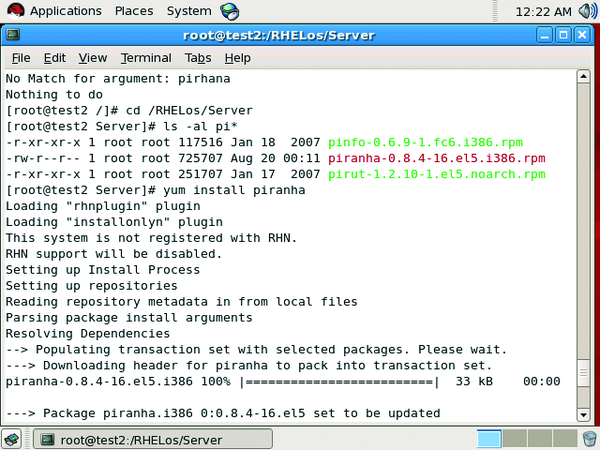 Figure 4: Installing with yum.
On the backup LVS router, you can repeat the same installation procedure for both RPMs.
For the LVS router to forward network packets properly to the real servers, each LVS router node must have IP forwarding turned on in the kernel. To do this, log in as root user on both LVS routers and change the line in /etc/sysctl.conf to the following:
net.ipv4.ip_forward = 1
The original value is usually 0. The changes take effect when you reboot the system.
You can start the piranha-gui service on the primary load balancing server, while the pulse service must be restarted on both LVS routers. After you start the pirhana-gui service on primary LVS router, you can log in to the piranha-gui through the web browser.
To start, go to the Redundancy tab to choose a cluster of LVS routers. Next, go to the Global Settings tab. In this tab, the choice for Network Type is important. For most of implementations, default direct routing works fine, but in some cases NAT could also be a choice. For this configuration, the choice of "direct routing" is sufficient (Figure 5).
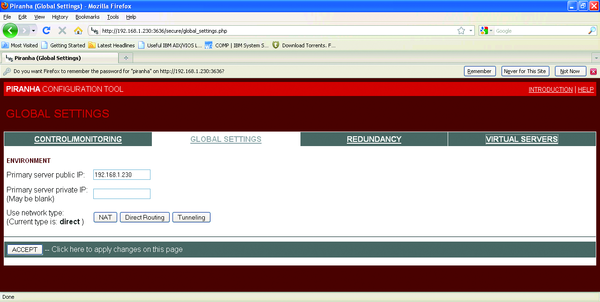 Figure 5: Choosing the network type.
Then, make sure that all real servers (in this case webserver1 and webserver2 ) are resolved by name from the primary and secondary LVS router servers and add definitions of both real servers by editing the Virtual Servers tab shown in Figure 6.
 Figure 6: Defining the real servers.
Both real web servers are defined with a weight value of 1.
Now, you are almost done with the initial configuration. As a last step, you can review the lvs.cf file on your primary piranha server, which should appear something like Listing 1. (I selected round-robin as the scheduling algorithm to do load balancing between web servers.)
Listing 1
lvs.cf File
01 serial_no = 40
02 primary = 192.168.1.230
03 service = lvs
04 backup_active = 1
05 backup = 192.168.1.232
06 heartbeat = 1
07 heartbeat_port = 539
08 keepalive = 6
09 deadtime = 18
10 network = direct
11 debug_level = NONE
12 monitor_links = 1
13 syncdaemon = 1
14 virtual webs.test.com {
15      active = 1
16      address = 192.168.1.250 eth0:0
17      vip_nmask = 255.255.255.0
18      port = 80
19      send = "GET / HTTP/1.0\r\n\r\n"
20      expect = "HTTP"
21      use_regex = 0
22      load_monitor = rup
23      scheduler = rr
24      protocol = tcp
25      timeout = 6
26      reentry = 15
27      quiesce_server = 1
28      server webserver1 {
29          address = 192.168.1.240
30          active = 1
31          weight = 1
32      }
33      server webserver2 {
34          address = 192.168.1.231
35          active = 1
36          weight = 1
37      }
38 }
You can then synchronize the lvs.cfary piranha server using the scp command and then restart the pulse service on both servers (service pulse start). Please note that, at this stage, you may see your virtual services in "down" status, but that is expected because real web servers have yet to be configured.
Once you're are done with LVS routers configuration, you can proceed to the configuration of real servers. In this case, these are just normal web servers that serve critical PHP applications.
Because you will put the same virtual IP address as an alias of Ethernet interfaces on each real web server, it's important to configure arptables-related parameters on both of these servers. That way, any ARP requests for the virtual IP are ignored entirely by the real servers, and any ARP packets that might otherwise be sent containing the virtual IPs are mangled to contain the real server's IP instead of the virtual IP.
To configure each real server to ignore ARP requests for each virtual IP address, perform the following steps on each real web server. To begin, install the arptables-related RPM on each real web server:
#/home/root> rpm - i arptables_jf- 0.0.8- 8.i386.rpm
warning: arptables_jf- 0.0.8- 8.i386.rpm: Header V3 DSA signature: NOKEY, key ID 37017186
Then, execute the arptables command on both real web servers to drop and mangle ARP requests for virtual IPs as shown in Figure 7.
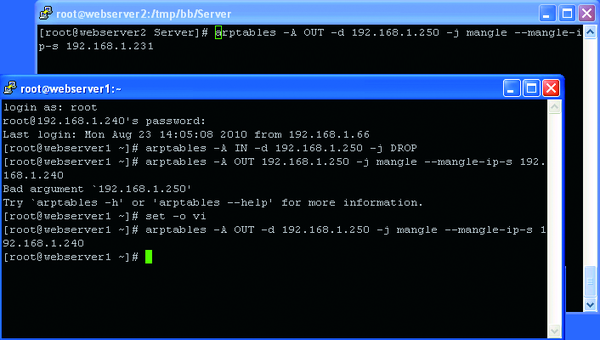 Figure 7: Configuring arptables.
Once the arptables-related configuration has been completed on each real server, the ARP table entries must be saved by typing the following commands on each real server:
service arptables_jf save
chkconfig - - level 2345 arptables_jf on
Finally, put an IP alias of 192.168.1.250 on the Ethernet interfaces of both web servers. This can be done on a temporary basis using the ifconfig command as shown in Figure 8.
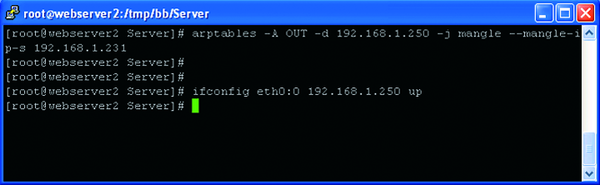 Figure 8: IP aliasing with ipconfig.
As a final step, you will configure Apache servers on these real servers using the virtual server directive in apache.conf. Now, if you go to the Piranha web interface, you should see all green status. Your virtual server will be up, and both real servers will show an "up" status (Figure 9).
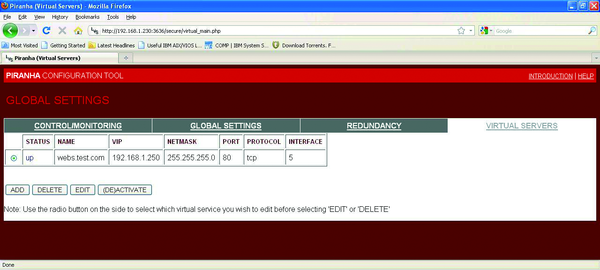 Figure 9: Up status of virtual servers.
Test Scenarios
Once the servers are successfully up and running, you can begin testing. The first test is to try to load a web page from these web servers. As more and more page requests go to the IP load balancer, it will automatically balance requests between the two web servers (round-robin fashion), as shown in Figure 10.
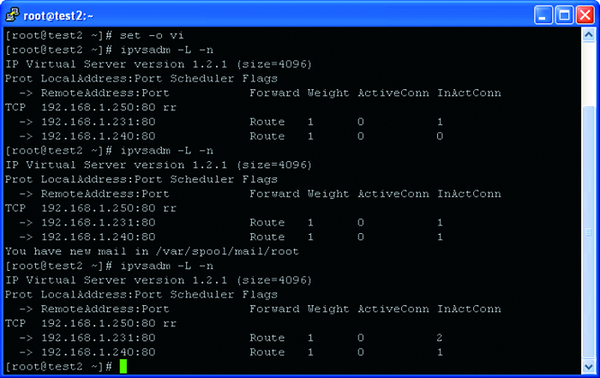 Figure 10: Balancing requests between web servers.
To begin testing, shut down one of the web servers. As soon as you shut down one web server, the IP load balancer will start serving all web page requests from other surviving web server as shown in Figure 11.
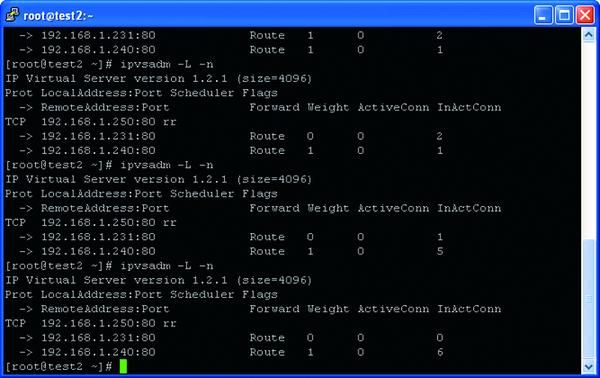 Figure 11: Routing requests to the surviving web server.
Next, shut down the primary LVS router server. It was expected that the backup LVS router would come into action and that I would get access to the web servers through the secondary LVS router. And, this was exactly the behavior I observed. It is worth noting that when using ruptime as the load monitor, I faced a lot of issues including non-availability of websites when the primary LVS router was down; however, when I switched to simple rup as the load monitoring program, everything went fine, and I was able to access the web application through web servers although the primary LVS router was down.
Summary
Because Piranha has been adopted as the IP load balancing software by Red Hat Enterprise Linux, you can look forward to increased maturity and reliability in future Piranha versions. At present, although some performance issues exist with this load balancing software, it has lot of potential that is worth being explored by system administrators.
« Previous 1 2
Buy ADMIN Magazine
US / Canada
UK / Australia
Related content
-
Software instead of appliances: load balancers compared
 We introduce the most important software load balancers, look at their strengths and weaknesses, and provide recommendations for use scenarios.
 -
High Availability without Pacemaker
 Managing your cluster could be so simple if it weren't so complicated. The object of many an admin's wrath in such cases is often a single component: Pacemaker. Luckily, other open source tools offer alternative options for high availability.
 -
High availability for RESTful services with OpenStack
 Admins can select from a cornucopia of options to make HTTP-based RESTful services highly available.
 -
MariaDB MaxScale: A smart proxy for MySQL
 MaxScale by MariaDB is a smart proxy server for MySQL that speaks the same protocol as the database server. The manufacturer claims solid high availability and horizontal scalability.
 -
Network load balancing on Windows Server
 Setting up and making the most of network load balancing on Windows Server 2019 and 2022.