Figure 3
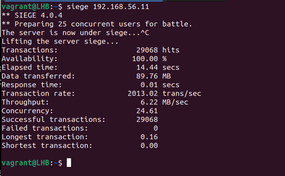
Figure 3: Running Siege against a single target.
Figure 3: Running Siege against a single target.