
High-performance computing begins with understanding what you are trying to achieve, the assumptions you make to get there, and the resulting boundaries and limitations imposed on you and your HPC system.
The Fundamentals of Building an HPC Cluster
The King in Alice in Wonderland said it best, “Begin at the beginning ….” The general goal of HPC is either to run applications faster or to run problems that can’t or won’t run on a single server. To do this, you need to run parallel applications across separate nodes. Although you could use a single node and then create two VMs, it’s important to understand how applications run across physically different servers and how you administer a system of disparate physical hardware.
With this goal in mind, you can make some reasonable assumptions about the HPC system. If you are interested in parallel computing using multiple nodes, you need at least two separate systems (nodes), each with its own operating system (OS). To keep things running smoothly, the OS on both nodes should be identical. (Strictly speaking, it doesn’t have to be this way, but otherwise, it is very difficult to run and maintain.) If you install a package on node 1, then it needs to be installed on node 2 as well. This lessens a source of possible problems when you have to debug the system.
The second thing your cluster needs is a network to connect the nodes so they can communicate to share data, the state of the solution to the problem, and possibly even the instructions that need to be executed. The network can theoretically be anything that allows communication between nodes, but the easiest solution is Ethernet. In this article, I am initially going to consider a single network, but later I will consider more than one.
Storage in each node can be as simple as an SD card to hold the OS, the applications, and the data. In addition to some basic storage, and to make things a bit easier, I’ll create a shared filesystem from the master node to the other nodes in the cluster.
The most fundamental HPC architecture and software is pretty unassuming. Most distributions have the basic tools for making a cluster work and for administering the tools; however, you will most likely have to add the tools and libraries for the parallel applications (e.g., a message-passing interface [MPI] library or libraries, compilers, and any additional libraries needed by the application). Perhaps surprisingly, the other basic tools are almost always installed by default on an OS; however, before discussing the software, you need to understand the architecture of a cluster.
Architecture
The architecture of a cluster is pretty straightforward. You have some servers (nodes) that serve various roles in a cluster and that are connected by some sort of network. That’s all. It’s that simple. Typically the nodes are as similar as possible, but they don’t have to be; however, I highly recommend that they be as similar as possible because it will make your life much easier. Figure 1 is a simple illustration of the basic architecture.
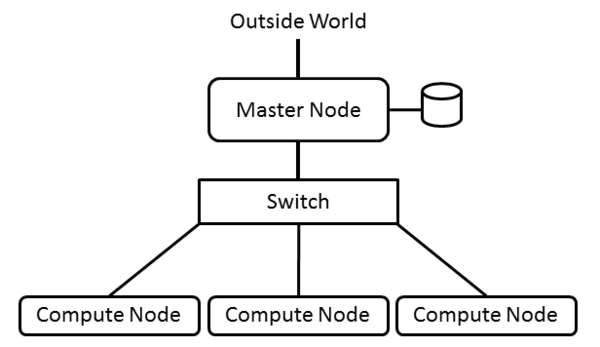 Figure 1: Generic cluster layout.
Almost always you have a node that serves the role of a “master node” (sometimes also called a “head node”). The master node is the “controller” node or “management” node for the cluster. It controls and performs the housekeeping for the cluster and many times is the login node for users to run applications. For smaller clusters, the master node can be used for computation as well as management, but as the cluster grows larger, the master node becomes specialized and is not used for computation.
Other nodes in the cluster fill the role of compute nodes, which describes their function. Typically compute nodes don’t do any cluster management functions; they just compute. Compute nodes are usually systems that run the bare minimum OS – meaning that unneeded daemons are turned off and unneeded packages are not installed – and have the bare minimum hardware.
As the cluster grows, other roles typically arise, requiring that nodes be added. For example, data servers can be added to the cluster. These nodes don’t run applications; rather, they store and serve data to the rest of the cluster. Additional nodes can provide data visualization capabilities within the cluster (usually remote visualization), or very large clusters might need nodes dedicated to monitoring the cluster or to logging in users to the cluster and running applications.
For a simple two-node cluster that you might use as your introduction to HPC, you would typically designate one master node and one compute node. However, because you only have two nodes, applications would most likely run on both – because why waste 50% of your nodes?
The network connecting the cluster nodes could be any networking technology, but the place to start is with wired Ethernet, which ranges from 100Mbps to 56Gbps; however, I’ll stick to the more common Fast Ethernet (100Mbps) or Gigabit Ethernet (1,000Mbps).
The network topology you use for clusters is important because it can have an effect on application performance. If you are just starting out, I would stick to the basics. A simple network layout has a single switch with all nodes plugged in to that switch. This setup, called a fat tree topology, has only one level and is simple and effective, particularly when building smaller systems. As systems get larger, you can still stick to the fat tree topology, but you will likely have to have more levels of switches. If you re-use your existing switches, design the topology carefully so you don’t introduce bottlenecks.
For smaller systems, Ethernet switches are pretty inexpensive, costing just a few dollars per port. Switches are going to be better than an Ethernet hub, but if all you have is a hub, then you can use it. Although hubs will limit performance, it won’t stop the cluster from working.
Because you’re interested in “high performance,” you want to do everything possible to keep the cluster network from reducing performance. A common approach is to put the cluster on a private Ethernet network. The address space is unroutable, so the compute nodes will effectively be “hidden” from a routable network, allowing you to separate your cluster logically from a public network.
However, a good idea would be to log in to the cluster from a public network, and the way to do that when the cluster is on a private network is to add a second network interface controller (NIC) to the master node. This NIC will have a public IP address that allows you to log in to the cluster. Only the master node should have the public IP address, because there is no reason for compute nodes to have two addresses. (You want them to be private.) For example, you can make the public address for the master node something like 72.x.x.x and the private address something like 10.x.x.x. The order of the network interfaces doesn’t make a huge difference, but you have to pay attention to them when installing the OS.
You can give the master node two private addresses if you are behind a network address translator (NAT). This configuration is very common in home routers, which are also NAT devices. For example, in my home network, I have an Internet router that is really a NAT. It converts packets from a private network, such as 192.168.x.x, to the address of the router (the Internet) and vice versa. My simple clusters have a master node with a public IP of 192.168.x.x, and they have a second NIC with an address of 10.x.x.x, which is the cluster’s private network.
Another key feature of a basic cluster architecture is a shared directory across the nodes. Strictly speaking this isn’t required, but without it, some MPI applications would not run. Therefore, it is a good idea simply to use a shared filesystem in the cluster. NFS is the easiest to use because both server and client are in the kernel, and the distribution should have the tools for configuring and monitoring NFS.
The classic NFS approach to a shared directory is to export a directory from the master node to the compute nodes. You can pick any directory you want to export, but many times, people just share /home from the master node, although sometimes they will also export a new directory, such as /shared. The compute nodes also mount the shared directory as /home. Therfore, if anything in /home is local to each node, it won’t be accessible.
Of course, you can get much fancier and more complicated, and you might have good reasons to do so, but in general you should adopt the KISS (Keep It Simple Silly) approach. Simple means it is easier to debug problems. Simple also means it’s easier to reconfigure the cluster if you want (or need). With the architecture established, I’ll turn to the software you’ll need.
Software Layers
Unfortunately, no single secret magic pixie dust can be sprinkled on a cluster to make it work magically and run applications in parallel. It takes careful thought and planning to operate a set of separate systems as a single system. This is especially true for the cluster software.
This article is really about the basics of HPC, so I want to start with the basic software you need to run parallel applications. However, additional tools can be added to make operating the cluster much easier for the administrator, as well as tools to make life easier for people using the cluster. Rather than just provided yet another list of these tools, I want to present them in three layers. The first layer is the basic software you need and really nothing extra. The second layer adds some administrative tools to make it easier to operate the cluster, as well as tools to reduce problems when running parallel applications. The third layer adds more sophisticated cluster tools and adds the concept of monitoring, so you can understand what’s happening.
Layer 1: Software Configuration
The first layer of software only contains the minimum software to run parallel applications. Obviously, the first thing you need is an OS. Typical installation options are usually good enough. They install most everything you need.
The next thing you need is a set of MPI libraries such as Open MPI or MPICH. These are the libraries you will use for creating parallel applications and running them on your cluster. You can find details on how to build and install them on their respective websites.
Each node has to have the same libraries for the MPI applications to run. You have two choices at this point: build, install, and set up the appropriate paths for the libraries in your shared directory or build and install the libraries on each node individually. The easiest choice is to install the source packages in the shared directory.
The next, and actually last, piece of software you need is SSH. More specifically, you need to be able to SSH to and from each node without a password, allowing you to run the MPI applications easily. Make sure, however, that you set up SSH after you have NFS working across the cluster and each node has mounted the exported directory.
In addition to NFS across the cluster, you need the same users and groups on the nodes. Because you have to create the same user on every node (recall that the OS is specific to each node), this can be a monumental pain if you have a few thousand nodes.
Running applications with this configuration is not too difficult because the nodes have a shared directory. Note also that you can have more than one shared directory. I’ll assume that you will compile your MPI application on your master node in your home directory (e.g., /home/laytonjb/bin/<app>, where <app> is the executable. The directory /home, can be shared across the cluster so that each node can access the application and the same input and output files (presumably the input and output files are in the shared directory).
As the application starts, SSH is used to communicate between MPI ranks (the MPI processes). Because you can SSH without using passwords, the application should run without problems. The details of running your MPI application depends on your MPI library, which typically provides a simple script or small executable to run the application.
This software configuration is the bare minimum to allow you to run applications. Even then you might have some issues, but with some careful consideration you should be able to run applications.
Layer 2: Architecture and Tools
The next layer of software adds tools to help reduce cluster problems and make it easier to administer. Using the basic software mentioned in the previous section, you can run parallel applications, but you might run into difficulties as you scale your system, including:
- Running commands on each node (parallel shell)
- Configuring identical nodes (package skew)
- Keeping the same time on each node (NTP)
- Running more than one job (job scheduler/resource manager)
These issues arise as you scale the cluster, but even for a small two-node cluster, they can become problems.
First, you need to be able to run the same command on every node, so you don’t have to SSH to each and every node. One solution would be to write a simple shell script that takes the command line arguments as the “command” and then runs the command on each node using SSH. However, what happens if you only want to run the command on a subset of the nodes? What you really need is something called a parallel shell.
A number of parallel shell tools are available, and the most common is pdsh, which lets you run the same command across each node. However, simply having a parallel shell doesn’t mean the cluster will magically solve all problems, so you have to develop some procedures and processes. More specifically, you can use a parallel shell to overcome the second issue: package skew.
Package skew can cause lots of problems for HPC admins. If you have an application that runs fine one day, but try it again the next day and it won’t run, you have to start looking for reasons why. Perhaps during the 24-hour period, a node that had been down suddenly comes back to life, and you start running applications on it. That node might not have the same packages or the same versions of software as the other nodes. As a result, applications can fail, and they can fail in weird ways. Using a parallel shell, you can check that each node has the package installed and that the versions match.
To help with package skew, I recommend after first building the cluster and installing a parallel shell you start examining key components of the installation. For example, check the following:
- glibc version
- GCC version
- GFortran version
- SSH version
- Kernel version
- IP address
- MPI libraries
- NIC MTU – Use ifconfig
- BogoMips – Although this number is meaningless, it should be the same across nodes if you are using the same hardware. To check this number, enter:
cat /proc/cpuinfo | grep bogomips
- Nodes have the same amount of memory (if they are identical):
cat /proc/meminfo | grep MemTotal
Many more package versions or system information can be checked, which you can store in a spreadsheet for future reference. The point is that doing this at the very beginning and then developing a process or procedure for periodically checking the information is important. You can quickly find package skew problems as they occur and correct them.
I also recommend keeping a good log so that if a node is down when you install or update packages, you can come back to it when the node is back up. Otherwise, you start getting package skew in your nodes and subsequent problems.
The third issue to overcome is keeping the same time on each node. The Network Time Protocol synchronizes system clocks. Most distributions install ntp by default and enable it, but be sure you check for it in each node in the cluster – and check the version of ntpd as well.
Use chkconfig, if the distribution has this package, to check that ntp is running. Otherwise, you will have to look at the processes running on the nodes to see whether ntpd is listed (hint – use your parallel shell). Configuring NTP can be a little tricky, because you have to pay attention to the architecture of the cluster.
On the master node, make sure that the NTP configuration file points to external servers (outside the cluster) and that the master node can resolve these URLs (try using either ping to ping each server or nslookup). Also be sure the ntpd daemon is running.
For nodes that are on a private network that doesn’t have access to the Internet, you should configure NTP to use the master node as the timekeeper. This can be done by editing /etc/ntp.conf and changing the NTP servers to point to the master node’s IP address. Roughly, it should look something like Listing 1. The IP address of the master node is 10.1.0.250. Be sure to check that the compute nodes can ping this address. Also be sure that ntp starts when the nodes are booted.
[root@test1 etc]# more ntp.conf
# For more information about this file, see the man pages
# ntp.conf(5), ntp_acc(5), ntp_auth(5), ntp_clock(5), ntp_misc(5), ntp_mon(5).

#driftfile /var/lib/ntp/drift

restrict default ignore
restrict 127.0.0.1
server 10.1.0.250
restrict 10.1.0.250 nomodify
The last issue to address is the job scheduler (also called a resource manager). This is a key element of HPC and can be used even for small clusters. Roughly speaking, a job scheduler will run jobs (applications) on your behalf when the resources are available on the cluster, so you don’t have to sit around and wait for the cluster to be free before you run applications. Rather, you can write a few lines of script and submit it to the job scheduler. When the resources are available, it will run your job on your behalf. (Resource managers allow HPC researchers to actually get some sleep.)
In the script, you specify the resources you need, such as the number of nodes or number of cores, and you give the job scheduler the command that runs your application, such as:
mpirun -np 4 <executable>
Among the resource managers available, many are open source, and they usually aren’t too difficult to install and configure; however, be sure you read the installation guide closely. Examples of resource managers include:
With these issues addressed, you now have a pretty reasonable cluster with some administrative tools. Although it’s not perfect, it’s most definitely workable. However, you can go to another level of tools, which I refer to as the third layer, to really make your HPC cluster sing.
Layer 3: Deep Administration
The third level of tools gets you deeper into HPC administration and begins to gather more information about the cluster, so you can find problems before they happen. The tools I will discuss briefly are:
- Cluster management tools
- Monitoring tools (how are the nodes doing)
- Environment Modules
- Multiple networks
A cluster management tool is really a toolkit to automate the configuration, launching, and management of compute nodes from the master node (or a node designated a master). In some cases, the toolkit will even install the master node for you. A number of open source cluster management tools are available, including:
Some very nice commercial tools exist as well.
The tools vary in their approach, but they typically allow you to create compute nodes that are part of the cluster. This can be done via images, in which a complete image is pushed to the compute node, or via packages, in which specific packages are installed on the compute nodes. How this is accomplished varies from tool to tool, so be sure you read about them before installing them.
The coolest thing about these tools is that they remove the drudgery of installing and managing compute nodes. Even with four-node clusters, you don’t have to log in to each node and fiddle with it. The ability to run a single command and re-install identical compute nodes can eliminate so many problems when managing your cluster.
Many of the cluster management tools also include tools for monitoring the cluster. For example, being able to tell which compute nodes are up or down or which compute nodes are using a great deal of CPU (and which aren’t) is important information for HPC administrators. Monitoring the various aspects of your nodes, including gathering statistics on the utilization of your cluster can be used when it’s time to ask the funding authorities for additional hardware, whether it be the household CFO, a university, or an agency such as the National Science Foundation. Regardless of who it is, they will want to see statistics about how heavily the cluster is being used.
Several monitoring tools are appropriate for HPC clusters, but a universal tool is Ganglia. Some of the cluster tools come pre-configured with Ganglia, and some don’t, requiring an installation. By default Ganglia comes with some pre-defined metrics, but the tool is very flexible and allows you to write simple code to attain specific metrics from your nodes.
Up to this point, you have the same development tools, the same compilers, the same MPI libraries, and the same application libraries installed on all of your nodes. However, what if you want to install and use a different MPI library? Or what if you want to try a different version of a particular library? At this moment you would have to stop all jobs on the cluster, install the libraries or tools you want, make sure they are in the default path, and then start the jobs again. This process sounds like an accident waiting to happen. The preventive is called environment modules.
Originally, environment modules were developed to address the problem of having applications that need different libraries or compilers by allowing you to modify your user environment dynamically with module files. You can load a module file that specifies a specific MPI library or makes a specific compiler version the default. After you build your application using these tools and libraries, if you run an application that uses a different set of tools, you can “unload” the first module file and load a new module file that specifies a new set of tools. It’s all very easy to do with a job script and is extraordinarily helpful on multiuser systems.
Lmod is a somewhat new version of environment modules that addresses the need for module hierarchies (in essence, module dependencies) so that a single module “load” command can load a whole series of modules. Lmod currently is under very active development.
Up to now I have assumed that all traffic in the cluster, including administration, storage, and computation, use the same network. For improved computational performance or improved storage performance, though, you might want to contemplate separating the traffic into specific networks. For example, you might consider a separate network just for administration and storage traffic, so that each node has two private networks: one for computation and one for administration and storage. In this case, the master node might have three network interfaces.
Separating the traffic is pretty easy by giving each network interface (NIC) in the node an IP address with a different address range. For example, eth0 might be on a 10.0.1.x network, and eth1 on 10.0.2.x network. Although theoretically you could give all interfaces an address in the same IP range, different IP ranges just make administration easier. Now when you run MPI applications, you use addresses in 10.0.1.x. For NFS and any administration traffic, you would use addresses in 10.0.2.x. In this way, you isolate computational traffic from all other traffic.
The upside to isolating traffic is additional bandwidth in the networks. The downside is twice as many ports, twice as many cables, and a little more cost. However, if the cost and complexity isn’t great, using two networks while you are learning cluster administration, or even writing applications, is recommended.
Summary
Stepping back to review the basics is a valuable exercise. In this article I wanted to illustrate how someone could get started creating their own HPC system. If you have any comments, post to the Beowulf mailing list. I’ll be there, as will a number of other people who can help.