
Cloud computing has become a viable option for high-performance computing. In this article, we discuss the use case for cloud-based HPC, introduce the StarCluster toolkit, and show how to build a custom machine image for compute nodes.
HPC in the Cloud with StarCluster
Virtualization has come a long way. So far, in fact, that it has become a viable option for high-performance computing (HPC) in the cloud.
StarCluster is a toolkit for launching, controlling, and orchestrating clusters of virtual servers within the Amazon Elastic Compute Cloud (EC2) service. The target audience for the StarCluster toolkit is scientists and researchers with a need for cluster computing power. That need may be for parallel computing, data processing tasks in batch jobs, running many iterations of a simulation model, or training and educational purposes.
The toolkit is presented as an easy-to-use command-line tool. Written in the Python language, it utilizes the boto API, an interface to Amazon Web Services (AWS), of which EC2 is a subset. StarCluster supports a variety of different machine image types, including DEB-based and RPM-based Linux images. In this article, I show how to set up a cloud-based HPC cluster using the StarCluster toolkit and build a custom OS image. You can use the Amazon Web Services Free Usage tier to get started and to complete the examples shown in this article.
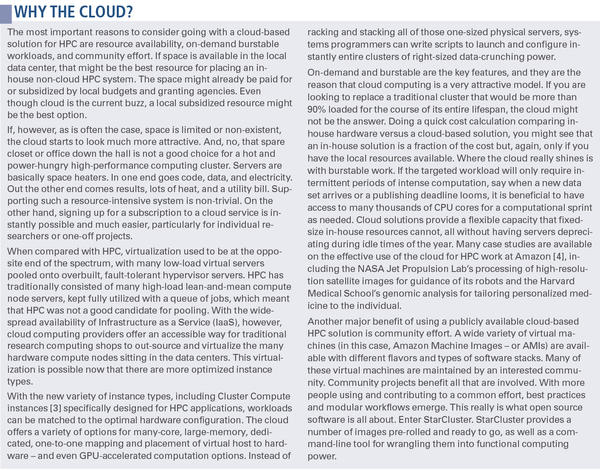
Why use the cloud for HPC? Most of the default arguments for using cloud computing apply. Cloud computing is the next level of abstraction, allowing for the programmable out-sourcing of the data center. What would traditionally be a locally managed room, full of physical hardware with a three- to five-year life cycle, situated within a managed facility that provides electricity and cooling, is now available through a programmable API. This allows systems administrators and programmers to focus on what they do best, empowering the researchers by providing customized and tweaked user environments. No more receiving freight deliveries and doing heavy lifting. No more chasing amber lights on failed hard drives. No more calling in maintenance crews for electrical and cooling issues. All of these logistical complications disappear with the added layer of abstraction provided by a cloud computing service. (See the box titled “Why the Cloud?”)
Introducing StarCluster
StarCluster is a project from the Massachusetts Institute of Technology (MIT), written by the Software Tools for Academics and Researchers (STAR) team. The toolkit is open source and freely available for download. The latest development version is in revision control at GitHub.
A prerequisite to using StarCluster is having an Amazon AWS account. If you don’t have one, go ahead and sign up for the AWS Free Usage tier. Note that AWS is an hourly-based service, and a bill will be incurred for any usage. The example in this article should only be charged a few cents for the use of a small amount of Elastic Block Store (EBS) disk storage. Once you have secured an account, open a terminal on your local Linux system to get started. I am currently using Fedora 17 as my local system, but these steps should work on all recent Linux distributions the same way.
To begin, you will want to create a project directory called starcluster. Then, you can use virtualenv with pip to install automatically the needed Python packages, including StarCluster, into a self-contained environment and subdirectory named cloudhpc (see Listing 1; download code at the Linux Magazine FTP site).
Listing 1: Installing the StarCluster
$ mkdir ~/starcluster ; cd ~/starcluster
$ curl -O https://raw.github.com/pypa/virtualenv/master/virtualenv.py
$ python virtualenv.py cloudhpc
New python executable in cloudhpc/bin/python
Installing setuptools............................done.
Installing pip.....................done.
$ . cloudhpc/bin/activate
$ pip install starcluster
Downloading/unpacking starcluster
...
Successfully installed starcluster ssh boto workerpool Jinja2 decorator pyasn1 pycrypto
Cleaning up...
The first time you run StarCluster, the program will throw an error without a configuration, but it will prompt you to ask about creating one. Select option 2 to create a default config file (Listing 2).
Listing 2: Creating a Configuration
$ starcluster help
StarCluster - (http://web.mit.edu/starcluster) (v. 0.93.3)
Software Tools for Academics and Researchers (STAR)
Please submit bug reports to starcluster@mit.edu

!!! ERROR - config file ~/.starcluster/config does not exist

Options:
--------
[1] Show the StarCluster config template
[2] Write config template to ~/.starcluster/config
[q] Quit

Please enter your selection: 2

>>> Config template written to ~/.starcluster/config
>>> Please customize the config template
Next, edit the config file, setting preferred values. Make sure to substitute your credentials. Here, the config will be for micro instances of 64-bit Scientific Linux 6. Use the text editor of your choice to add the lines in Listing 3 to your ~/.starcluster/config file.
Listing 3: Adding Config Settings
$ nano ~/.starcluster/config
[aws info]
AWS_ACCESS_KEY_ID = YOUR_AWS_Access_Key_ID
AWS_SECRET_ACCESS_KEY = YOUR_Secret_Access_Key
AWS_USER_ID= YOUR_amazon_userid
The GNU nano editor just happens to be the most beginner-friendly command-line editor.
Next, to create an SSH key for remote shell access to the StarCluster cluster nodes, enter the following command:
$ starcluster createkey -o ~/starcluster/foocluster.rsa foocluster
Add your RSA key definition to the config file, while also updating the smallcluster section to specify the t1.micro instance type and your new key (Listing 4).
Listing 4: Specifying Image and Instance Type
$ nano ~/.starcluster/config
[key foocluster]^n
KEY_LOCATION = ~/starcluster/foocluster.rsa
[cluster smallcluster]
KEYNAME = foocluster
NODE_IMAGE_ID = ami-d60185bf
NODE_INSTANCE_TYPE = t1.micro
The micro instances only provide a fraction of a CPU core but are useful for prototyping, testing, and helping you stay within the free usage tier. The machine image ami-d60185bf is based on Scientific Linux 6.2. Scientific Linux is a rebuilt version of Enterprise Linux, supported by the national labs and popular in university research.
Now you are ready to start a microcluster of two nodes (Listing 5).
Listing 5: Starting the Microcluster
$ starcluster start -s 2 foocluster
...
>>> Using default cluster template: smallcluster
>>> Validating cluster template settings...
>>> Cluster template settings are valid
>>> Starting cluster...
>>> Launching a 2-node cluster...
...
>>> Configuring cluster took 1.154 mins
>>> Starting cluster took 2.305 mins
...
The first head node in the cluster is referred to as the “master” node. Every node that has a slot in the Grid Engine job queue is referred to as a “worker” node. By default, there will be one slot per CPU core, including cores on the master node. To keep an eye on the currently running instances, use the listclusters option (Listing 6).
Listing 6: Listing Running Clusters
$ starcluster listclusters
...
Uptime: 0 days, 00:04:05
Zone: us-east-1d
Keypair: foocluster
EBS volumes:
    vol-4c048437 on master:/dev/sda (status: attached)
    vol-4f048434 on node001:/dev/sda (status: attached)
Cluster nodes:
    master running i-6a10c710 ec2-50-17-57-111.compute-1.amazonaws.com
    node001 running i-6810c712 ec2-23-20-255-177.compute-1.amazonaws.com
Total nodes: 2
To connect to the command line of the master node via SSH, use the sshmaster option, then take a look at the now-available job queue with the qstat and qhost commands (Listing 7).
Listing 7: Viewing the Queue
$ starcluster sshmaster foocluster -u sgeadmin
[sgeadmin@master ~]$ qstat -g c
CLUSTER QUEUE                   CQLOAD   USED    RES  AVAIL  TOTAL aoACDS  cdsuE
--------------------------------------------------------------------------------
all.q                             0.14      0      0      2      2      0      0
[sgeadmin@master ~]$ qhost
HOSTNAME                ARCH         NCPU  LOAD  MEMTOT  MEMUSE  SWAPTO  SWAPUS
-------------------------------------------------------------------------------
global                  -               -     -       -       -       -       -
master                  linux-x64       1  0.20  590.8M   68.1M  243.2M     0.0
node001                 linux-x64       1  0.08  590.8M   55.3M  243.2M     0.0
The batch-queuing system that manages the jobs here is Grid Engine. Job scripts submitted to the queue will wait for free slots and then execute on the basis of a weighted priority. The status shows that there are now two hosts with one CPU slot each in the all.q job queue. But why leave these CPUs idle? As an example, Listing 8 shows how to use the Monte Carlo method to calculate the value of pi:
$ grep -v local /etc/hosts | cut -d" " -f2 > ~/hostfile
$ nano pi.py
$ mpirun -np 2 -hostfile hostfile python pi.py
3.14192133333
Listing 8: pi.py
01 from mpi4py import MPI
02 import random
03
04 comm = MPI.COMM_WORLD
05 rank = comm.Get_rank()
06 mpisize = comm.Get_size()
07 nsamples = int(6e6/mpisize)
08
09 inside = 0
10 random.seed(rank)
11 for i in range(nsamples):
12     x = random.random()
13     y = random.random()
14     if (x*x)+(y*y)<1:
15         inside += 1
16
17 mypi = (4.0 * inside)/nsamples
18 pi = comm.reduce(mypi, op=MPI.SUM, root=0)
19
20 if rank==0:
21     print (1.0 / mpisize)*pi
Executing mpirun outside of a script does not use the job queue, which is vital when dealing with many jobs efficiently. To use the queue, craft a job script specifying the parallel environment (Listing 9), then submit it with the qsub command:
$ nano pi.sh
$ qsub pi.sh
Listing 9: pi.sh
01 #!/bin/sh
02 # Export all environment variables
03 #$ -V
04 # Your job name
05 #$ -N pi
06 # Use current working directory
07 #$ -cwd
08 # Join stdout and stderr
09 #$ -j y
10 # PARALLEL ENVIRONMENT:
11 #$ -pe orte 2
12 # Enable resource reservation
13 #$ -R y
14 # The max hard walltime for this job is 16 minutes (after this it will be killed)
15 #$ -l h_rt=00:16:00
16 # The max soft walltime for this job is 15 minute (after this SIGUSR2 will be sent)
17 #$ -l s_rt=00:15:00
18 echo "Got $NSLOTS processors."
19 # The mpirun command.
20 mpirun -np $NSLOTS python pi.py
Check the status of the job with the qstat command. The job script will enter the queue in the queued-and-waiting (qw) state, then change to the running (r) state. After the run, the output of the job can be found in the $JOB_NAME.o$JOB_ID file. The module errors can be safely ignored; they refer to a harmless and known bug.
$ qstat
$ cat pi.o1
...Got 2 processors.
3.14192133333
You can monitor the status of all instances in a web browser via the EC2 Management Console. When you are done, make sure to exit and terminate all running instances because billing is based on hourly usage. To do so, enter the following lines:
$ exit
$ starcluster terminate foocluster
...
Terminate EBS cluster foocluster (y/n)? y
Conclusion
The cloud has become a key resource in the support of HPC. Given the proper use case, cloud offerings are an affordable fit for a variety of different workflows. A key tool in any systems programmer’s arsenal should be the StarCluster toolkit, which provides a powerful interface for harnessing these cloud resources in an effective manner. The toolkit builds from the well-established model of HPC clustering with Linux, providing a clear path to transferring existing skills and code to the cloud. To learn more about MIT StarCluster, you can find additional information in the manual and wiki, and see the box titled “Build Log” for more on building your own custom Amazon Machine Image (AMI) compute node.
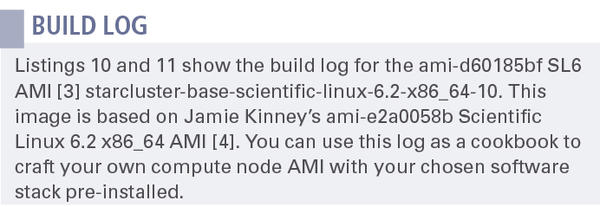
Listing 10: AMI Build Log
$ starcluster start -s 1 foocluster -n ami-999d49f0
$ starcluster get foocluster /opt/sge6-fresh .
$ starcluster terminate foocluster
$ starcluster start -o -s 1 -i t1.micro -n ami-e2a0058b imagehost
$ starcluster listclusters --show-ssh-status imagehost
$ starcluster sshmaster imagehost -u ec2-user
$ sudo sed -i.bak -e's/\#PermitRootLogin\    yes/PermitRootLogin\ without-password/g' /etc/ssh/sshd_config
$ sudo sed -i.bak -e's/\#UseDNS\ yes/UseDNS\ no/g' /etc/ssh/sshd_config
$ sudo cp -f /home/ec2-user/.ssh/authorized_keys /root/.ssh/authorized_keys
$ sudo service sshd reload
$ exit
$ starcluster put imagehost ./sge6-fresh /opt/
$ rsync -e "ssh -i $HOME/starcluster/foocluster.rsa" -avP --delete sge6-fresh -l root ec2-23-23-64-53.compute-1.amazonaws.com:/opt/
$ starcluster sshmaster imagehost
# yum -y install yum-fastestmirror yum-conf-epel
# yum -y update
# yum -y install openmpi-devel nfs-utils-lib-devel java-1.6.0-openjdk-devel tmux zsh ksh tcsh unzip mysql-server mysql httpd emacs ntsysv freetype-devel libpng-devel blas-devel lapack-devel atlas-devel lbzip2 bzip2-devel ncurses-devel sqlite-devel zlib-devel libjpeg-devel mercurial ipython python-imaging python-boto python-virtualenv Cython python-nose python-gnutls python-pip ruby
# echo "exit 0" >> /etc/init.d/portmap
# chmod +x /etc/init.d/portmap
# yum -y groupinstall "Development Tools"
# yum -y install infinipath-psm-devel
# yumdownloader --source openmpi
# rpm --import https://www.redhat.com/security/fd431d51.txt
# yum-builddep openmpi-1.5.4-1.el6.src.rpm
# rpm -ivh openmpi-1.5.4-1.el6.src.rpm
# rpmbuild -bb --define 'configure_options --with-sge' /root/rpmbuild/SPECS/openmpi.spec
# rpm -Uhv /root/rpmbuild/RPMS/x86_64/openmpi-1.5.4-1.el6.x86_64.rpm /root/rpmbuild/RPMS/x86_64/openmpi-devel-1.5.4-1.el6.x86_64.rpm
# echo "exclude=openmpi*" >> /etc/yum.conf
# . /etc/profile.d/modules.sh
# module load openmpi-x86_64
# ompi_info | grep -i grid
  MCA ras: gridengine (MCA v2.0, API v2.0, Component v1.5.4)
# echo "module load openmpi-x86_64" >> /etc/profile.d/zzlocal.sh
# echo "module load openmpi-x86_64" >> /etc/profile.d/zzlocal.csh
# echo 'export       PYTHONPATH=/usr/local/lib64/python2.6/      site-packages:$PYTHONPATH' >> /etc/profile.d/zzlocal.sh
# echo 'setenv PYTHONPATH /usr/local/lib64/python2.6/ site-packages:$PYTHONPATH' >> /etc/profile.d/zzlocal.csh
# chmod +x /etc/profile.d/zzlocal.*
# . /etc/profile.d/zzlocal.sh
# pip-python install --install-option="--prefix=/usr/local" mpi4py
# pip-python install --install-option="--prefix=/usr/local" numpy
# pip-python install --install-option="--prefix=/usr/local" scipy
# pip-python install --install-option="--prefix=/usr/local" matplotlib
# chmod u=rwx,go= /root /home/ec2-user
# vim /etc/rc.local # see rc.local
# exit
$ starcluster listclusters
$ starcluster ebsimage i-xxxxxxxx starcluster-base-scientific-linux-6.2-x86_64-XX
>>> Your new AMI id is: ami-xxxxxxxx
$ starcluster terminate imagehost
Listing 11: rc.local
# update ec2-ami-tools
wget http://s3.amazonaws.com/ec2-downloads/ec2-ami-tools.noarch.rpm && rpm -Uvh ec2-ami-tools.noarch.rpm
# reset root password
dd if=/dev/urandom count=50|md5sum|passwd --stdin root
dd if=/dev/urandom count=50|md5sum|passwd --stdin ec2-user
# update root ssh keys
sleep 40
if [ ! -d /root/.ssh ]; then
    mkdir -p /root/.ssh
    chmod 700 /root/.ssh
fi
wget http://169.254.169.254/latest/meta-data/public-keys/0/openssh-key && cat openssh-key >>/root/.ssh/authorized_keys && chmod 600 /root/.ssh/authorized_keys
rm -f openssh-key
The Author
Gavin W. Burris, a specialist in Linux and high-performance computing, enjoys enabling science by providing effective research computing resources. He has been involved in high-performance and research computing since 2001. Current projects find him working with HPC, big data, cloud computing, and grid technologies. Burris’ favorite languages are Python and Bash. In his free time, he enjoys bad cinema, video editing, synthesizers, and bicycling. He maintains a blog at http://idolinux.blogspot.com.
Info
[1] Amazon HPC: http://aws.amazon.com/hpc-applications/
[2] Amazon HPC case studies: http://aws.amazon.com/solutions/case-studies/#hpc
[3] ami-d60185bf SL6 Amazon Machine Image: https://aws.amazon.com/amis/starcluster-base-scientific-linux-6-2-x86-64-10
[4] ami-e2a0058b Amazon Machine Image: https://aws.amazon.com/amis/scientific-linux-6-2-x86-64