
Managing Linux storage servers with the Linux Logical Volume Manager.
Managing Storage with LVM
In a previous article you started the journey toward managing storage, which launched into a discussion of labeling and partitioning storage devices. Now I want to build on that knowledge by introducing the Linux Logical Volume Manager (LVM). LVM allows for greater flexibility and control of storage devices and partitions in Linux and lets you take various storage devices and partitions; abstract them; and concatenate, stripe, or otherwise combine devices or partitions into flexible virtual partitions. Also, you can resize, snapshot, move, and mirror these partitions.
LVM comprises several “layers,” starting with storage devices or partitions, moving up to physical volumes (PVs), then building volume groups (VGs), and finally creating logical volumes (LVs), which are typically used for building filesystems (Figure 1).
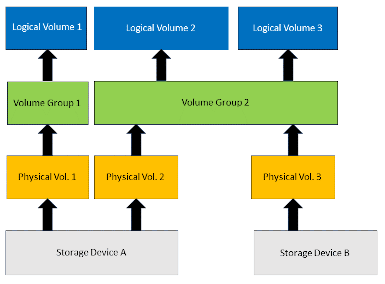 Figure 1: The layers used in logical volume management.
Physical Volumes
Setting up LVM begins with physical volumes that are created from storage drives or partitions on a storage drive. The PVs do not all have to be the same size or even have the same level of performance. Note that you have to root or have superuser privileges to create a PV with partitions,
# pvcreate /dev/sdb1
or to create an entire drive:
# pvcreate /dev/sdd
Creating the PVs places an LVM label in the second 512-byte sector of the device or partition. This label allows VGs and LVs to be assembled correctly.
In addition to the LVM label, LVM metadata stores the configuration details of the VGs. At creation, LVM allows you to store zero, one, or two copies of the metadata on each physical volume. (This cannot be changed.)
You can display information about PVs with the command:
# pvdisplay
The output is fairly detailed, including the name of the specific PV, the size, whether it is allocatable, the UUID of the device, and some other information.
An important aspect to remember is that you don't need to configure all storage devices and partitions as PVs. You can save some partitions or devices for later when the requests for more space arrive. You can also create PVs and just leave them for later.
Listing 1 is an example from an Ubuntu 22.04 system. The first command (pvcreate) creates the PV and the second (pvdisplay) displays its physical properties.
Listing 1: Physical Volume Properties
$ sudo pvcreate /dev/sdb1
  Physical volume "/dev/sdb1" successfully created.
$ sudo pvdisplay
  "/dev/sdb1" is a new physical volume of "<1.82 TiB"
  --- NEW Physical volume ---
  PV Name               /dev/sdb1
  VG Name
  PV Size               <1.82 TiB
  Allocatable           NO
  PE Size               0
  Total PE              0
  Free PE               0
  Allocated PE          0
  PV UUID               pHZ105-nDrN-V1E2-nGvI-1wyc-dqLC-TlXB58
Two other commands can be used to display PV information. The first, pvs, displays the physical volume information in a configurable form, with one line of information per PV. This command is great for a quick snapshot of information or if you have a large number of PVs:
$ sudo pvs
  PV         VG Fmt  Attr PSize  PFree
  /dev/sdb1     lvm2 ---  <1.82t <1.82t
The second command, pvscan, scans for all PVs and outputs one line per PV with succinct information:
$ sudo pvscan
  PV /dev/sdb1                      lvm2 [<1.82 TiB]
  Total: 1 [<1.82 TiB] / in use: 0 [0   ] / in no VG: 1 [<1.82 TiB]
Notice that the output from pvs and pvscan is very terse.
Volume Groups
After creating your PVs, you then create the volume groups that combine the storage capacity of the PVs:
# vgcreate vg0 /dev/sdb1 /dev/sdd
Obviously, a VG must have at least one PV. Note that the first argument after vgcreate is the name of the VG (in this case, vg0). A space-separated list follows of the PVs to be included in the VG. Note that the PVs must be created before they can be used in the VG. By the way, you will be able to add or remove PVs from the VG later.
The VG creates a pool of storage space with the PVs, with the VG storage divided into fixed units that are referred to as “extents.” An extent is the smallest amount of storage space that can be allocated. The VG creates the storage pool from physical extents (PEs). Think of these as “chunks” of space within the VG. By default, the PE is 4MiB in size, but this can be different for various reasons.
When you create the VG with vgcreate, you can change the extent size. Starting with the last command as an example, an option to specify the extent size would be:
# vgcreate -s 8M vg0 /dev/sdb1 /dev/sdd
The -s 8M option specifies a PE size of 8MB when the VG is created. You can change many aspects of the PE to improve performance or management, but once they are part of a logical volumes, which are discussed next, you will have to work backward to rebuild the VG, followed by rebuilding the logical volume, which means destroying the filesystem that uses the VG. Just make a copy of the data on the filesystem first and then rebuild and copy the files back.
Specifying two PVs in a VG without any options creates a “linear volume,” which allows you to combine physical storage partitions that have differing sizes and a different number of extents into a single VG.
For example, assume two PVs, /dev/sdb1 and /dev/sdd, are used to create a linear VG named vg0 with default extents of 4MiB:
# vgcreate vg0 /dev/sdb1 /dev/sdd
The first PV, /dev/sdb1, has 125,000 extents (500,000MiB or 488.28GiB, determined by dividing by 1,204). The second PV, /dev/sdd, has 500,000 extents (2,000,000MiB, 1.953GiB, or 1.9TiB). The VG /dev/vg0 has a total of 625,000 extents.
Of course, the vgcreate command has other options, and other commands are related to VGs. The two commands to display information about VGs are vgs and vgdisplay, which are similar to the PV information display commands. The vgs command scans all the disks for VGs and displays information about them. Like pvs, it displays information about each VG, one line per VG. It’s a great command for a quick summary.
The vgdisplay command gives you more details about a specific VG, including the name, the UUID, information about the PVs, the size of the VG, the PE size, the number of PEs, and some information about the VG.
Continuing with the Ubuntu 22.04 example from the previous section, you can create a volume group with the /dev/sdb1 physical volume:
$ sudo vgcreate vg0 /dev/sdb1
  Volume group "vg0" successfully created
The vgdisplay command lets you examine the volume group (Listing 2). Listing 3 shows the output from the vgs and vgscan commands.
Listing 2: vgdisplay
$ sudo vgdisplay
  --- Volume group ---
  VG Name               vg0
  System ID
  Format                lvm2
  Metadata Areas        1
  Metadata Sequence No  1
  VG Access             read/write
  VG Status             resizable
  MAX LV                0
  Cur LV                0
  Open LV               0
  Max PV                0
  Cur PV                1
  Act PV                1
  VG Size               <1.82 TiB
  PE Size               4.00 MiB
  Total PE              476931
  Alloc PE / Size       0 / 0
  Free  PE / Size       476931 / <1.82 TiB
  VG UUID               o1Td3h-y72R-SR2R-HjHh-3mMG-ekXw-pkALKV
Listing 3: Volume Group Information
$ sudo vgs
  VG  #PV #LV #SN Attr   VSize  VFree
  vg0   1   0   0 wz--n- <1.82t <1.82t
$ sudo vgscan
  Found volume group "vg0" using metadata type lvm2
Logical Volumes
Volume groups are used to create logical volumes (LVs). To create a logical volume, you use the lvcreate command, but before running the command, you need to plan your LV. For example, how will the LV be used? How many VGs will be used in the LV? Do you think the LV will need to be expanded or shrunk? How will you be able to do maintenance on the LV? Is performance a key consideration? A number of possibilities should be considered that, unfortunately, I won’t discuss here because the topic is too large. At the very least, you need to decide how much space will be in the LV.
In general, think of the amount of space in gibibytes or tebibytes. (I think you’re past the kibibyte and mebibyte stage, except for certain very specific use cases). Once the size is decided, you can create the logical volume. The generic form of the command is,
# lvcreate -L [size] -n lvname vgname0
where size is the size of the logical volume, lvname is the name of the logical volume, and vgname0 is the volume group used in the LV. Sometimes this will be referred to as “carving out a logical volume within a volume group.”
An example that uses the previously created vg0, might be:
# lvcreate -L 500G -n lv0 vg0
Here, the name of the LV is lv0, and it is 500GiB in size and uses just one volume group, vg0.
Note that you can also specify the size with the number of extents:
# lvcreate -l 125 -n lv0 vg0
If the VGs all use a 4MiB physical extent, this command creates a 500GiB logical volume – the same as before. The device name for an LV is different from that for a PV or VG. In the previous example, the device name would be /dev/vg0/lv0.
Three commands display information about the LVs, and you can probably guess their names: lvs, lvdisplay, and lvscan. They are very similar to the PV commands but relate to logical volumes. The lvs command displays, in a configurable form, one line of information for each LV.
The lvdisplay command gives you many details for a specific LV, with a lot of property details in the output. The lvscan command scans for all logical volumes on the server and lists them in a single line for each LV. This summary command is very useful for logical volumes.
For a more concrete example, I return to the Ubuntu 22.04 example and create the logical volume with the lvcreatecommand:
$ sudo lvcreate -L 1.8T -n lv0 vg0
  Rounding up size to full physical extent 1.80 TiB
  Logical volume "lv0" created.
The lvdisplay command shows the details for the logical volume (Listing 4). Note that the LV Path of the logical volume /dev/vg0/lv0 will be needed when creating the filesystem. The output from the lvs and /lvscan commands are shown in Listing 5.
Listing 4: lvdisplay
$ sudo lvdisplay
  --- Logical volume ---
  LV Path                /dev/vg0/lv0
  LV Name                lv0
  VG Name                vg0
  LV UUID                Fg8M2h-m066-Nr9m-WLyW-XDPI-7w3E-SK9BYf
  LV Write Access        read/write
  LV Creation host, time laytonjb-APEXX-T3-04, 2023-10-14 08:38:33 -0400
  LV Status              available
  # open                 0
  LV Size                1.80 TiB
  Current LE             471860
  Segments               1
  Allocation             inherit
  Read ahead sectors     auto
  - currently set to     256
  Block device           253:0
Listing 5: lvs and lvscan Output
$ sudo lvs
  LV   VG  Attr       LSize Pool Origin Data%  Meta%  Move Log Cpy%Sync Convert
  lv0  vg0 -wi-a----- 1.80t
$ sudo lvscan
  ACTIVE            '/dev/vg0/lv0' [1.80 TiB] inherit
Creating a Filesystem on Logical Volumes
You can use the logical volume /dev/vg0/lv0 as the block device for a filesystem, mount the new filesystem and check it with the df command. The Ubuntu 22.04 example can illustrate this process (Listing 6).
Listing 6: LV Block Device for Filesystem
$ sudo mkdir /mnt/test
$ sudo mkfs.ext4 /dev/vg0/lv0
mke2fs 1.46.5 (30-Dec-2021)
Creating filesystem with 483184640 4k blocks and 120799232 inodes
Filesystem UUID: 7df63c80-0c91-4f71-9776-d704dadfad3a
Superblock backups stored on blocks:
        32768, 98304, 163840, 229376, 294912, 819200, 884736, 1605632, 2654208,
        4096000, 7962624, 11239424, 20480000, 23887872, 71663616, 78675968,
        102400000, 214990848

Allocating group tables: done
Writing inode tables: done
Creating journal (262144 blocks): done
Writing superblocks and filesystem accounting information: done

$ sudo mount /dev/vg0/lv0 /mnt/test
$ df -H
Filesystem           Size  Used Avail Use% Mounted on
tmpfs                 28G  2.7M   28G   1% /run
/dev/nvme0n1p2       503G  137G  341G  29% /
tmpfs                136G     0  136G   0% /dev/shm
tmpfs                5.3M  8.2k  5.3M   1% /run/lock
/dev/nvme1n1p1       1.1T  488G  468G  52% /home
/dev/nvme0n1p1       536M  6.4M  530M   2% /boot/efi
/dev/sda1            6.0T  3.4T  2.4T  60% /home2
tmpfs                 28G  119k   28G   1% /run/user/1000
/dev/mapper/vg0-lv0  2.0T   29k  1.9T   1% /mnt/test
The commands and concepts to this point have been explained “mechanically.” There is much more to using LVM for performance, better control, expanding filesystems, replacing PVs or VGs, and so on, which would be an extensive tutorial. Ultimately the details of the LVM layout depend on many factors. However, I will give a few examples of options you can use with LVM and why you would use them.
Adding Filesystem Capacity
For this example, you want to increase the capacity of a filesystem, perhaps in reaction to the villagers carrying pitchforks and torches to your office demanding more space (referred to in this article as the "targeted" filesystem). To begin, assume you have added a new storage drive to the system. To begin to use it, you have to work backward a little by discovering which logical volume is associated with the specific filesystem that is to be extended; then, you find which volume group is associated with that LV and which physical volumes are associated with the VG. Think of this as the "layout" of the LV.
The process of adding the new drive just follows the same general LVM steps, but the commands may be slightly different. In this case you need to "extend" the VG then extend the filesystem.
A key point in this process is that despite the smoke pouring under your door from the villagers, you will have to take the targeted filesystem offline (unmount it) before proceeding with any of these steps. The villagers will just have to be patient, but the steps don’t take too much time.
For this example, the targeted logical volume that supports the filesystem to be extended is /dev/vg0/lv0. The targeted VG associated with the targeted LV is /dev/vg0 and is the “layout” of the LV. At this point, you add the new PV to the targeted VG; now you can extend the filesystem.
Beginning with the added drive /dev/sde, you create a single partition /dev/sde1. Note that you could have partitioned the drive into several parts and saved some of the partitions for the inevitable requests for even more space or used them for other VGs. That decision is up to you, but for this example, I am going to say there is only one partition.
As in the initial LVM discussions, you first create a physical volume with the storage device or partition(s). In this case, the drive has one partition, /dev/sde1, for which you create a PV:
# pvcreate /dev/sde1
Before proceeding, to make sure you don’t lose any data, you should unmount the filesystem you are going to extend. After unmounting the filesystem, extend the target volume group by adding the new PV. Remember that you are extending an existing VG, /dev/vg0, so rather than use vgcreate, use vgextend:
# vgextend vg0 /dev/sde1
Note that using this command requires the name of the existing volume group and the name of the additional physical volumes. You can extend the volume group by specifying more than one PV with this command. Also note that vg0 now “controls” all of the capacity of /dev/sde1.
The next step is to extend the target logical volume so that it uses the added space in the volume group. For this particular example, I won’t add all of the storage of the extended VG to the targeted LV, which means that vg0 will hold some of the capacity of the PV (/dev/sde1) for later use, perhaps further extending the filesystem:
# lvextend -L+100G /dev/vg0/lv0
In this command, 100GB is added (-L+100G) to the targeted LV device /dev/vg0/lv0. The command specifies how much additional space is made available to the filesystem.
The last step is to extend the filesystem to use the additional space:
# umount /mnt/project
# resize2fs /dev/vg0/lv0
# mount /dev/vg0/lv0 /mnt/project
The important tip in this process is to make sure the filesystem is unmounted before extending the VG or LV or the filesystem.
The previous example used resize2fs to grow the filesystem, which is for ext filesystems such as ext4. Other filesystems such as XFS or Btrfs have their own tools.
Note that the resize2fs command in this example has no other parameters; it will resize the filesystem to use the space available. If you want to resize to a specific size, then after the storage target /dev/vg0/lv0, add the total size you want the filesystem to become.
Striped LVs for Better Performance
You can use physical volumes to create volume groups and logical volumes so that when data is written or read, the VG will use all the physical volumes in turn. This method allows the overall performance to be improved because all the devices are being used rather than just a single specific device. This configuration is referred to as a “striped volume.”
An example of using a striped logical volume could be, when writing an 80GB file, that the first 4MB of the file is written to the first extent, which could be the first physical volume (e.g., /dev/sdc1); the second 4MB to the second extent, the second physical volume (/dev/sdd1); the third 4MB to the third physical volume (/dev/sde1); and so on until you have used all the physical volumes at roughly the same time. The pattern then is repeated with the first physical volume storing the next extent and so on. Recall that, by default, extents are 4MB in size.
All things being equal (same number and size of physical volumes), a linear volume and a striped volume have the same capacity, but the striped volume will have better performance.
Now assume you have four physical storage devices in a server, each with a single partition. You can create physical volumes for each of them, and with those PVs, create a volume group:
# pvcreate /dev/sdc1
# pvcreate /dev/sdd1
# pvcreate /dev/sde1
# pvcreate /dev/sdf1

# vgcreate vg0 /dev/sdc1 /dev/sdd1 /dev/sde1 /dev/sdf1
Up to this point, you’ve encountered nothing new in creating a striped logical volume. As the name implies, however, the details are in the creation of the logical volume. The command to use is,
# lvcreate -i 4 -I 128k -L 1T -n striped_logical_volume vg0
where the lvcreate options are:
- -i 4: the number of stripes (usually the number of PVs)
- -I 128k: the size of a single stripe (128KB)
- -L 1T: the size of the logical volume (1TB)
- -n striped_logical_volume: the name of the logical volume
- vg0: the name of the volume group to be used
In this example, the stripe size (128KB) is 1/32 of a physical extent (4MiB).
Finally, you can put a filesystem on top of the striped logical volume as before:
# mkfs.ext4 /dev/vg0/striped_logical_volume
# mkdir /mnt/project
# mount /dev/vg0/striped_logical_volume /mnt/project
Several online references can help you manage striped logical volumes, including a Red Hat Enterprise Linux document on LVM.
LVM and RAID
LVM supports RAID levels 0, 1, 4, 5, 6, and 10. In the next article in this series I will discuss Linux RAID in more detail, but for now, I’ll present a quick example of using lvcreate to create a simple RAID 1 with two devices,
# lvcreate --type raid1 -m 1 -L 500G -n lv_raid1 vg0
where the command options are:
- --type raid1: the raid “type” or the specific raid level to be used (RAID 1)
- -m 1: the number of mirrored logical volumes to create (i.e., a “two-sided” mirror or a linear volume and one copy)
- -L 500G: size of the logical volume (500GB)
- -n lv_raid1: the name of the logical volume
- vg0: the name of the volume group to be used
One more example is one of my favorites because the focus is really on performance. For a RAID 0 striped logical volume, you need to specify the raid type. Because it’s striped, you also need to define the number of stripes and the stripe size,
# lvcreate --type raid0 -L 2T --stripes 3 --stripesize 4 -n lv_stripe_raid0 vg0
where the command options are:
- --type raid0: the raid type
- -L 2T: size of the logical volume
- --stripes 3: the number if stripes, which should be the same as the number of physical volumes used in the volume group
- --stripesize 4: the number of kilobytes in a stripe (4KB in this case), which cannot exceed the size of the physical extents
- -n lv_stripe_raid0: the name of the logical volume
- vg0: the name of the volume group to be used to create the logical volume
If you poke around online, you will see that other lvcreate options can be used to build logical volumes that use specific raid levels.
Summary
The Logical Volume Manager is a powerful tool for managing storage in a Linux server, allowing you to combine storage devices in interesting ways and with great flexibility, performance, and manageability. You can create volume groups targeted for performance while adding and removing storage devices for easy replacement.
LVM also allows you to create RAID logical volumes without the Linux mdadm RAID tool, which is the subject of the next article in this series.