Figure 2
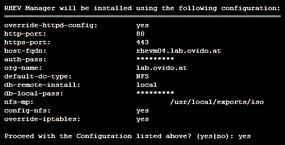
Figure 2: Completing the RHEV-M installation.
Figure 2: Completing the RHEV-M installation.