Customizing PortSentry
Do you have a sentry to keep an eye on your servers? We’ll show you how to customize PortSentry’s response to suspicious activity.
In the olden days, the Internet was without a doubt a nicer place. Akin to leaving your front door unlocked when you went shopping, you could leave your email accessible with password and no-one would even bat an eyelid. And although you might have only received 20 email messages a week, the bonus was that they’d all be for you and from people you knew.
Sadly, the Internet is no longer like that. The days of the alleged unpatched Windows Server being infected with malware within 10 seconds of being plugged into the Internet paints a picture of where we are today with our precious but flawed Internet.
Neighborhood Watch
In these darker times, when you set a freshly baked server live on the Internet, it’s critical to know how it’s fairing. Knowing how much bandwidth your server is using and how much email it sends in a day is all well and good, but are you aware of how many times someone scanned which TCP or UDP ports you left open? Can you really make sure that all 65,535 UDP and 65,535 TCP ports are safe – every day and night, 365 days a year?
Thankfully straight out of the box, or with a little customization, can manage all that easily with the long-standing security stalwart PortSentry . In this article, I’ll help you monitor all your ports and help you avoid banning your own user and admin IPs in the process.
Incidentally, PortSentry heralds from those innocent and forgotten times and is well over a decade old; amazingly, it still does its job very well. When it comes to PortSentry, simplicity is the key to its efficacy.
Not All Implementations Are the Same
PortSentry reacts a little differently on various operating systems, I’ve used it on Solaris and Debian, Ubuntu, and Gentoo, but just to be clear from the outset, I’ll focus on the Debian/Ubuntu flavors.
One of the main operating systems differences is how it “opened” ports. By design, PortSentry listens on any unused ports that aren’t in use by your legitimate daemons at boot/execution time. On some Unix-like systems, rather than just responding to probes on those open ports, PortSentry actually opens those unused ports and almost becomes a Honeypot – which has its pros and cons.
PortSentry has a handful of config files, most of which live inside /etc/portsentry on Debian-based distributions. One, however, resides in /etc/default/portsentry, which contains the settings in which mode PortSentry should run. Here, I’m using the advanced modes for both TCP and UDP:
TCP_MODE="atcp"
UDP_MODE="audp"
Figure 1 sheds a little more light on the available modes that PortSentry can offer.
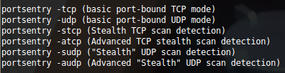
Figure 1: The various modes of PortSentry.
In standard, basic port-bound modes, it runs in the background and reports any violations, whereas in Stealth modes, PortSentry will use a raw socket to monitor all incoming packets, and if a monitored port is probed, it will block the host. Apparently this method will detect connect() scans, SYN/half-open scans, and FIN scans.
The most sensitive modes are those used by Advanced Stealth scan detection. You can explicitly ask PortSentry to ignore certain ports (which can be key when running a particularly reactionary configuration) to protect legitimate traffic. By default, PortSentry pays most attention to the first 1024 ports (otherwise known as privileged ports) because that’s where non-ephemeral connections usually originate from daemons.
As part of the advanced modes for both TCP and UDP, PortSentry employs what’s referred to as Advanced Logic mode, wherein it can follow traffic from already established connections and ignore the re-connect back to a separate port, avoiding a false positive being triggered. An example might be an FTP client that opens up ports outside of the privileged port range (anything from port 1024 to 65535), which requires the FTP server to connect back to you, opening another port. PortSentry is clever enough to consider this safe traffic, and this mechanism could even be referred to as using a rudimentary stateful inspection engine, which for software of its age is a little surprising.
Step Away from the Ports
The main config file portsentry.conf might be described as lengthy, but once you’ve glanced over it, you’ll see that many options don’t apply to all supported modes, so it’s relatively light work.
For now, I’ll focus on the Advanced Stealth Mode because it looks for sequential port scans and other prestidigitation that attackers employ to their advantage on today’s Internet.
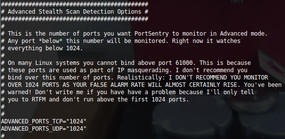
Figure 2: Don’t mess with the ephemeral port settings; you have been warned.
Inside the main config file, the first part that you’re interested in is shown in Figure 2. The comments give a crystal clear word of warning from the author. The next section just below is most important. I’ve left some real-world settings in place as a good example that should stop NetBIOS and DHCP broadcasts and the like from triggering the banning mechanisms. Shortly, I’ll cover how to prevent banning your entire LAN by accident but still protect your server against attacks.
Figure 3: How to ignore certain ports whilst using the Advanced modes.
To Ignore or Not to Ignore
The next parameters to check ensure that attacking IP addresses are banned and not just reported:
BLOCK_UDP="1"
BLOCK_TCP="1"
Next, you need to look at which mechanism will trigger when you want to ban an IP address. The default on Linux is to fill up your local hosts table with what are effectively black-hole routes to a non-existent IP address on your local area network (so a route already exists in the hosts table and you’re sending your attack traffic elsewhere – to annoy someone else, presumably):
# Generic Linux
KILL_ROUTE="/sbin/route add -host $TARGET$ gw 123.45.67.89"
I’ll cover the actual KILL_RUN_CMD a later. This method, however, is a little antiquated and not very efficient, so you’d be wiser to use iptables instead, or something similar, to drop the offending IP:
# iptables support for Linux
KILL_ROUTE="/sbin/iptables -I INPUT -s $TARGET$ -j DROP"
The last section of interest is the main config file. It lets you run an external command and is listed as such. If you plan to customize PortSentry’s responses to attacks, make sure you understand this section and the order of events.
# The KILL_RUN_CMD_FIRST value should be set to "1" to force the command
# to run *before* the blocking occurs and should be set to "0" to make the
# command run *after* the blocking has occurred.
#
KILL_RUN_CMD_FIRST = "0"
#
#
KILL_RUN_CMD="commands_to_run"
Customization
I came across a few limitations with the way a third party script would run when triggered, but with a little bit of environment bashing (no pun intended) you can work your way around any issues.
For example, I had a LAN with machines on it that I mostly trusted, but occasionally they would get infected with malware or be compromised and become a risk to my other servers. PortSentry can offer a simple “ignore IP” function where CIDR-formatted IP address blocks, or just single IP addresses, can be added to /etc/portsentry/portsentry.ignore.static. This method is fine for most scenarios; however, first it was important that I knew about any LAN machines that were port scanning my servers in an attempt to get into them or discover running services for a future compromise. Second, I wanted to disconnect all access to my locally offending servers briefly (some were mail servers that LAN machines used to send mail through via SMTP) so that when PortSentry sent me an email about the port scan, the users on the potentially compromised machines also were informed about the problem but then allowed to resume service again afterward without my manual intervention. With a little bit of help from Cron and a shell script, this was easily achieved (after dealing with a few fiddly environment issues).
KILL_RUN_CMD="(/usr/bin/whois $TARGET$) | /usr/bin/mailx -s 'Ganymede banned $TARGET$ for scanning port $PORT$'alarms@mail.domain.com; /etc/portsentry/temp_ban_length $TARGET$ $PORT$;"
This customized KILL_RUN_CMD is split into two main elements. First is a WHOIS lookup on the offender’s IP address and then puts that inside an email to the admins with a useful subject line, detailing what’s happened. Second, directly from PortSentry, it spawns the first custom script, which checks to see whether the offending IP address is one of the recognized local IPs. If it is, then it just bans it from speaking for 10 minutes and then re-opens access to the services again. Once the temporary ban is removed, logger writes to syslog, so it’s easy for an admin to see that the IP address ban has been lifted.
Bear in mind that this KILL_RUN_CMD and the script in Listing 1 might be improved with things like lock files if a certain number of email messages are generated by PortSentry for one host – or one set of ports, for example), but it met my needs nicely because of the low frequency of alerts being generated.
Listing 1: Custom Script Spawned by PortSentry: /etc/portsentry/temp_ban_length
#!/bin/bash

# Local IPs are only banned briefly
if [ `echo $1 | grep '123.45.67.' ` ] || [ `echo $1 | grep '89.91.23.' ` ] || [ `echo $1 | grep '45.67.78.91' ` ]
then
/bin/sleep 1200
/sbin/iptables -D INPUT -s $1 -j DROP
/usr/bin/logger "portsentry: Removed the ban for IP: $1"
exit 0
fi

# Otherwise ban permanently
exit 0
The second script is fired by Cron every 10 minutes (obviously, that’s adjustable). It’s needed because PortSentry keeps a log of its banned connections in the usefully named /etc/portsentry/portsentry.blocked.atcp and /etc/portsentry/portsentry.blocked.audp files. It seems to reference these rather than look up firewall rules (for greater efficiency, I suppose), so it can say that an IP address is “already banned” if a returning IP address comes back at some point in the future for a repeat visit. For the purposes here, that means a LAN IP can attack once, be banned for 10 minutes, then come back and attack with impunity because PortSentry has it listed as already dealt with. The following Cron entry spawns the script to fix that issue:
# Flush PortSentry of LAN IPs
*/10 * * * * root /etc/portsentry/perm_ban_length
The script in Listing 2 then runs through each of the blocked files holding PortSentry’s history and deletes any entries with the sed -i command. The script is laid out so that it’s easy to see the two short sections – one for TCP and one for UDP history. Finally a quick mention is made of what has been removed in syslog so LAN IP addresses are banned again if they attempt to attack in the future.
Listing 2: Custom Script Spawned by Cron: /etc/portsentry/perm_ban_length
#!/bin/bash
# Cron script for flushing recognized LAN IPs from PortSentry history
# because they’re not permanently banned and PortSentry ignores connections from them otherwise

bantcp="/etc/portsentry/portsentry.blocked.atcp";
banudp="/etc/portsentry/portsentry.blocked.audp";

# TCP
tcp=`tail -n1 $bantcp | awk '{ print $6 }' | cut -d / -f 2`;
if [ `echo $tcp | grep '123.45.67.' ` ] || [ `echo $tcp | grep '89.91.23.' ` ] || [ `echo $tcp | grep '45.67.78.91' ` ]
then
/bin/sed -i '/'$tcp'/ d' /etc/portsentry/portsentry.blocked.atcp
/usr/bin/logger "portsentry: Removed TCP events ($tcp) from the PortSentry history file"
exit 0
fi

# UDP
udp=`tail -n1 $banudp | awk '{ print $6 }' | cut -d / -f 2`;
if [ `echo $udp | grep '123.45.67.' ` ] || [ `echo $udp | grep '89.91.23.' ` ] || [ `echo $udp | grep '45.67.78.91' ` ]
then
/bin/sed -i '/'$udp'/ d' /etc/portsentry/portsentry.blocked.audp
/usr/bin/logger "portsentry: Removed UDP events ($udp) from the PortSentry history file"
exit 0
fi

exit 0
Conclusion
The use of PortSentry out of the box is sufficient for lots of server scenarios, but hopefully this quick look at how to customize it might give you food for thought to help you solve a problem of your own. It’s important that you continue to monitor who is connecting to your servers, and it’s equally important that you have the ability to respond in some way – sometimes manually and sometimes automatically. Since implementing the script shared in this article, the LAN machines I temporarily ban rarely cause any problems; whereas, they frequently did in the past. Hopefully you’ll reap the same rewards.