Shell in a Browser
PHP Shell and Shell In A Box put a shell in your browser, thus facilitating web server management – even from the nearest Internet café and without SSH access.
Secure Shell makes it easy to manage an external web server. Thanks to X forwarding, you can even run graphical tools to manage your computers at home, assuming the connection is fast enough. But administrators are often faced with situations in which they cannot or are not allowed to install additional software on the only machine available. And, in many cases, the firewall is so restrictive that nothing, apart from HTTP(S), gets through. In this case, PHP Shell and Shell In A Box can help you gain shell access to your server.
PHP Shell
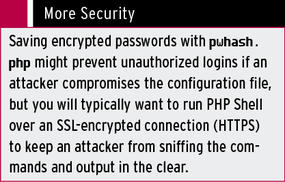
PHP Shell supports shell access to servers even if the firewall blocks it or if installing software on the local filesystem is not an option. All it takes is a PHP-capable web server to execute shell commands. PHP safe mode must be disabled for this to work – its normal job is boosting security by restricting the execution of certain commands (see the “More Security” box).
PHP Shell is easy to install: Just download the current version from the PHP Shell website and unpack the ZIP archive in a directory in your webspace. To set a password, call the URL http://server/phpshell/pwhash.php and enter the desired username and password combination. The output this command returns is a line that you need to add to the [users] section of your config.php configuration file. If needed, you can create multiple users. Besides usernames and passwords, you can also define shell aliases and a home directory for PHP Shell in your config.php.
PHP Shell is now ready for action. You can run it by entering the URL https://server/phpshell/phpshell.php. Logging in with your username and password lets you start your shell session in your web browser. To begin, enter commands in the PHP Shell window (Figure 1).
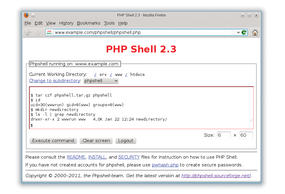
Figure 1: PHP Shell is recognizable as a web application.
After confirming by pressing Enter or clicking Execute Command, the commands are executed and the results appear in the shell window.
The following restrictions apply to the command line that PHP Shell serves up in your browser:
- Each command has to do without additional input; interactive programs cannot be used.
- Each command must fit in one line. PHP Shell doesn’t understand command continuation. So, for example, you can’t enter a for loop in multiple lines (unlike the normal shell).
- The commands must be processed within a certain time frame – typically 30 seconds. This restriction is not enforced by PHP Shell: Both the web server (typically Apache) and PHP stop processing within a certain time.
You can configure the limits in Apache with the timeout directive and in PHP with the max_execution_time setting in php.ini. PHP Shell executes the commands with the web server’s user and group ID, as you can see by running the id command.
This setup can be quite useful if, for example, you need to create a directory to which the web server will write. Typically, such an operation would not work with FTP because your user ID would be different; you could only create globally writable directories. In contrast, PHP Shell handles the task perfectly.
PHP Shell offers a simple history function that lets you scroll back and forth with the arrow keys through the last commands you ran. However, PHP Shell doesn’t give you more advanced history features such as a search. You can use the Size input boxes below and to the right of the input area to change the size of the shell window by entering the desired values and then running a command. PHP Shell also includes a simple editor (editor filename), which you can use to modify any files for which the web server has write access.
Shell In A Box
Shell In A Box (Figure 2) is useful if you have shell access to the server and can set up a number of programs on the server but want or have to use a web browser as the client. The project offers the source code on its website along with DEB packages. Users on Debian and its derivatives, as well as Ubuntu users, can conveniently install the binaries via the package manager.
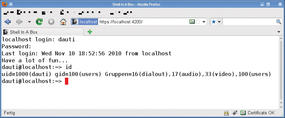
Figure 2: Shell In A Box looks like a genuine command line at first glance.
If you use any other distribution, you need to download the source code tarball, unpack in any directory, build by typing ./configure; make, then install Shell In A Box by issuing the make install command with root privileges. The call sets up the program in /usr/local.
In contrast to PHP Shell, Shell In A Box includes its own web server that listens on port 4200 by default. It has several services (Table 1) that you can launch with the generic syntax:
shellinaboxd -s web_path:service
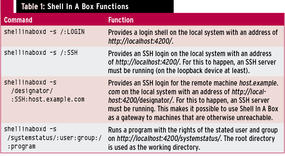
For your initial attempts, you can temporarily disable SSL encryption using the -t option, or its longer form --disable-ssl. The “Shell In A Box Functions” box gives more details. A shellinaboxd process can provide multiple services, such as logging in to multiple computers,
shellinaboxd -s /host1/:SSH:host.example.com -s /host2/:SSH:host2.example.com
which lets you connect to host.example.com with the URL http://localhost:4200/host1/ and open an SSH connection to the computer host2.example.com with http://localhost:4200/host2/.
In contrast to PHP Shell, in which each line is entered in full, then processed, and the results returned to the browser, Shell In A Box supports text-based, interactive sessions – for example, with the vi editor. The performance is slightly poorer than in a “normal” terminal, but you will not typically notice any major restrictions.
Shell In A Box provides a number of additional options, and it is worth checking out the documentation.
Encryption and Certificates
Although initial experiments with Shell In A Box on your local machine can do without encryption, you will definitely want to use SSL to safeguard your connections in production. You need a certificate for this, either in the current working directory or at a storage location you specify using the --cert=directory option.
Encrypting passwords and data between the sender and receiver keeps data safe against sniffing by unauthorized third parties. To add this level of security, you need a certificate, like those used by many websites (and mail servers) – people don’t typically notice them until the browser reports a certificate issue. The idea is that the certificates ensure that the server at the other end of the connection really is what it tells the client it is; otherwise, an attacker could simply spoof the authorized entity at the other end of the connection.
Certificates are issued by commercial certification authorities: They verify the identity of the certificate owner and then issue a certificate for a hostname. The browser automatically identifies the certificate as genuine: It trusts specific certificate authorities. CAcert is a community-based alternative solution.
Finally, another option is to create self-signed certificates with OpenSSL.
Create a key:
# openssl genrsa -des3 -out server.key 1024
Create a certificate signing request (CSR):
# openssl req -new -key server.key -out server.csr
Remove the password from the key:
# cp server.key server.key.org
# openssl rsa -in server.key.org -out server.key
Sign the CSR and create the certificate:
# openssl x509 -req -days 365 -in server.csr -signkey server.key -out server.crt
# cat server.crt server.key > certificate.pem
If you use a self-signed certificate (Figure 3) and access services secured in this way from other machines across the Internet, you should definitely take a close look at the certificate and compare the matching MD5/SHA1 fingerprints.
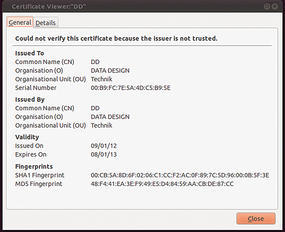
Figure 3: A self-signed certificate in a web browser.
The Author
Wolfgang Dautermann is a system administrator who has tamed many flavors of Linux and various Unices, including Solaris, Irix, and Tru64. He is a co-organizer of Linux Days in Graz, Austria, which next convenes April 28 for its 10th annual meeting [http://www.linuxtage.at] (in German).
Tags:
![]() browser ,
browser , ![]() PHP Shell ,
PHP Shell , ![]() shell ,
shell , ![]() Shell In A Box
Shell In A Box