Lighten Your DNS Load with TinyDNS
TinyDNS is superfast, minuscule, and secure DNS server software.
When the Internet was barely a handful of interconnected networks, only a few key standardized services existed. Given the Internet’s rapid pace of change, two or more decades on, a few of those services remarkably still exist fundamentally unchanged, such as SMTP, HTTP, and DNS.
In a business environment opinions from experienced individuals are usually the main drivers of how businesses make use of these services. For SMTP, you had sendmail. Even if you’re using another MTA (Mail Transfer Agent) on some distributions today, you might be surprised to discover there are references to sendmail still present within that operating system or MTA. For your beloved web servers, the mighty Apache was a given, even though for a while IIS and Roxen, for example, tried hard to make their mark. For DNS, it was always BIND – a standard recognized everywhere.
What Does DNS Do?
The actual core functions of DNS are almost painfully simple. When you converse with a name server it’s really as straightforward as “If I present you with a domain name, will you me tell its IP address?” – or the other way round – “If I give you an IP address, will you tell me its DNS name?” The first question is a forward DNS lookup, and the second is a reverse DNS lookup. Although DNS does a few other things, mostly it addresses these two basic types of queries.
Consider then why a package like BIND, which apparently appeared in the early 1980s, became the de facto standard. With its large, sprawling, cumbersome codebase and its, sometimes unfairly repeated, poor security pedigree, it’s an unusual choice for such simple functions as answering the questions above. For a number of reasons, I suspect, BIND continues to rule the waves for serving DNS on the Internet despite its background of problems.
BIND’s multiple embarrassing security holes, which left the Internet’s most popular DNS server open to really serious attacks over the years, its lengthy config files, and its initial inability to store records in databases – only within flat text files – meant the technical community was understandably looking for alternatives.
The Young Pretender
One of the DNS server alternatives that sprung up was written by the well-known Internet influencer Dan Bernstein and, as well as writing the phenomenal mail server QMail (second only to sendmail in popularity) among other exceptional contributions, he wrote a DNS server called djbdns (Bernstien’s initials are DJB).
Much like Qmail, his djbdns name server became the second most used on the Internet behind BIND. To introduce a more appealing nickname for djbdns, the moniker TinyDNS was bandied about, and for many, it stuck, replacing the original name completely. Strictly speaking, the whole package of DNS tools should really be called djbdns, and only the actual DNS server element (its DNS data and the authoritative name server) should be called TinyDNS. For simplicity, however, I’ll refer to it as TinyDNS.
The Importance of DNS
Bernstein, a savvy and creative mathematician and programmer, originally devised TinyDNS a the frustrations I’ve already mentioned with BIND. DNS might be simple, but every service online uses it – almost. Forget about key services functioning, even partially, including email and the web, if DNS isn’t behaving. Bernstien’s frustrations, I suspect, were mostly down to the constant threat of security holes being discovered in BIND and the distinct urgency felt by many in fixing them before their critical services were brought down purely because of a name server exploit.
Bernstein’s answer was to write something spectacularly super lightweight, lightning fast, and because of its diminutive code base, exceptionally secure. How secure? You might well ask Well, how does a US$ 1,000 reward sound if you discover a security hole? You have to admit that such an offer certainly exudes confidence (see his security guarantee).
Popularity
Alongside the tiniest of codebases, making it fantastically lightweight relative to BIND, this security claim rocketed TinyDNS to popularity. You could install it on the oldest, lowest powered hardware and still serve DNS queries without any headaches. No wonder it’s so popular. Likely, it was surpassed by BIND only because many businesses historically have relied on BIND – in some cases, for decades.
Hieroglyphics
If you’re used to BIND, then the layout and formatting of the TinyDNS config files are not for the infirm. To get past the issue of this understandable learning curve, Bernstein bundles some useful shell scripts to perform everyday tasks. The contents of the add-mx script shows the way TinyDNS adds an MX record:
#!/bin/sh
exec /usr/local/bin/tinydns-edit data data.new add mx ${1+"$@"}
Once you’ve run the stock script above, try examining how the main config file looks with the MX record added. You might find it easy just to copy and paste directly inside the main config file (incidentally, named data, until it’s compiled with make so it’s significantly faster to process; then, it’s called data.cdb).
The data file now shows this for the MX entry:
@domainname.com::mail.domainname.com:10:3600
If you ran a similar MX command again adding mail2, you’d add a secondary MX with a different priority (a.k.a. delivery preference – in other words, the preferred delivery order in which the mail server receives the inbound email).
@domainname.com::mail2.domainname.com:20:3600
Here, you’re telling TinyDNS to answer MX queries for domainname.com, making mail.domainname.com the first port of call. If that’s unavailable, then mail2.domainname.com is the second choice. The priorities of 10 and 20 adjust the order of preference, and the 3600 at the end is the time to live (TTL), or how long in seconds the answer should be trusted to be correct before asking the name server again.
The Belly of the Beast
Now that you’ve had a cursory look at the main config file’s content, take a look at TinyDNS installed on an Ubuntu server. A whole host of documentation is available at http://cr.yp.to/djbdns.html, where you can check for any configuration nuances.
By running
apt-get install djbdns
you can see in Figure 1 that Bernstein’s other well-known packages, namely daemontools and ucspi-tcp, are pulled in at installation time. The daemontools package has tools to start and stop services under a directory called /service, an improved alternative to inittab, and so forth. In an attempt to provide an alternative to the famous inetd, Bernstein’s ucspi-tcp handles client-server communications.
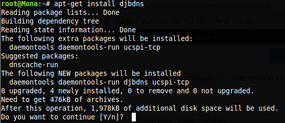
Figure 1: The packages pulled in at installation time.
Gotcha
The file /usr/share/doc/djbdns/README.Debian dutifully informs you about a critical difference on Ubuntu/Debian servers relative to other operating systems (OSs): “daemontools’ default directory for services on Ubuntu Server is /etc/service/, not /service/.”
If you use TinyDNS on other OSs and begin troubleshooting the installation, should you run into any problems, then bear that key change in mind. A standard install from source might include creating the /service directory, so don’t get caught out. When the majority of the software on a system places configuration files inside /etc, it’s easy to see why this choice was made. Just be aware that any mention in online documentation of symlinks to /service are incorrect in this OS’s case.
Forward and Reverse
TinyDNS can offer several services, but I’ll ignore the likes of a local DNS cache and instead look further at getting a domain name served correctly on a more straightforward configuration.
The first task is to let the highly useful installation tool know where it should install your services. When you run inydns-conf on its own, you are shown the parameters it expects to run successfully. After installation of the main .deb packages initiated in Figure 1, you can now look at creating the directory structures needed:
tinydns-conf tinydns tinydns /etc/tinydns 12.34.56.78
This command tells TinyDNS that you want to run it as user tinydns under group tinydns to keep security threats to a minimum. The mention of a directory path then instructs the authoritative name server’s directory structure on the file system to be under /etc/tinydns. This is then followed by the IP address on which the name server will listen for queries (look for the IP files under root/ if you need to change it in the future).
Believe it or not, that almost takes care of the installation.
As an example of how other services install, here’s how you would install the DNS Zone Transfer element of TinyDNS. Zone Transfers allow one name server to replicate its DNS database with another. Because DNS entries can be updated frequently, they need to be efficient and secure, so your name servers serve the vitally correct information. According to the man page: “axfrdns reads a zone-transfer request in DNS-over-TCP format from its standard input, and responds with locally configured information”:
axfrdns-conf axfrdns axfrdns /etc/axfrdns /etc/tinydns 12.34.56.78
As you can see, I’m using a different user and group to keep security risks separate and distinct, this time using user axfrdns and an identically named group. Obviously, you need to create them by hand if they don’t exist:
addgroup --system tinydns
adduser --no-create-home --disabled-login --shell /bin/false --system --ingroup tinydns tinydns
With the /etc/axfrdns command-line switch, you inform TinyDNS where you want it installed on the filesystem. Then you need to point axfrdns to where on the filesystem TinyDNS resides and, finally, which IP address it should be listening on. As an aside, as well as Zone Transfers, running axfrdns allows you to answer DNS-over-TCP and SOA queries, too.
Finishing the Install
You’re almost up and running and only need to add the required services – just TinyDNS in this case and, optionally, axfrdns – to the /etc/service directory (not the more common /servicedirectory), so you can stop and start them with daemontools. To achieve this, create symbolic links to their services with the following commands:
cd /etc/service
ln -sf /etc/tinydns .
ln -sf /etc/axfrdns .
The Answer is 42
Now that you’re raring to go, all you need are some answers to the queries that your name server will receive. In TinyDNS terms, that means constructing a data.cdb file. In reality, that simply means typing some config information (or creating it using scripts such as add-mx), saving it in the /etc/tinydns/root/data file, and then running make to transform it into data.cdb. If your system doesn’t respond well to make from inside the aforementioned directory, just try apt-get install make.
As you can imagine, you have a magnitude of options and types of queries to consider, but I’ll just look at constructing a few basics so you can serve some email and a website from your shiny new name server with, in this case, mydomainname.com as an example.
Start Of Authority (SOA)
Your SOA should pass DNS testing tools (such as IntoDNS) if its syntax resembles this:
mydomainname.com:postmaster.mydomainname.com.:2012111503:1228731457:1800:604800:3600
SOA entries are important, so have a read about them if in doubt.
Create Your NS Entries
Say you have three name servers for mydomainname.com called ns1, ns2, and ns3. For the example domain name, create them like this:
.mydomainname.com:1.1.1.1:ns1.mydomainname.com:900
.mydomainname.com:2.2.2.2:ns2.mydomainname.com:900
.mydomainname.com:3.3.3.3:ns3.mydomainname.com:900
Another Domain
Now that you’ve told TinyDNS which IP addresses you want your name servers to work on (1.1.1.1, 2.2.2.2, and 3.3.3.3, as above), if you add another domain name, you can just create the config like this
.myotherdomainname.com::ns1.mydomainname.com:3600
.myotherdomainname.com::ns2.mydomainname.com:3600
.myotherdomainname.com::ns3.mydomainname.com:3600
to create your NS records. Note the two colons where your IP addresses previously were (showing an empty config parameter of sorts).
Moving Forward
A forward DNS entry looks like this, with a simple plus sign at the front:
+www.mydomainname.com:5.5.5.5:1200
Moving Backward
A reverse DNS entry (where you pass the name server an IP address and ask for a DNS name, as opposed to asking which IP address a domain name refers to) is a little trickier at first and looks like this with backward IP address notation:
^78.56.34.12.in-addr.arpa:chris.mydomainname.com:3600
Note the IP address answered when queried is 12.34.56.78 in this example.
Email Records
The following lines configure three mail servers for the MX records discussed at the top of this article:
+mx.mydomainname.com:7.7.7.7:300
@mydomainname.com::mail.mydomainname.com:10:300
+mx2.mydomainname.com:8.8.8.8:300
@mydomainname.com::mydomainname.com:20:300
+mx3.mydomainname.com:9.9.9.9:300
@mydomainname.com::mx3.mydomainname.com:30:300
Although you have other ways to configure IP addresses, this way should illustrate how it works, in the same way as the NS records above, in a less confusing way. Essentially you announce your A record with an IP address first (the first line where mx.mydomainname.com points to IP address 7.7.7.7 with a prefixed plus sign). The actual MX record entries are those with different priorities – each line starting with an @ sign. You can shorten this configuration in other ways, but this is the clearest way to explain the methodology.
CNAMEs
The last basic, but sometimes hugely useful, type of query is the CNAME, which looks like this using TinyDNS’s syntax:
Cblog.mydomainname.com:www.mydomainname.com:1800
Starting Services
Now that you have the basics under your belt, you can try it out. Different versions of Ubuntu, and indeed Debian, have various ways to start and stop services, but on Lucid Lynx, you use:
initctl start svscan
swapping stop in place of start if needed.
Come in Tokyo
To list open ports, you use lsof -i; to see if your name server is listening, you can check its logging (with the use of less here):
less /etc/tinydns/log/main/current
At first glance, the logging that TinyDNS produces isn’t for the faint of heart, as you can see in Figure 2.
Figure 2: TinyDNS log shows some bizarre time and date entries.
All you need to do to read the logfile content is pipe it through a filtering program called tai64nlocal (Figure 3), then you need to convert the TAI64N timestamps into a human-readable format.
Figure 3: Logging that actually makes sense.
In addition to checking the logging, you can try querying your name server remotely with the host command:
host yourdomain.com
While you’re at it, try tailing the logfile like this
tail -f /etc/tinydns/log/main/current | tai64nlocal
to see logging updates in real time.
The End
Relative to BIND, your new friend, TinyDNS, is superfast, minuscule, and (arguably) significantly more secure. Having stumbled past the new type of config file formatting that challenges new users, die-hard BIND fans might even be persuaded to give it a try.
Tags:
![]() BIND ,
BIND , ![]() DNS ,
DNS , ![]() IP address ,
IP address , ![]() name server ,
name server , ![]() TinyDNS
TinyDNS