ClusterHAT

Inexpensive, small, portable, low-power clusters are fantastic for many HPC applications. One of the coolest small clusters is the ClusterHAT for Raspberry Pi.
When I started in high-performance computing (HPC), the systems were huge, hulking beasts that were shared by everyone. The advent of clusters allowed the construction of larger systems accessible to more users. I always wanted my own cluster, but with limited funds, that was difficult. I could build small clusters from old, used systems, but the large cases took up a great deal of room. The advent of small systems, especially single-board computers (SBCs), allowed the construction of small, low-power, inexpensive, but very scalable systems.
Arguably, the monarch of the SBC movement is the Raspberry Pi. It is now the third best selling computer of all time, overtaking the Commodore 64 and behind the PC and the Mac, and has sparked a whole industry around small, inexpensive, low-power but expandable computers that can be used for anything from sensors in the field, to desktops, to retro game consoles, and even to experiments on the International Space Station. The top-end Raspberry Pi, the Raspberry Pi 3 (RPi3), is about $35, and the introduction of the Raspberry Pi Zero (Pi Zero) in 2015, set the low-end price of $5.
People have been building clusters from Raspberry Pi units, starting with the original Raspberry Pi Model A, ranging from two to more than 250 nodes. That early 32-bit system had a single core running at 700MHz with 256MB of memory. You can build a cluster of five RPi3 nodes with 20 cores connected by a Gigabit Ethernet switch for about $300, including a case and case fan.
Fairly recently, a company created a Hardware Attached on Top (HAT) add-on board that you can add to a single “host” RPi2 or 3. It has four micro-USB slots that each connect to a Pi Zero. It provides both power and a network between the Pi Zeros and the host node. The ClusterHAT fits into the GPIO pins on the host (master node) and accepts up to four Pi Zeros in mini-USB ports.
The ClusterHAT kit is a little over $25 and includes the HAT board, four standoffs, a handy USB cable, and some plastic feet if you want to put them on the bottom of your host node (Figure 1). Putting everything together is very easy, and you can watch a video on the ClusterHAT website to show how it’s done.
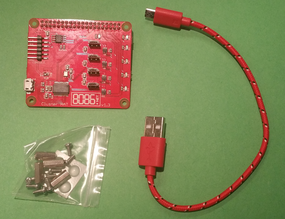
Figure 1: ClusterHAT components.
After threading the USB cable between the HAT and the RPi3, attaching the HAT, and snapping the Pi Zero boards into the HAT, you should have something that looks like the Figure 2. Next, attach a keyboard, a mouse, an external power supply, and a monitor (Figure 3). Notice that the Pi Zeros are powered on in this image (i.e., the lights near the boards are lit).
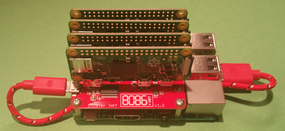
Figure 2: ClusterHAT and Pi Zeros attached to a Raspberry Pi 3.
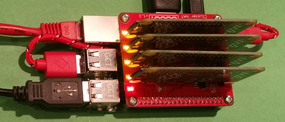
Figure 3: Completed ClusterHAT configuration.
The RPi2 or 3 needs a good power supply capable of 2 to 2.5A and at least one microSD card for the master node. You can put a card in each Pi Zero, if you want, or you can NFS boot each one (although that’s a little experimental). I put a 16GB microSD card into each of the five Raspberry Pis.
The ClusterHAT site has created Raspbian Jessie-based software images that have been configured with a few simple tools for the ClusterHAT. Jessie is a little different from past Raspbian versions, and the biggest difference that affects the ClusterHAT is the use of DHCP by default.
For this article, the target cluster configuration uses an RPi3 as the master node and Pi Zeros in the ClusterHAT as compute nodes. The master node will be an NFS server, with /home and /usr/local, for the four Pi Zeros. Additionally, the cluster will use passwordless SSH and pdsh, a high-performance, parallel remote shell utility. MPI and GFortran will be installed for building MPI applications and testing.
At this point, the ClusterHAT should be assembled and the operating system (OS) images copied to the microSD cards for the five nodes. The next steps are to boot the images for the first time on the RPi3 and configure them to meet the previously mentioned target configuration.
Master Node
Because the master node effectively controls the cluster, getting the OS configuration correct is important. Fortunately, only a small number of changes need to be made to the image provided on the website.
The first step is to boot the master node (RPi3) with its microSD card. Be sure it is plugged in to your local network and can access the Internet. After the RPi3 boots, you should be in the Pixel desktop (Figure 4). A few “classic” configurations are called for at this point with the help of the raspi-config command:
- Expand the storage to use the entire microSD card
- Change the default password for the pi account
- Enable SSH (it is no longer enabled by default in Raspbian)
- Switch the keyboard to a US keyboard (by default, Raspbian uses a UK keyboard)
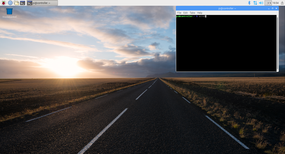
Figure 4: Pixel desktop.
After configuring, you need to install the NFS server packages on the RPi3 (master node):
$ apt install nfs-common nfs-kernel-server
Next, the NFS exports, a list of filesystems to be exported, needs to be created. The file /etc/exports should be created or edited to include the following:
/home        *(rw,sync,no_subtree_check)
/usr/local   *(rw,sync,no_subtree_check)
Notice that the filesystems are exported globally with the “*” wildcard. Although this is usually not a good idea, because anyone could mount the filesystems, I almost always run the system with no Internet access, so I’m not too worried. To make things safer, you can specify an IP range that can mount the filesystems.
To ensure that the NFS server starts when the RPi3 is booted, run following commands:
$ sudo update-rc.d rpcbind enable
$ sudo /etc/init.d/rpcbind start
$ sudo /etc/init.d/nfs-kernel-server restart
Note that these commands need to be run whenever the master node is rebooted.
The filesystems can be exported and checked to make sure they are actually exported:
$ sudo exportfs -ra
$ sudo export's
/home
/usr/local
Next, SSH is configured so that passwordless logins can be used on the cluster. Many tutorials on the web explain how to accomplish this.
After SSH, both GFortran, the GCC Fortran compiler, and MPICH, a high-performance implementation of the Message Passing Interface (MPI) standard, are installed using apt:
$ apt install gfortran mpich
The HPC world uses tools that allow commands to run across the entire cluster or a subset of nodes in the cluster. My preferred “parallel shell” tool is pdsh. Consult one of my previous articles for directions on how to build, install, and use pdsh. I installed pdsh for the ClusterHAT in /usr/local. A /home/pi/PDSH directory was created with a /home/pi/PDSH/hosts file that lists the default nodes to be addressed by pdsh when no nodes are specified. For the ClusterHAT, the list of nodes is:
p1.local
p2.local
p3.local
p4.local
As an option, controller.local could be added to the list if the master node is to be a default target for commands.
Configuring Compute Nodes
The ClusterHAT site provides several ways to build images for the compute nodes. I took the easier route and downloaded five images – one for the controller (head node or master node), and one each for the four compute nodes – and copied them to a microSD card for each node. By taking this approach, each image could be booted in the RPi3 so that changes could be made before booting the entire cluster.
Unlike the master node, the compute nodes do not boot into the desktop; they just boot to the command line so you can log in to the node.
Booting each image allows you to make some basic changes that are needed on the first boot of a Raspbian system. First, the command raspi-config must be used, as discussed for the master node, to extend the filesystem to use the entire microSD card and enable SSH (see the bulleted list above). The third action, changing the password, should be done on all the compute node images; they should have the same password, but not the default, raspberry.
To make life easier, I like to have my clusters share a common /home for the users and /usr/local/ for applications shared by the nodes. The ClusterHAT cluster is no exception: I want to mount /home and /usr/local from the master node to all of the compute nodes. I added the following line to /etc/fstab on all of the compute node images:
controller.pi:/home        /home        nfs    default     0   0
controller.pi:/usr/local   /usr/local    nfs    default     0   0
Also installed on each compute node are gfortran and mpich; these were installed on the master node from the Raspbian repositories, so they are not installed in /usr/local or /home; consequently, they have to be installed on each node.
By default, the Pi Zero nodes are named p1.local, p2.local, p3.local, and p4.local. If you look at the ClusterHAT from above, at one end you can see the labels p1, p2, p3, and p4, for the four slots. The master node has the node name controller.local.
After setting up the master node, the ClusterHAT, and the compute nodes, it's time for the first boot!
First Boot
Booting is pretty simple: You plug in the HDMI cable to the monitor and then plug in the power cable to boot the RPi3 master node, which should go into the Pixel desktop. The first time I booted the ClusterHAT, I didn't have it plugged in to the network because my router acts as a DHCP server and assigns IPs to the compute nodes. This setup can sometimes cause problems.
Once the master node has booted, it is a good idea to check the node to see if it looks correct – look especially to see that the two filesystems are NFS exported and that gfortran, mpich, and pdsh are functioning.
The ClusterHAT images come with a very useful tool to start and stop the compute nodes. The clusterhat tool is a simple Bash script that uses gpio (General Purpose Input/Output) pin commands to control the power to the compute nodes, allowing you to turn nodes on and off individually, in groups, or all together and adding a two-second delay between the command for each node. For example, to turn on all of the compute nodes, you run:
pi@controller:~ $ clusterhat on all
Turning on P1
Turning on P2
Turning on P3
Turning on P4
pi@controller:~ $
People have also taken the spirit of the clusterhat tool and created something a little different. For example, clusterctl allows you turn the compute nodes on and off, but also lets you determine the status of the node, cut the power, and even run a command across all of the compute nodes.
The first time, it’s probably a good idea to boot the cluster nodes one at a time. For example, to boot the first node, run:
pi@controller:~ $ clusterhat on p1
Turning on P1
pi@controller:~ $
Booting nodes one at a time allows each to be checked to make sure everything is installed and has booted properly.
Remember that the master node NFS-exports two filesystems to the compute nodes. Given that the Pi Zeros use a bridged network over USB 2.0, the network performance is not expected to be very good. Therefore, it will take a little longer for the filesystems to mount. One suggestion is to ping the node (ping p1.local) until it responds. If the filesystems don't mount for some reason, you can use the clusterhat tool to turn the node off and then on again.
After testing each node independently and ensuring that everything works correctly, you can then reboot all of the nodes at once. Now you can test the cluster by running some MPI code on it.
MPI Code Example
I'm not going to cover "benchmarks" on the ClusterHAT, but it is important to illustrate some real MPI code running on the cluster. Rather than run HPL, the high-performance Linpack benchmark, and argue over tuning options to get the "best" performance, I find it’s better to run the NAS Parallel Benchmarks (NPB), which are fairly simple benchmarks that cover a range of algorithms, primarily focused on CFD (computational fluid dynamics). They stress the processor, memory bandwidth, and network bandwidth; are easy to build and compile; and come in several flavors, including MPI. Also, different problem sizes or “classes” scale from very small to very large systems.
Because the ClusterHAT is a small cluster, I used only the class A test. In the interest of brevity, I only used the cg (conjugate gradient, irregular memory access and communication), ep (embarrassingly parallel), is (integer sort, random memory access), and lu (lower-upper Gauss-Seidel solver) applications with four and eight processors. Four processors included two cases: (1) Pi Zeros only, and (2) RPi3 only. The eight processors case included the RPi3 and the Pi Zeros (a total of eight cores).
For all four applications, performance, measured in millions of operations per second (MOPS), was recorded from the output for the entire MPI group and for each process in the MPI group. These results are tabulated in Table 1.
Table 1: NPB Results
| Test | Class | No. of Cores | Total MOPS (RPi3 Only) | MOPS/Process (RPi3 Only) | Total MOPS (Pi Zeros Only) | MOPS/Process (Pi Zeros Only) | Total MOPS (Pi Zeros + RPi3) | MOPS/Process (Pi Zeros + RPi3) |
| CG | A | 4 | 198.98 | 49.75 | 38.77 | 9.69 | — | — |
| CG | A | 8 | — | — | — | — | 71.98 | 9 |
| EP | A | 4 | 25.8 | 6.45 | 6.93 | 1.73 | — | — |
| EP | A | 8 | — | — | — | — | 13.92 | 1.74 |
| IS | A | 4 | 43.85 | 10.96 | 3.99 | 1 | — | — |
| IS | A | 8 | — | — | — | — | 6.71 | 0.84 |
| LU | A | 4 | 425.36 | 106.34 | 197.88 | 49.47 | — | — |
| LU | A | 8 | — | — | — | — | 396.22 | 49.53 |
Summary
The ClusterHAT is one of the most innovative clusters to come along in many years. It’s very compact, uses a very small amount of power, runs Linux, and is fairly inexpensive (around $100 for the entire system).
Although it is obviously not designed to be a speed demon, you can use it to learn about common cluster tools and clustering and how to write parallel and distributed software. The ClusterHAT cluster can run Singularity and Docker containers, including resource managers. In a classroom, each student could have a small ClusterHAT cluster on which to run real applications, including AI.
The ClusterHAT is one of the coolest HPC pieces of hardware to come out in a long time.
Tags:
![]() cluster ,
cluster , ![]() ClusterHAT ,
ClusterHAT , ![]() Raspberry Pi
Raspberry Pi