« Previous 1 2 3 4 Next »
MySQL upgrade obstacles
Stumbling Blocks
Upgrading Applications
A number of steps should be taken before upgrading MySQL from 5.7 to 8.0. You'll need to find out if your applications support 8.0. Some third-party applications might require upgrades. Fortunately, because MySQL 8.0 was released for general availability in 2018, most vendors should have long since updated their products – assuming, of course, that they haven't gone defunct. If you're regularly upgrading your third-party applications, you've likely already moved to a MySQL 8.0-compatible version.
If you have any applications or scripts you've developed in-house, they will have to be checked, as well. If you're using a continuous integration (CI) tool, such as Jenkins or CircleCI, it might be wise to run your automated tests twice – once with your legacy version of MySQL and once with 8.0 – so you will be confident that your code works with MySQL and stays working with MySQL until you perform the upgrade.
Before beginning the backup process, it is likely wise to take both a logical or physical backup, or both, of your MySQL database and attempt upgrading in a non-production environment. If it's not practical to test the entire database in this way, then a subset thereof can be used. Although performance in a test or development environment won't be identical to production, you might be able to detect errors attributable to differences in the environments.
Related to that concept, a very helpful tool called pt-upgrade, a part of the Percona Toolkit, is freely available and designed to compare two different database servers. For example, say you have a backup of your production database loaded onto two test machines, test57 and test80. Furthermore, say you've downloaded some sample queries from your production machine's slow log into a file called prod-mysql-slow.log. You can then run pt-upgrade:
pt-upgrade h=test57 h=test80 prod-mysql-slow.log
This entry will run the commands in prod-mysql-slow.log on both servers, check for errors, check that both servers returned the same data, compare performance results, and more. If you get errors to queries on MySQL 8.0 but not 5.7, then you've likely been affected by a breaking change. The pt-upgrade tool can also run arbitrary queries from text files, from packet capture, and a lot more, and you can check the Percona Toolkit documentation for more details.
Note that pt-upgrade is designed to be run in test, not production, environments; it can't produce valid timing data if one or both servers are loaded, and if the data is changing while the process is running, the consistency checks will likely produce false positives.
Upgrading Official Tools
Once you've established that the applications you run are compatible with MySQL 8.0, it's time to inspect the database itself thoroughly with one or both of two official tools. The older tool is mysqlcheck:
mysqlcheck -u root -pmy-secret-pw --check-upgrade --all-databases
mysql.columns_priv                       OK
mysql.db                                 OK
mysql.engine_cost                        OK
mysql.event                              OK
...
The MySQL Shell checkForServerUpgrade command is the newer tool. The official MySQL documentation mostly references the latter tool, but many recommend running both for the sake of completeness.
The checkForServerUpgrade command is distinct from the much older mysql command-line tool and has to be installed separately. It does have a very similar purpose, but has considerably more features – notably including built-in JSON output for queries.
You can install the MySQL Shell with either the mysql-shell
Yum or Apt packages, which require you to have the official MySQL repositories enabled, or by downloading from mysql.com. Unlike the traditional mysql command, it's not included by default with MySQL server (Figure 1). Once installed, you can use the server upgrade check:
mysqlsh -e 'util.checkForServerUpgrade()'
You can also simply invoke the tool with the docker command:
docker run mysql:8 mysqlsh -e 'util.checkForServerUpgrade()'
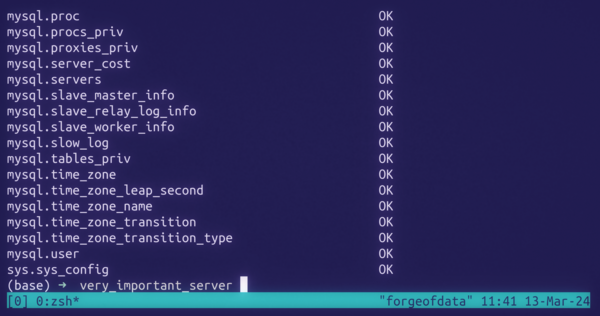 Figure 1: Example mysqlcheck output during a pre-upgrade check.
In both cases, you can add authentication options as needed through options (e.g., -u and -p) similar to the old mysql client; you can also use the new uri parameter (Figure 2):
mysqlsh --uri=root:my-secret-pw@mysql57:3306 -e 'util.checkForServerUpgrade()'
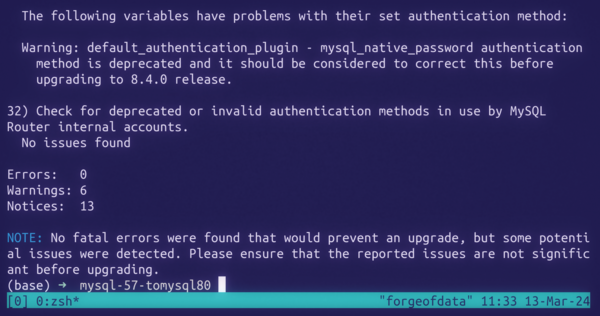 Figure 2: Example mysqlsh output.
In either case, you should see output like that shown in Listing 1. As you can see in this case, the old temporal date types discussed earlier are not present. The NO_AUTO_CREATE_USER sql_mode warning relates to the GRANT USER changes mentioned earlier in the article. Because GRANT USER is no longer allowed to create users, the NO_AUTO_CREATE_USER sql_mode relating to when GRANT USERS is and is not allowed to create users has been removed. Therefore, the above-mentioned objects will need to be rewritten.
Listing 1
mysqlsh Output
The MySQL server at mysql57:3306, version 5.7.44 - MySQL Community Server
(GPL), will now be checked for compatibility issues for upgrade to MySQL 8.3.0.
To check for a different target server version, use the targetVersion option...
1) Usage of old temporal type
  No issues found
2) MySQL syntax check for routine-like objects
  No issues found
...
9) Usage of obsolete sql_mode flags
  Notice: The following DB objects have obsolete options persisted for
  sql_mode, which will be cleared during the upgrade.
  More information:
  https://dev.mysql.com/doc/refman/8.0/en/mysql-nutshell.html#mysql-nutshell-removals
  sakila.film_in_stock - PROCEDURE uses obsolete NO_AUTO_CREATE_USER sql_mode
  sakila.film_not_in_stock - PROCEDURE uses obsolete NO_AUTO_CREATE_USER
  sql_mode
  sakila.get_customer_balance - FUNCTION uses obsolete NO_AUTO_CREATE_USER
  sql_mode
  sakila.inventory_held_by_customer - FUNCTION uses obsolete
  NO_AUTO_CREATE_USER sql_mode
...
Once the output of both tools is scrutinized and issues found are corrected, you can proceed to the upgrade. Immediately before upgrading, it is wise to take both a logical and physical backup, with the use of tools such as mydumper or mysqldump for the logical backup and a tool such as xtrabackup or another copying tool for the physical backup (Figure 3).
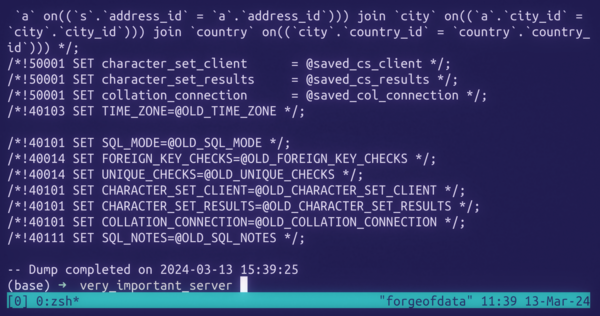 Figure 3: Inspecting the output of a mysqldump backup.
Typically, as with all upgrades, backups will be scheduled for a period of low traffic, and, depending on your situation, a maintenance window is announced. Although in theory the process can be, as in the words of Oracle's website, "seamless," it is instead wiser to plan for a somewhat "seamful" experience instead.
In-Place and Upgrade Options
The two main upgrade paths are in-place and with the upgrade command. The in-place upgrade is likely the first method most admins consider. This path involves stopping the old server process, replacing it with a new server binary, and then starting the new binary. If you've installed MySQL manually, you can keep both binaries, but realistically, most systems have MySQL installed through a package manager, so I'll discuss that in a bit more detail.
For example, on a Debian-based system with the official MySQL repositories, the routine would be
sudo apt-get update
sudo dpkg-reconfigure mysql-apt-config
sudo apt-get update
The second command prompts you to select a MySQL major version; after selecting 8.0 you then need to run the update command again. To stop the MySQL process, enter
sudo systemctl stop mysql
If you haven't already, now is a reasonable time to make the physical backup, because you can do so without the server running by simply copying the MySQL data directory.
After that, you can now commence the upgrade process:
sudo apt-get install mysql-server
If you've decided to make any changes to configuration files (e.g., changing the default auth plugin, as mentioned earlier, or changing the default character set and collation) now is a good time to do so.
Now you can start the server:
sudo systemctl start mysql
At this point, the MySQL server should automatically upgrade your tables. Unlike earlier versions of MySQL, you do not have to run the separate mysql_upgrade tool.
Taking an additional set of backups at this point is good practice. In the case of some unusual behavior, it will allow you to compare pre-upgrade and post-upgrade backups. Although you likely won't need to do this, if such information turns out to be valuable, you won't be able to get it any other way.
If you're running a Debian-based system, but not from the official repository, the official recommendation is to change to using the repository before the upgrade. Documentation on how to do that is available on the MySQL website.
On dnf-based systems, instead of apt-get, you can use
sudo systemctl stop mysql-server
sudo dnf config-manager --disable mysql57-community
sudo dnf config-manager --enable mysql80-community
sudo dnf upgrade mysql-server
sudo systemctl start mysql-server
As before, I recommend manually stopping the process with systemctl and taking a physical backup, as well as adjusting settings before issuing the systemctl start command.
« Previous 1 2 3 4 Next »
Buy this article as PDF
(incl. VAT)
Buy ADMIN Magazine
US / Canada
UK / Australia
Related content
-
MariaDB vs. MySQL
MariaDB is a cousin of MySQL – but not an identical twin.
-
MySQL is gearing up with its own high-availability Group Replication solution
 Oracle recently introduced Group Replication as a trouble-free high-availability solution for the ubiquitous MySQL.
 -
Advanced MySQL security tips (a complete guide)
 Security safeguards protect data on MySQL servers.
 -
MySQL as a Service
If you need a hosted solution that provides all the features of MySQL, a MySQL-as-a-service product might be the database option you’re looking for.
-
Setting up MariaDB replication with the help of XtraBackup
 If your database is so important that the content must not be lost between periodic data backups, replication is a possible solution. We describe how to set up replication for MariaDB with the aid of XtraBackup.
Subscribe to our ADMIN Newsletters
Subscribe to our Linux Newsletters
Find Linux and Open Source Jobs
Most Popular
Support Our Work
ADMIN content is made possible with support from readers like you. Please consider contributing when you've found an article to be beneficial.
