Intruder Tools

During reconnaissance, intruders gather information from public sources to learn about the target: the nature of the business, the technical infrastructure, architecture, products, and network configuration. The actions required to discover this information might seem harmless and might even be overlooked by security administrators as “network noise,” but the information gathered in the reconnaissance phase can be useful for launching a network attack. Social Engineering – manipulating people to divulge confidential information or tricking people to do things beneficial to the user – might become prevalent at this stage. If the reconnaissance is pulled off successfully, the target might not know until it is too late.
In this article, I describe some tools and techniques used in the planning, scoping, and recon portion of a penetration test. If you learn to use these recon tools, you’ll get a head start on the intruder by finding these vulnerabilities before they are subject to attack.
Domain Tools
Intruders and penetration testers use a number of tools to obtain DNS information. Many of these tools are very familiar to IT professionals. Tools such as nslookup and dig provide information on domain names, name servers, and network hosts accessible through the Internet. The popular whois service also offers a means for discovering domain information. The Nmap scanner’s -sL option (nmap -sL ) performs a reverse DNS lookup on every IP address in the scan and queries the DNS server each time an IP address is listed.
In addition to these standard DNS tools, a pair of lesser known utilities also inhabit the toolboxes of many experienced pen testers. Dnsrecon , written by Carlos Perez, provides different methods for enumerating targets, such as querying for service-oriented architecture (SOA) and top-level domain, zone transfer, reverse-record lookup, service record enumeration, and brute force attacks on subdomain and host records with a wordlist:
# ./dnsrecon.rb  -t std  -d packetstormsecurity.org
packetstormsecurity.org,199.58.210.12,A
NS25.WORLDNIC.COM,205.178.190.13,SOA
ns25.worldnic.com,205.178.190.13,NS
ns26.worldnic.com,206.188.198.13,NS
mail.packetstormsecurity.org,199.58.210.12,MX,10
Fierce , written by Rsnake, queries your DNS servers of the target and attempts to dump the SOA records:
$ ./fierce.pl -dns <target> -wide -file output.txt
Fierce is interesting to run in larger organizations that have vast networks. If it finds anything, Fierce will scan up and down looking for anything else with the same domain name using reverse lookups.
A search option that allows you to find non-related domain names (Figure 1) is:
$ ./fierce.pl -dns <target> -search searchoption1,searchoption2
(Where searchoption1 and searchoption2 are different names that the target goes by, such as acme.com and acmecompany.com ).
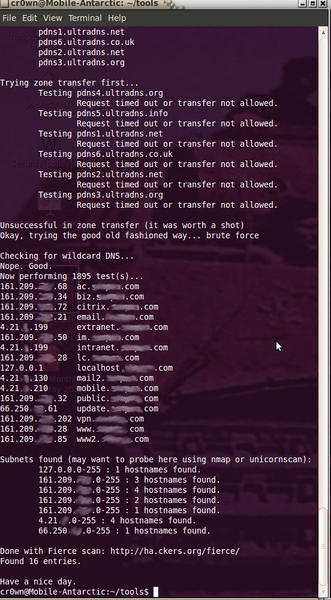 Figure 1: Searching out non-related domain names with Fierce.
Fierce has wordlist support, so you can supply your own dictionary using the -wordlist key:
$ ./fierce.pl -dns <target> -wordlist dicfile.txt -file target.txt.
Dnsrecon, Fierce, and the other DNS tools will likely identify numerous systems that are directly and indirectly associated with the target. You might identify many systems that are out of scope of your initial target, and you must then verify their inclusion in or exclusion from your target scope.
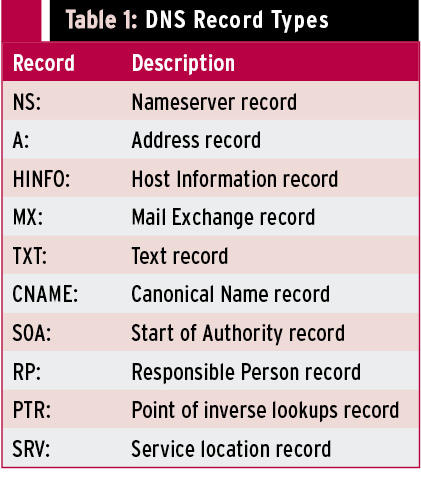
When querying DNS servers, you get some interesting information, indicating which machines are mail servers or name servers. Table 1 shows a list of DNS record types.
Searching for Metadata
Metadata (data about data) resides in email files, spreadsheets, or other electronic document formats. This type of information became popular when it was used to catch the 30-year-old case involving the Wichita, Kansas, BTK killer. Metadata is information about a document, such as who created a file, the date it was created, and when it was last modified. The amount of metadata depends on the properties of the file format. Pen testers can use a tool called Metagoofil to help find metadata on websites. Metagoofil is an information-gathering tool designed for extracting metadata off public documents (PDF, DOC, XLS, PPT, ODP, ODS) available on target websites. To install Metagoofil on Ubuntu, you need libextractor installed on your system:
$ sudo apt-get install libextractor-plugins extract
Edit the metagoofil.py file and have the extcommand read as:
extcommand='/usr/bin/extract'
The metagoofil.py file is executable, but on some systems, you might not be able to issue the simple command:
$ ./metagoofil.py
and will instead have to enter the following:
$ python metagoofil.py
Once Metagoofil is running, issue the following command to search a website for useful documents (see Figure 2):
$ python metagoofil.py
  -d warnerbros.com
  -f all
  -l 50
  -o warnerbros.html
  -t deadfile
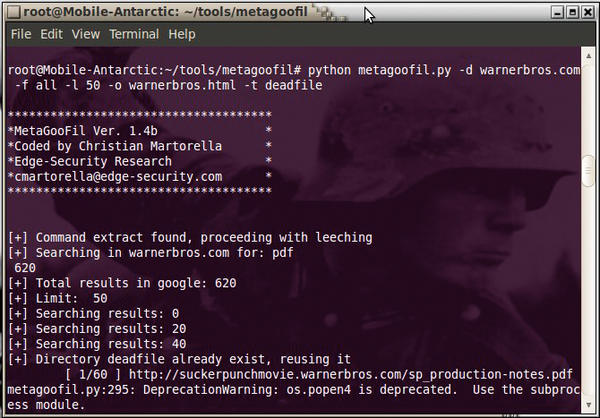 Figure 2: Finding useful documents with metagoofil.
The -d option specifies the website to search, -f specifies the file type, for which I selected all , -l specifies to limit the results to 50 , -o specifies the output (in this case, HTML), and -t specifies the target directory to download the files.
Now open up a web browser and look at the results of the warnerbros.html file (see Figure 3).
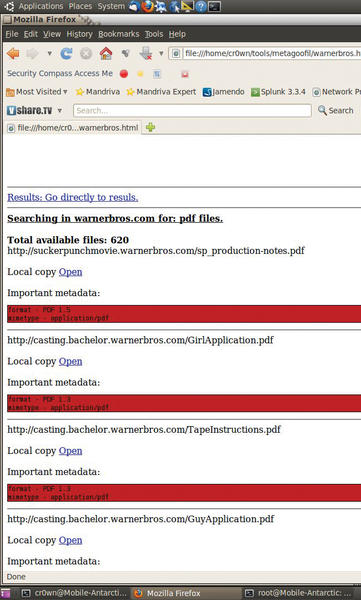 Figure 3: Metagoofil results.
wScroll through the HTML page and find all the important metadata from each file that was found during the scan. At the end of the document is a list of total authors found (potential users) along with path disclosures (see Figure 4).
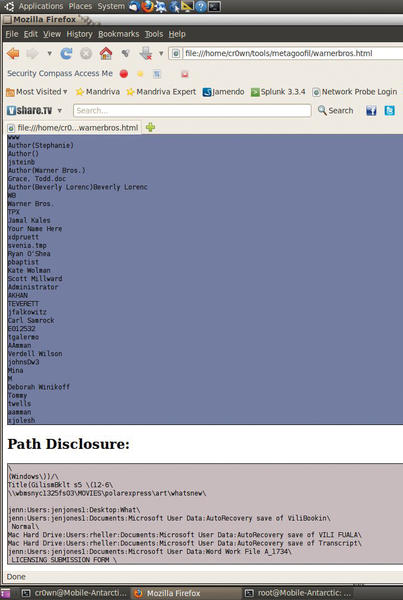 Figure 4: Finding potential users and path disclosures.
Related content
-
What tools do intruders use to
 Professional attackers have much more pointed at your site than just Nmap, and you should too if you want to test your network's security. We'll show you some tools intruders use to gather information.
 -
Open source intelligence tools for pen testing
 Automating the pen test discovery process in the era of IoT, the cloud, and social media.
 -
Kali Linux is the complete toolbox for penetration testing
 The Kali Linux distribution is a complete toolbox for penetration testing.
 -
Improved defense through pen testing
 Discover indicators of compromise with open source pen testing tools.
Subscribe to our ADMIN Newsletters
Subscribe to our Linux Newsletters
Find Linux and Open Source Jobs
Most Popular
Support Our Work
ADMIN content is made possible with support from readers like you. Please consider contributing when you've found an article to be beneficial.
