
For read-heavy workloads, CacheFS is a great caching mechanism for NFS and AFS.
Caching with CacheFS
Early networks were painful slow, although at the time we thought they were fast (better than dial-up). For the best possible efficiency, you didn’t want to move data across the network if you could help it, particularly on network-based filesystems such as NFS or AFS. To compensate for the lag in data access, local mechanisms were created that cached data – either complete files or parts of files – on local storage so that data could be accessed from a local storage device instead of a network-based filesystem.
Today, AI and, in particular, Deep Learning (DL) are rapidly becoming a significant portion of HPC workloads. One of the key parts of DL is training the neural network model. This training process is fairly straightforward: The DL framework (e.g., TensorFlow) reads the training dataset, adjusting the variables in the model by comparing the computed results to the actual results. In essence, the same training data set is read over and over until a convergence criterium is met or until the training is stopped.
If the dominant I/O pattern for DL training is reading, how can one architect a storage solution to match these needs? One answer is to use read caching on the server that is doing the training. Linux has a very good solution for this, generically called CacheFS, which is targeted at, but not limited to, distributed filesystems such as NFS or AFS.
If you have read about FS-Cache or CacheFS, it is easy to get confused by the terminology. FS-Cache is the interface between the filesystem and the cache, allowing the filesystem to be cache agnostic. CacheFS is the caching backend for FS-Cache and handles the data storage and retrieval (i.e., the caching mechanism) by using a partition on a block device. An alternative caching mechanism called CacheFiles uses a directory in an existing filesystem. This architecture allows FS-Cache to use alternative caching mechanisms. The first implementation of CacheFS was developed by Sun Microsystems in 1993 for the Solaris 2.3 operating system. After that, other versions soon appeared, notably for Irix in 1994.
FS-Cache needs a cache backend, which is a storage driver configured to provide caching services (i.e., cachefiles). The initial FS-Cache implementation for Linux offered two options: a device and a directory. In my experience, almost all people use the directory option, which allows you to designate a directory on a device where the cache data is stored.
CacheFS is not a technology that you enable to get read caching for your filesystems. The filesystem has to be written to use FS-Cache, which itself can use any caching mechanisms of the caching interface. Figure 1, after a figure of David Howells, the original Linux architect for FS-Cache, gives you a general view of the data flow when using FS-Cache and CacheFS.
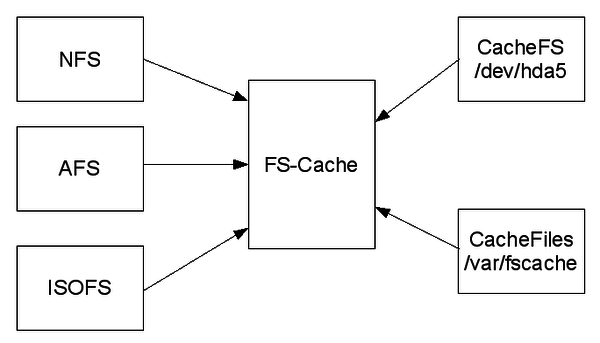 Figure 1: Data flow showing FS-Cache, CacheFS, and CacheFiles.
NFS or AFS or ISOFS, which are generically called the netfs, make function calls to FS-Cache, which in turn calls either CacheFS or CacheFiles. FS-Cache allows the filesystems on the left-hand side in the figure to use caching, without having to know about the caching implementation, although it has to have been “ported” to use FS-Cache. This method allows you to keep a constant API for the filesystems (NFS, AFS, etc.) while allowing developers to slip in different caching schemes as needed (or desired). Notice that to store the locally cached files, CacheFS uses a partition on a block device, which in Figure 1 is /dev/hda5, whereas CacheFiles uses a directory on an already mounted filesystem – in this case, /var/fscache. The data flow of the netfs (here, NFS) and FS-Cache are shown in more detail in Figure 2.
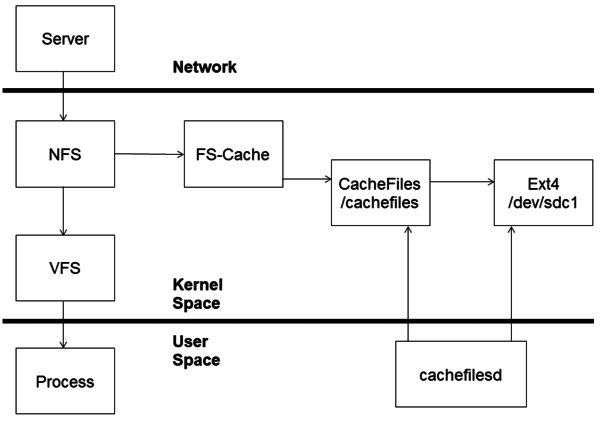 Figure 2: More detailed data flow showing FS-Cache, CacheFS, and CacheFiles along with the netfs.
The netfs communicates with FS-Cache, which in turn communicates to CacheFS or CacheFiles. Notice, too, that the netfs also communicates with the virtual filesystem as needed (CacheFS is just for caching and is not intended to be a complete filesystem itself). Documentation for general filesystem caching can be viewed online.
A key concept behind FS-Cache is that it does not itself require a file from the netfs to be completely loaded into the cache before the file can be accessed through the cache because:
- It must operate without a cache.
- It must be possible to open a remote file that's larger than the cache.
- The combined size of all open remote files must not be limited to the size of the cache.
- The user should not be forced to download an entire file just to access a portion of the file once.
Consequently, FS-Cache is built around the concept of pages. Pages, rather than files, are put into the cache and are used when the netfs requires it.
The kernel documentation for FS-Cache points out some interesting facts about the implementation:
- You can use more than one cache at a time.
- Caches can be added or removed at any time.
- Data I/O is done directly to and from the netfs page.
- As much caching as possible is done asynchronously.
- If configured, FS-Cache will gather certain stats and display them with the use of several /proc files:
- /proc/fs/fscache/stats (the primary main location)
- /proc/fs/fscache/histogram
Setting Up CacheFiles
As a simple experiment, I NFS-exported my home directory from a laptop (running Xubuntu 20.04) to my primary desktop (running Xubuntu 18.04). On the primary desktop, I mounted the NFS-exported filesystem and enabled FS-Cache. On the desktop, I mounted the NSF-exported filesystem with the following entry in /etc/fstab:
192.168.1.13:/home/laytonjb   /mnt/data   nfs  \
  auto,noatime,nolock,bg,nfsvers=4,intr,tcp 0 0
To check that the filesystem is mounted, I entered:
$ ls -s /mnt/data
total 32
4 Desktop/  4 Documents/  4 Downloads/  4 Music/\
  4 Pictures/  4 Public/  4 Templates/  4 Videos/
You can also easily check to see whether FS-Cache is being used:
# cat /proc/fs/nfsfs/volumes
NV SERVER   PORT DEV   FSID                              FSC
v4 c0a8010d  801 0:53  7867b2b773c843a1:83c2d5c0f7015194 no
For the NFS client, you can install FS-Cache on the desktop:
$ sudo apt-get install cachefilesd -y
By default, the cachefilesd package installs a default FS-Cache configuration file in /etc/cachefilesd.conf (Listing 1). You can set a few options in this file. The line that begins with dir points to the host directory that will be used for the cache. The next line allows you to add a tag to FS-Cache to distinguish multiple caches. The next six lines are cache parameters that allow you to define behavior on the basis of blocks with parameters that start with b (free space) or of files with the parameters that start with f.
Listing 1: /etc/cachefilesd.conf
$ more /etc/cachefilesd.conf
###############################################################################
#
# Copyright (C) 2006,2010 Red Hat, Inc. All Rights Reserved.
# Written by David Howells (dhowells@redhat.com)
#
# This program is free software; you can redistribute it and/or
# modify it under the terms of the GNU General Public License
# as published by the Free Software Foundation; either version
# 2 of the License, or (at your option) any later version.
#
###############################################################################

dir /var/cache/fscache
tag mycache
brun 10%
bcull 7%
bstop 3%
frun 10%
fcull 7%
fstop 3%

# Assuming you're using SELinux with the default security policy included in
# this package
secctx system_u:system_r:cachefiles_kernel_t:s0
The first two block parameters define the minimum amount of free space (brun) and the number of available files (frun). If the amount of free space and the number of available files drops below 10%, then culling is turned on. Culling is the process of removing data from the cache, starting with the oldest data, and prevents the cache from filling so that no new data can be cached. Both parameters must be exceeded before culling is turned on.
The next two parameters, bcull and fcull, are similar to brun and frun in that if they are exceeded, culling is turned on. However, they are different in that if either parameter is exceeded, culling commences. The default limits are 7%, so if the amount of free space (bcull) is below 7% or if the number of available files drops below 7%, culling is turned on.
The third set of parameters, bstop and fstop, controls when caching is stopped until culling has raised the situation above the limits. The defaults are 3%, so if the amount of free space drops below 3% (bstop) or if the number of available files drops below 3% (fstop), caching stops until culling satisfies the first two sets of parameters.
According to the online Red Hat 7 documentation, you need to follow just a couple of rules in setting the caching parameters:
0 ≤ bstop < bcull < brun < 100

0 ≤ fstop < fcull < frun < 100
Remember that these values are percentages, so they have to be between 0 and 100. In this article, I use the configuration defaults.
In the file /etc/default/cachefilesd you can make another simple configuration to FS-Cache by adding a line that reads RUN=yes. The file on my desktop configuration looks like Listing 2. The line RUN=yes is likely to be in the file already but may be commented out, so you’ll just need to uncomment it.
Listing 2:cachefilesd Defaults
# Defaults for cachefilesd initscript
# sourced by /etc/init.d/cachefilesd

# You must uncomment the run=yes line below for cachefilesd to start.
# Before doing so, please read /usr/share/doc/cachefilesd/howto.txt.gz as
# extended user attributes need to be enabled on the cache filesystem.
RUN=yes

# Additional options that are passed to the Daemon.
DAEMON_OPTS=""
The last change you need to make is to the filesystem that will be used as the cache. For my example, the command is,
# tune2fs -o user_xattr /dev/sda1
where /dev/sda1 is the device where /var/cache/fscache is located.
To start FS-Cache, run the following command as root:
# systemctl start cachefilesd
With systemd, you can check the status of the cache (Listing 3). Everything looks good, so I can run an experiment. (And, yes, I was running the test on July 4th.)
Listing 3: Checking Cache Status
# systemctl status cachefilesd
  cachefilesd.service - LSB: CacheFiles daemon
   Loaded: loaded (/etc/init.d/cachefilesd; generated)
   Active: active (running) since Sat 2020-07-04 11:00:41 EDT; 33min ago
     Docs: man:systemd-sysv-generator(8)
  Process: 819 ExecStart=/etc/init.d/cachefilesd start (code=exited, status=0/SUCCESS)
    Tasks: 1 (limit: 4915)
   CGroup: /system.slice/cachefilesd.service
           └─1030 /sbin/cachefilesd

Jul 04 11:00:41 laytonjb-desktop systemd[1]: Starting LSB: CacheFiles daemon...
Jul 04 11:00:41 laytonjb-desktop cachefilesd[819]:  * Starting FilesCache daemon  cachefilesd
Jul 04 11:00:41 laytonjb-desktop cachefilesd[894]: About to bind cache
Jul 04 11:00:41 laytonjb-desktop cachefilesd[894]: Bound cache
Jul 04 11:00:41 laytonjb-desktop cachefilesd[1030]: Daemon Started
Jul 04 11:00:41 laytonjb-desktop cachefilesd[819]:    ...done.
Jul 04 11:00:41 laytonjb-desktop systemd[1]: Started LSB: CacheFiles daemon.
Onto the NFS server I downloaded the source for Octave 5.1. The experiment is to copy from the NFS server with FS-Cache turned on and then copy the same file to a different directory. Then, I can compare the copy times and look at the FS-Cache statistics in /proc.
Before starting the copy over NFS, take a look at the FS-Cache stats (Listing 4). An explanation of these stats is in the kernel documentation. Notice that almost all values are zero because I just started FS-Cache. The non-zero stats are the result of running ls -s on the NFS mountpoint before the copy to make sure it was mounted.
Listing 4: FS-Cache Stats
# cat /proc/fs/fscache/stats
FS-Cache statistics
Cookies: idx=138 dat=0 spc=0
Objects: alc=0 nal=0 avl=0 ded=0
ChkAux : non=0 ok=0 upd=0 obs=0
Pages  : mrk=0 unc=0
Acquire: n=138 nul=0 noc=0 ok=138 nbf=0 oom=0
Lookups: n=0 neg=0 pos=0 crt=0 tmo=0
Invals : n=0 run=0
Updates: n=0 nul=0 run=0
Relinqs: n=136 nul=0 wcr=0 rtr=0
AttrChg: n=0 ok=0 nbf=0 oom=0 run=0
Allocs : n=0 ok=0 wt=0 nbf=0 int=0
Allocs : ops=0 owt=0 abt=0
Retrvls: n=0 ok=0 wt=0 nod=0 nbf=0 int=0 oom=0
Retrvls: ops=0 owt=0 abt=0
Stores : n=0 ok=0 agn=0 nbf=0 oom=0
Stores : ops=0 run=0 pgs=0 rxd=0 olm=0
VmScan : nos=0 gon=0 bsy=0 can=0 wt=0
Ops    : pend=0 run=0 enq=0 can=0 rej=0
Ops    : ini=0 dfr=0 rel=0 gc=0
CacheOp: alo=0 luo=0 luc=0 gro=0
CacheOp: inv=0 upo=0 dro=0 pto=0 atc=0 syn=0
CacheOp: rap=0 ras=0 alp=0 als=0 wrp=0 ucp=0 dsp=0
CacheEv: nsp=0 stl=0 rtr=0 cul=0
The timed initial copy command is:
$ time cp /mnt/data/Downloads/octave-5.1.0.tar.gz /tmp

real    0m46.298s
user    0m0.000s
sys     0m0.034s
Don’t worry about the performance of the transfer. After the transfer, take a look at the FS-Cache stats again (Listing 5).
Listing 5: New FS-Cache Stats
# cat /proc/fs/fscache/stats
FS-Cache statistics
Cookies: idx=138 dat=1 spc=0
Objects: alc=4 nal=0 avl=4 ded=0
ChkAux : non=0 ok=0 upd=0 obs=0
Pages  : mrk=7821 unc=0
Acquire: n=139 nul=0 noc=0 ok=139 nbf=0 oom=0
Lookups: n=4 neg=4 pos=0 crt=4 tmo=0
Invals : n=0 run=0
Updates: n=0 nul=0 run=0
Relinqs: n=136 nul=0 wcr=0 rtr=0
AttrChg: n=0 ok=0 nbf=0 oom=0 run=0
Allocs : n=0 ok=0 wt=0 nbf=0 int=0
Allocs : ops=0 owt=0 abt=0
Retrvls: n=5 ok=0 wt=0 nod=5 nbf=0 int=0 oom=0
Retrvls: ops=5 owt=0 abt=0
Stores : n=7821 ok=7821 agn=0 nbf=0 oom=0
Stores : ops=31 run=7852 pgs=7821 rxd=7821 olm=0
VmScan : nos=0 gon=0 bsy=0 can=0 wt=0
Ops    : pend=0 run=36 enq=7852 can=0 rej=0
Ops    : ini=7826 dfr=0 rel=7826 gc=0
CacheOp: alo=0 luo=0 luc=0 gro=0
CacheOp: inv=0 upo=0 dro=0 pto=0 atc=0 syn=0
CacheOp: rap=0 ras=0 alp=0 als=0 wrp=0 ucp=0 dsp=0
CacheEv: nsp=0 stl=0 rtr=0 cul=0
If you compare the stats after the copy, you can see that caching is happening. A few highlights are:
- Object: alc=4 (started as 0) is the number of objects allocated.
- Pages: mrk=7821 (started as 0) is the number of pages marked as being cached.
- Stores: n=7281 (started as 0) is the number of storage (write) requests seen.
- Ops: ini=7826 (started as 0) is the number of times async ops added to pending queues.
The next test does the same copy but not to /tmp. Instead, it copies to the local directory. The timed output from the command is:
$ time cp /mnt/data/Downloads/octave-5.1.0.tar.gz .

real    0m0.371s
user    0m0.000s
sys     0m0.024s
Notice the massive difference in time: 46.298s in the first copy and 0.371s in the second copy. Listing 6 shows the FS-Cache stats.
Listing 6: Stats for Local Directory Copy
# cat /proc/fs/fscache/stats
FS-Cache statistics
Cookies: idx=138 dat=1 spc=0
Objects: alc=4 nal=0 avl=4 ded=0
ChkAux : non=0 ok=0 upd=0 obs=0
Pages  : mrk=7821 unc=0
Acquire: n=139 nul=0 noc=0 ok=139 nbf=0 oom=0
Lookups: n=4 neg=4 pos=0 crt=4 tmo=0
Invals : n=0 run=0
Updates: n=0 nul=0 run=0
Relinqs: n=136 nul=0 wcr=0 rtr=0
AttrChg: n=0 ok=0 nbf=0 oom=0 run=0
Allocs : n=0 ok=0 wt=0 nbf=0 int=0
Allocs : ops=0 owt=0 abt=0
Retrvls: n=5 ok=0 wt=0 nod=5 nbf=0 int=0 oom=0
Retrvls: ops=5 owt=0 abt=0
Stores : n=7821 ok=7821 agn=0 nbf=0 oom=0
Stores : ops=31 run=7852 pgs=7821 rxd=7821 olm=0
VmScan : nos=0 gon=0 bsy=0 can=0 wt=0
Ops    : pend=0 run=36 enq=7852 can=0 rej=0
Ops    : ini=7826 dfr=0 rel=7826 gc=0
CacheOp: alo=0 luo=0 luc=0 gro=0
CacheOp: inv=0 upo=0 dro=0 pto=0 atc=0 syn=0
CacheOp: rap=0 ras=0 alp=0 als=0 wrp=0 ucp=0 dsp=0
CacheEv: nsp=0 stl=0 rtr=0 cul=0
Notice that the major stats didn't change:
- Object: alc=4 (same as before)
- Pages: mrk=7821 (same as before)
- Stores: n=7281 (same as before)
- Ops: ini=7826 (same as before)
The file was copied, but in this case it was copied from the cache.
If you are curious, you can also check the cache directory. Note that this has to be done as root:
# ls -Z /var/cache/fscache/
? cache/  ? graveyard/
# du -sh /var/cache/fscache/
31M     /var/cache/fscache/
Summary
SSDs of various types have become inexpensive and are widely available. These drives are 2.5 inches or smaller and use very little power, so it’s fairly simple to put a number of these in a server. Although you can use them as local storage, it’s also possible to use them as a cache for NFS, AFS, or both.
With FS-Cache, you can configure the cache to act as a read cache, which can be used for any read I/O and can have a great effect on the I/O performance of applications, particularly in Deep Learning training.