
Sure, you could pay for cloud services, but with GlusterFS, you can take the idle space in your own data center and create a large data warehouse quickly and easily.
GlusterFS
GlusterFS combines the unused storage space on multiple servers to create a single, large, virtual drive that you can mount like a legacy filesystem – using NFS or FUSE on a client PC. And, you can add more servers or remove existing servers from the storage pool on the fly. GlusterFS works kind of like “RAID on the network,” and if you look closely, you will discover many RAID concepts during setup.
GlusterFS really comes into its own when you need to store huge quantities of data, have redundant file storage, or write data very quickly for later access. GlusterFS can juggle multiple petabytes easily, and it’s easy to install and manage.
Theoretically, data throughput increases with each server you add, although the network connection also imposes limits. GlusterFS can use both TCP/IP connections and InfiniBand RDMA. Whether just one or several thousand clients are attached to the wire at the same time makes no difference.
GlusterFS is equally well suited for small or large networks, and it will distribute your payload and metadata across all your servers in an intelligent way, thus making it error tolerant and highly available.
Thrifty Old-Timer
GlusterFS itself goes back a couple of years: Development started in 2005 with Gluster Inc. At that time, the developers placed the source code under the GNU GPL and mainly earned money on commercial support.
At the end of 2011, Red Hat acquired the distributed filesystem for several million US dollars and thus pushed it into the limelight . Initially, the sales model didn’t change. The current GlusterFS versions, on the basis of which Red Hat has compiled some of its commercial products in its cloud computing division, are licensed under the GPL v3.
To show how fast and easy it is to set up GlusterFS, I’ll use a simple example. On a small network with Gigabit Ethernet, three servers provide hard disk capacity, and a client wants to use them (Figure 1).
 Figure 1: The lab setup has three servers; GlusterFS bundles their storage and serves it up to a client.
GlusterFS requires at least 1GB of RAM in the servers, 8GB of free space on the disk, at least Gigabit Ethernet, and a 64-bit version of Linux.
For GlusterFS 3.2.5, which was the latest version at press time, the developers recommend Red Hat Enterprise Linux 6.1 because it has undergone the most testing. A cheaper alternative is available in the form of the free counterpart to Red Hat, CentOS; you should have a fresh installation of CentOS on all of the computers you use to follow this example. The installation and setup works in exactly the same way on other distributions (see the “GlusterFS Abroad” box).
After fulfilling all of the requirements, it’s time to turn to the servers that will be providing the storage capacity. If you are running these servers on a recent CentOS 6.2, you can download the matching GlusterFS packages off the Internet. You need the core, fuse, and geo-replication packages and should install them in this order, working as root:
rpm -Uvh glusterfs-core-Version.x86_64.rpm
rpm -Uvh glusterfs-fuse-Version.x86_64.rpm
rpm -ivh glusterfs-geo-replication-Version.x86_64.rpm
Typing glusterfs -V tells you whether or not the installation worked.
Building Blocks
Each server gives one of its directories (referred to as a “brick”) into the care of GlusterFS, which combines multiple bricks to create a large data repository. The volume, in turn, is mounted by the clients like a drive. For this to happen and for the individual servers to exchange information, you need to open the matching ports on the servers.
To be precise, these are UDP port 111; TCP ports 111, 24007, 24008; and an additional port for each brick starting from 24009. If you want to use NFS on the clients later to access the data storage, you also need to open the ports starting with 38465 – again, you need one port for each server (see Figure 2).
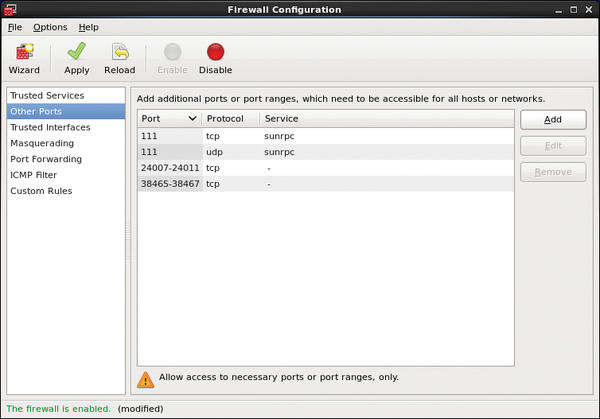 Figure 2: The example firewall configuration in CentOS.
On a freshly installed CentOS 6.2, the following commands will do the trick:
iptables -I INPUT -m state --state NEW -m tcp -p tcp --dport 24007:24011 -j ACCEPT
iptables -I INPUT -m state --state NEW -m tcp -p tcp --dport 111 -j ACCEPT
iptables -I INPUT -m state --state NEW -m udp -p udp --dport 111 -j ACCEPT
iptables -I INPUT -m state --state NEW -m tcp -p tcp --dport 38465:38467 -j ACCEPT
service iptables save
service iptables restart
These commands open up the ports for three bricks and three servers, which will be perfect for this example.
Finally, you need to launch the GlusterFS daemon on all your servers. On CentOS, you would use:
/etc/init.d/glusterd start
The installation scripts in the packages have already ensured that the server is started at boot time.
Collection Point
After completing these preparations, you can log in to one of the servers as the root user. It doesn’t really matter which server you choose, but it does make sense to go for the first one (192.168.2.101). Next, log in to the other two servers using the gluster tool:
gluster peer probe 192.168.2.102
gluster peer probe 192.168.2.103
Instead of using the IP addresses, you can use the hostnames. These three computers now form a Trusted Storage Pool (Figure 3).
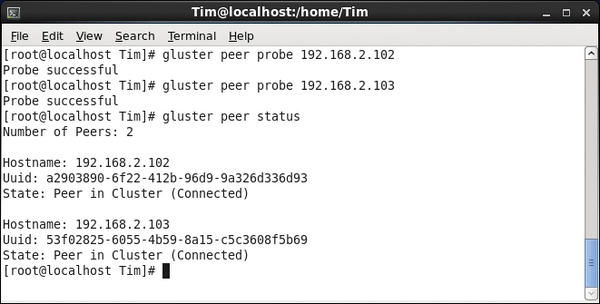 Figure 3: The Trusted Storage Pool comprises three computers; the local computer is not listed.
GlusterFS will only access these computers in the examples that following. To discover their status, type the following:
gluster peer status
If you erroneously attached a server,
gluster peer detach IP address
will remove it from the Trusted Storage Pool. Incidentally, the gluster tool is formally referred to as the Gluster Management Console. In contrast to the older versions of GlusterFS, you no longer need to edit the configuration file directly, thanks to the console. If you prefer to do some manual editing, you can open the /etc/glusterfs/glusterfsd.vol file. In the same directory, you will find a nicely commented sample configuration, glusterfs.vol.sample, which, with the help of the information in this article, should be easy to understand. Speaking of configuration: All servers in the storage pool automatically synchronize their configuration, so they are always up to date.
Building a House
The next step is to tell GlusterFS which directories (a.k.a. bricks) it should combine on the individual servers to create a new large volume. In this example, I am using the /data directory on each server, which GlusterFS can now access for its own purposes. According to Red Hat, the filesystem of choice is XFS, but GlusterFS will also work with any other POSIX-compatible filesystem, such as ext3 or ext4. On one hand, these filesystems have had less testing; on the other hand, you might need to do without some GlusterFS features (e.g., Access Control Lists).
The hardware on which the filesystem resides doesn’t matter as far as GlusterFS is concerned. This means /data can be a legacy hard disk on a server or a RAID array, an Amazon EBS, or a SAN. To create a new volume named examplevolume, enter:
gluster volume create examplevolume transport tcp 192.168.2.101:/data 192.168.2.102:/data 192.168.2.103:/data
In this example, you can even leave out transport tcp because GlusterFS automatically assumes this is a TCP/IP connection. You can type the following to see if everything works:
gluster volume info
This command lists all of the existing volumes and shows what they’re made of (Figure 4).
 Figure 4: The example volume is now complete.
Now, you can do the following:
gluster volume start examplevolume
to start the volume.
Clients
The clients can now mount the created volume. For this to happen, you first need to install the Gluster Native Client on the client side. It uses FUSE to mount the volume and, thus, runs totally in user space and is POSIX compliant.
The Gluster Native Client is included in the same packages as the server programs. On a CentOS client, you would use the following three commands for the installation:
rpm -Uvh glusterfs-core-Version.x86_64.rpm
rpm -Uvh glusterfs-fuse-Version.x86_64.rpm
rpm -ivh glusterfs-geo-replication-Version.x86_64.rpm
At first glance, this seems too good to be true, but with GlusterFS, any computer on the network can be a server and a client at the same time. This means that any computer on the network could hand over a part of its storage capacity to GlusterFS and then tap into the large storage pool – as long as you remember to open the appropriate ports on the client.
Mounting the volume on the client is handled in the normal way. In this example, the command
mount -t glusterfs 192.168.2.101:/examplevolume /mnt/glusterfs
mounts examplevolume in the /mnt/glusterfs directory. If you want this to happen automatically at boot time, adding the following line added to /etc/fstab will help you out:
192.168.2.101:/examplevolume /mnt/glusterfs glusterfs defaults,_netdev 0 0
For troubleshooting purposes, you might need to raise the log level:
192.168.2.101:/examplevolume /mnt/glusterfs glusterfs defaults,_netdev,loglevel=WARNING 0 0
Incidentally, it doesn’t matter which server you specify for the mount. The Gluster Native Client only retrieves the configuration from the server and then communicates autonomously with the servers involved.
The Gluster Native Client ensures the best possible concurrency and maximum possible write speeds. Unfortunately, it is available exclusively for Linux systems right now. Alternatively, you can use NFS v3 to mount the volume, but again, the results have only been tested on Linux. If you use, for example, Windows 7, you might encounter some obstacles. To mount the volume on the client using NFS v3, you first need to ensure that all of the required tools are installed and then, on Linux, issue the following command:
mount -o mountproto=tcp -t nfs 192.168.2.101:/examplevolume /mnt/glusterfs
If you only see an error message, something must be wrong with your network configuration.
When the volume appears below /mnt/glusterfs, you can start to populate it with files. GlusterFS will distribute the files randomly across the individual bricks – in this case, across the /data directories on the three servers. You can verify this for yourself by logging into one of the servers and taking a look at the directory in question.
This approach helps GlusterFS achieve very fast read and write speeds. Unfortunately, this method is anything but safe: If one of the servers fails, all of the data saved on that server is lost. Luckily, GlusterFS can set up volumes other than as the distributed volumes that I have looked at so far.
Redundant Storage
Unlike a distributed volume, a replicated volume sends copies of files to all servers. Even if one of the three servers fails, you still have two duplicates of the file up your sleeve. The following command creates a replicated volume:
gluster volume create examplevolume replica 3 transport tcp 192.168.2.101:/data 192.168.2.102:/data 192.168.2.103:/data
The replica 3 parameter tells GlusterFS to replicate the file to be saved exactly three times (here, that means storing a copy on each server). The GlusterFS developers recommend setting this value to the number of bricks, with the bricks preferably residing on different servers.
A Distributed Replicated Volume follows the same principle, but only replicates data to some of the bricks. In the following example,
gluster volume create examplevolume replica 2 transport tcp 192.168.2.101:/data 192.168.2.102:/data 192.168.2.103:/data 192.168.2.104:/data
each file exists exactly twice, each copy stored on one of the four servers. In other words, a Distributed Replicated Volume offers a compromise between data protection and speed. The replica values should always be set to a multiple of the existing bricks. To be quite sure that the replicated data really do end up on different servers, the create command should list the first bricks on each server, then the second bricks on each server, and so on. GlusterFS forms matching internal groups, or sub-volumes.
A Striped Volume takes this one step further than the Distributed Volume: In the background, GlusterFS splits up each file delivered to it and distributes the pieces randomly over the individual bricks. This allows for very fast read and write speeds, but again, if even one server fails, all of the data is lost. Therefore, volumes of this kind are only suitable for large, temporary files. To create them a Striped Volume, enter:
gluster volume create examplevolume stripe 3 transport tcp 192.168.2.101:/data 192.168.2.102:/data 192.168.2.103:/data
The value following stripe should reflect the number of bricks. If this isn’t the case, you can create a Distributed Striped Volume, which spreads the file snippets over two or more bricks. The number of bricks should be a multiple of the stripe value.
Constraints
As it stands now, the configuration allows any client on the network to mount the volume. To prevent this, you need the help of the Gluster Management Console on the server:
gluster volume set examplevolume auth.allow 192.168.2.*
For multiple clients, you just append the IP addresses or use an asterisk as a wildcard. In this example, only computers with the 192.168.2. prefix are allowed access. Alternatively, you can deny access to individual clients:
gluster volume set examplevolume auth.reject 192.168.2.55 192.168.2.56
These two clients can still mount examplevolume, but they can’t access it.
Size Matters
If you are running out of space on the volume, you can easily add another server on the fly with:
gluster peer probe 192.168.2.105
and then add a brick:
gluster volume add-brick examplevolume 192.168.2.105:/export
If you enlarge a Distributed Replicated or Distributed Striped volume, you need to add new bricks in a multiple of the replica or stripe value, or both (see the “Redundant Storage” section).
Similarly, you can remove a brick on the fly,
gluster volume remove-brick examplevolume 192.168.2.103:/data
which is useful if a hardware failure occurs. In that case, GlusterFS simply removes the brick from its configuration. The data stored on the affected brick remains where it is, although it is not accessible to the client. In the case of Distributed Replicated or Distributed Striped volumes, you again need to remove bricks in multiples of the replica or stripe value from the same group (see the “Redundant Storage” section).
If you are resizing a volume, the data stored on it will probably no longer be spread over the servers or bricks in an optimum way. Thus, you should always rebalance after resizing:
gluster volume rebalance examplevolume start
This command is actually only a shortcut for two other commands, which the “Two Phases” box introduces.
How long rebalancing takes depends primarily on the number of files stored in the bricks. You can view the current progress by typing:
gluster volume rebalance examplevolume status
Also, you can stop the whole process as follows:
gluster volume rebalance examplevolume stop
If you then use the start command above, GlusterFS automatically continues where it left off, rather than restarting.
Substitute
If a server is not working properly, you will definitely want to replace it. To do so, you integrate the new server, but not the brick, that will serve as the replacement. The following command then migrates the data from the old brick to the new brick:
gluster volume replace-brick examplevolume 192.168.2.101:/data 192.168.2.106:/sub start
In this command, GlusterFS copies the data from the brick 192.168.2.101:/data to its colleague in 192.168.2.106:/sub and then replaces the volume on the old brick with the new one. For this to happen, you must have FUSE in place and set up on the server. To view the migration progress, type:
gluster volume replace-brick examplevolume 192.168.2.101:/data 192.168.2.106:/ersatz status
Finally, you need to commit the migration:
gluster volume replace-brick examplevolume 192.168.2.101:/data 192.168.2.106:/ersatz status
Now you can remove the troublesome server 192.168.2.101 and repair it.
To disconnect a volume, you first need to stop it, by doing:
gluster volume stop examplevolume
which keeps clients from accessing the volume. Then, you can delete as follows:
gluster volume delete examplevolume
GlusterFS offers profiling and monitoring tools that help you quickly identify bottlenecks and keep an eye on data throughput. To use the tools, you need to enable profiling for a volume
gluster volume profile examplevolume start
then enter
gluster volume profile examplevolume info
to output statistics (Figure 5).
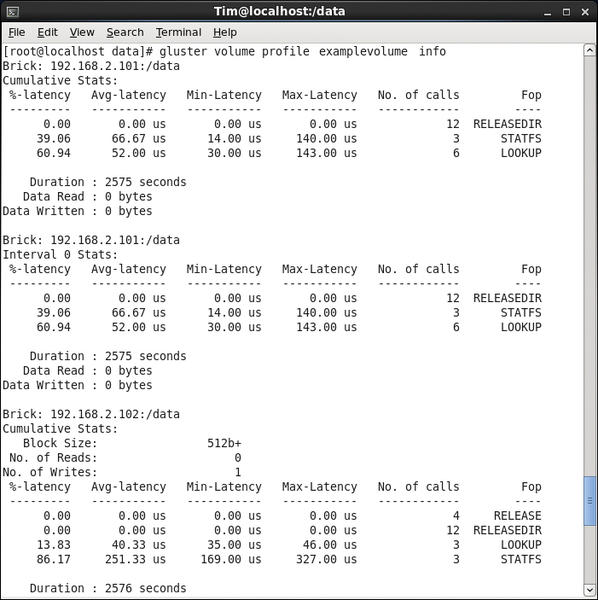 Figure 5: The profile statistics keep you up to date with I/O speed and thus with bottlenecks.
Conclusions
GlusterFS can do even more. Geo-replication lets you mirror data on a volume across the wire. The target can be a single directory or another GlusterFS volume. The transmission can use a secure SSH tunnel if needed. Right now, GlusterFS only supports master-slave operations in which the GlusterFS source installation (the master) transfers its data to the slaves. Geo-replication is mainly intended for creating mirrors and backups.Additionally, you can restrict the space available to individual users on a volume or in individual directories – in other words, you can set up quotas. Finally, access to files and directories can be controlled with the use of POSIX Access Control Lists. As mentioned earlier, this assumes you have the right kind of filesystem on the bricks. GlusterFS also offers a REST-API.
More features are on the roadmap for the future: According to Red Hat, it is currently investing heavily in GlusterFS development. The company is also looking to collaborate more closely with the community and thus establish GlusterFS as a standard for distributed storage in the long term. The distributed filesystem will form the basis of Red Hat and JBoss installations. The new version 3.3 of GlusterFS is already available as a beta version and will be released in 2012Q2 or Q3. The new version can act as a back end for Apache Hadoop and also supports Unified File and Object Storage for accessing stored data via an Amazon S3-compatible interface.
If you are interested in more details on managing GlusterFS, check out the very good PDF manuals on the GlusterFS website. If you have questions, the community portal is definitely worth a visit.
Info
[1] Gluster website