
OpenCL is an open standard for parallel programming in heterogeneous environments.
OpenCL
OpenCL is a programming language for parallel environments. In this article, I look at how to get started with OpenCL. The example described here shows how to use OpenCL for parallel computations with the graphics processor (GPU), but this is just a sample of the many powers of OpenCL.
In the past few months, more and more high-powered computers have leveraged their video cards to secure a place in the list of Top 500 supercomputing sites. It is possible to invoke the GPU directly to assist with generic application processing, but the data has to be parallelizable. In today’s machines, quad- and hexacore processors with four or six processor cores have become the norm. Each processor core can handle a different task at any given time. For example, while core 1 is accessing RAM, core 2 might be adding the numbers in two registers.
A graphics card, on the other hand, comprises several hundred cores, but they are not as versatile. Calculations performed by the GPU use SIMD/SIMT [1], which means the same instruction is executed at the same time on all the active cores but applied to different data. This restriction imposes a limitation on the underlying problem, but programmers can still speed up certain types of applications using the GPU and OpenCL programming techniques.
On the GPU
Just a few years ago, video cards were designed solely for accelerating special applications. To perform such precise, generic calculations, programmers had to delve deep into their box of tricks and take a roundabout route to achieve their aims. For example, a scientist who wanted to add two large matrices could interpret them as textures with OpenGL, position them one in front of the other, and make the front half transparent. The rendered result is a texture that can then be interpreted as the resulting matrix. Although this might sound like a fairly simple addition, you’ll soon hit limits if you start to multiply, or introduce, loops, jumps, or conditions. At the beginning of 2007, NVidia took the first step toward providing some structure to this collection of tricks with its CUDA parallel computing architecture [2].
The CUDA architecture gives programmers an interface for solving arbitrary problems with parallelizable data without taking the roundabout approach that I mentioned. Also, C for CUDA gives developers an easy option for parallel computing with the video card. However, CUDA is restricted to NVidia cards, and you will need to use a special compiler (namely, the NVCC in the case of C for CUDA), which makes integrating CUDA with existing projects more difficult.
Faced with this problem, Apple took the initiative and (along with AMD, IBM, and NVidia) submitted a specification to the Khronos Group, which promotes the OpenGL specification. Open Computing Language 1.0 (OpenCL) was released late in 2008 [3].
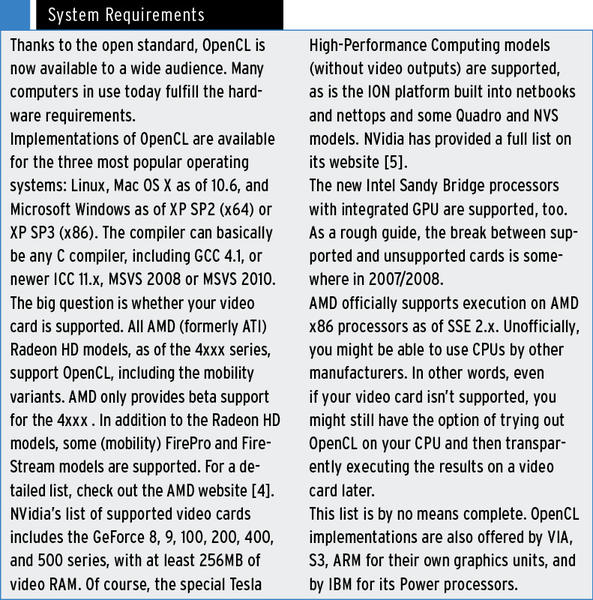
OpenCL now provides a cross-platform standard for creating heterogeneous, parallel programs for CPUs, GPUs, and other processors. The presence of the OpenCL standard makes it possible to perform generic calculations on the GPU independently of the platform and manufacturer (see the “System Requirements” box).
OpenCL offers exciting opportunities for software developers who want to accelerate their applications on contemporary PCs. However, do keep in mind that the video card isn’t the answer for everything.
A video card–based solution works best for problems that involve serious amounts of computation and don’t rely on double precision. Also, running a problem on the GPU involves some overhead and only pays dividends for problems that exceed a certain input size.
Installing OpenCL
The OpenCL specification lets individual manufacturers (AMD, NVidia, Intel, etc.) offer implementations that are slightly different. What you mainly get from the manufacturers is a library and the matching header file.
Besides the original specification for C, C++ bindings have been included by default since OpenCL 1.1. These bindings facilitate the handling of OpenCL data structures and help keep the code shorter. Because the C++ bindings wrap the C functions inline, the process doesn’t involve any computational overhead.
If you have a supported AMD/ATI video card, or if want to use your CPU, you must install the ATI Stream SDK [6]. After downloading and unpacking the ATI Stream SDK, it is also a good idea to read the guide. Basically, the path variable $LD_LIBRARY_PATH is extended to include the libOpenCL.so library. A user on the AMD forum also kindly provided a .deb package for Ubuntu, which automatically installs the library and header files in the right system folders [7]. In this case, you do not need to change $LD_LIBRARY_PATH.
Users of NVidia video cards will need the CUDA Toolkit [8]. After downloading and unpacking the file, become root to install the toolkit. The standard path for the cl.h header file is /usr/local/cuda/include; the library belongs in /usr/local/cuda/lib or in /usr/local/cuda/lib64 if you have a 64-bit system.
You will need to tell the linker the path to the library by adding it to your $LD_LIBRARY_PATH. Unfortunately, the current toolkit (3.2) only contains the OpenCL 1.0 libraries, not the C++ bindings that I referred to previously. Registered developers can download the pre-release driver for OpenCL 1.1 [9].
As a temporary workaround, you can add the C++ bindings header file (cl.hpp) to the system global include folder /usr/local/include/CL/cl.hpp or copy it into your own project. You can download the header file from the Khronos website [10].