
Sometimes sharing a screen between two users is enormously helpful. We look at two terminal sharing tools: screen and tmux.
Sharing Linux Terminals
At times, you wish you could explain what you are seeing on the screen of your Linux system to someone else. Although you could exchange screenshots, being able to interact would be so much better; thus, the basis for Linux terminal sharing.
Several tools let you share a screen, including tmate, tmux, screen, teleconsole, tty-share, ttyd, named pipe/FIFO, WebTTY, and byobu, to name a few.
In this article, I cover what are generally considered the most common tools: screen and tmux.
screen
The screen application is a terminal multiplexer that allows you to connect and disconnect from sessions. You simply type screen to get started. Although you won’t really see any difference in the terminal, you have started screen. To show you what it can do, start a download:
$ wget https://download.rockylinux.org/pub/rocky/8/isos/x86_64/Rocky-8.6-x86_64-dvd1.iso
Once the download starts, disconnect (detach) from the session while leaving the download to continue by typing Ctrl+A-d (i.e., press and release Ctrl+A and then press d). In the terminal, you should see something like:
$ ls -s
total 621176
     4 Desktop         4 Downloads       4 Pictures  621144 Rocky-8.6-x86_64-dvd1.iso       4 Videos
     4 Documents       4 Music           4 Public         4 Templates
Notice that you see the ISO file downloading, and if you check the size, you will see that it continues to increase.
Note that the wget terminal command runs headless in the background, which is the important feature of terminal sharing. Even if you close the terminal, the session will still be running, allowing you to open another terminal and reattach to the screen session in that new terminal.
As you will see in a subsequent section, you can even SSH from a remote system into the system in which you started the screen session and attach to it.
To reconnect (reattach) to the screen session, just type:
$ screen -r
You should see the terminal window much as you did before:
$ wget https://download.rockylinux.org/pub/rocky/8/isos/x86_64/Rocky-8.6-x86_64-dvd1.iso
--2022-07-06 12:48:08--  https://download.rockylinux.org/pub/rocky/8/isos/x86_64/Rocky-8.6-x86_64-dvd1.iso
Resolving download.rockylinux.org (download.rockylinux.org)... 146.75.82.132, 2a04:4e42:83::644
Connecting to download.rockylinux.org (download.rockylinux.org)|146.75.82.132|:443... connected.
HTTP request sent, awaiting response... 200 OK
Length: 11213471744 (10G) [application/octet-stream]
Saving to: Rocky-8.6-x86_64-dvd1.iso

Rocky-8.6-x86_64-dvd1.iso     35%[===========>                         ]   3.74G  37.4MB/s    eta 2m 45s
When you reconnected to the session, you didn’t specify a particular one. Because you can have more than one screen session running at the same time, you sometimes have to specify a particular session. To get a list, use the command:
$ screen -ls
There is a screen on:
  8520.pts-0.laytonjb-desktop (07/06/2022 12:45:36 PM)  (Detached)
1 Socket in /run/screen/S-user1.
The output from the command lists the sessions that are available. You can reconnect to a session with:
$ screen -r 8520.pts-0.laytonjb-desktop
You'll be reconnected to the session and should see the download continue.
Sharing a Screen Session
If two users are logged in to a single system on the same account, they can share a screen session between them. Whatever one user types, the other user sees.
For example, on a remote system, laytonjb-desktop, user1 creates a session:
$ screen -d -m -S remote
This comand starts a detached session named remote; user1 can attach to the session with the command:
$ screen -x remote
Next, user1 on another system, named APEXX, uses ssh to log in to laytonjb-desktop. After logging in, it joins the session with the command:
$ screen -x remote
Everything that appears on your terminal will also appear on the terminal of the user on the other system. For example, user1 logs in to laytonjb-desktop with
$ help me from laytonjb-desktop
as shown in Figure 1; Figure 2 shows the APEXX machine.
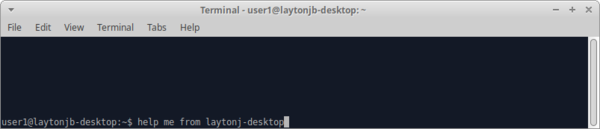 Figure 1: Terminal window on laytonjb-desktop.
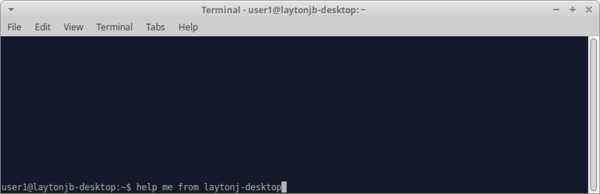 Figure 2: Terminal window on APEXX.
Sharing a Screen Session with Another User
Sharing a screen session with another user is possible, but it involves setting the SUID bit on the screen binary.
CAUTION: Setting the SUID bit can be dangerous on Linux systems. Please read about this, ask security experts, and make your own decision.
For the sake of completeness, I will show you how to proceed. The information is taken from an online article at /dev/blog.
The first step is to set the SUID bit on the screen binary. Run the following commands on the system – in my previous example, this would be laytonjb-desktop:
$ sudo chmod u+s $(which screen)
$ sudo chmod 755 /var/run/screen
Note that these commands need to be run by root or prefixed with sudo, as shown here.
On that remote system, user2 (in this case) needs to do a few things after launching a screen session.
$ screen -d -m -S multisession
$ screen -x multisession
The second command attaches to the session established in the first command. To continue, press and release Ctrl+A, which is the preface for screen commands, and type the following (don’t forget the colon):
:multiuser on
Next, user2 types in the screen session,
:acladd user1
which adds access control lists (ACLs) for the other user that will be sharing the session. You have to do this every time you start a multiuser session. Also note that you can have more than one other user, you just need to add them to the ACLs as shown above. Be sure they have an account on the system, as well.
Now user1 SSHs into laytonjb-desktop and enters
$ screen -x user2/multisession
to connect to the session. To check, type something from the APEXX system where user1 used ssh to log in to laytonjb-desktop (Figure 3).
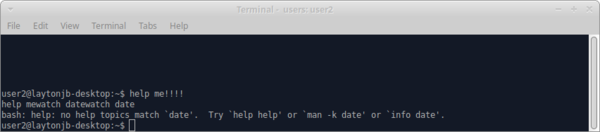 Figure 3: Terminal window on APEXX as user1.
Note that the prompt beings with user2, which indicates that the session is connected to the one started by user2 on the laytonjb-desktop session; therefore, the prefix will always be the starting user. The laytonjb-desktop will show exactly the same thing as shown in Figure 3.
The screen option lacks one thing, in that you cannot be exactly sure which session you’re in if you have more than one session going. However, the Giles's Notes website shows a way to correct this problem.
tmux
The tmux terminal multiplexer is very much like screen. It is allows you to detach and reattach to terminal sessions, with a few differences. In screen you prefaced commands with Ctrl+A, whereas in tmux it is Ctrl+B. By default, tmux changes the status bar in the terminal when you attach to it. In screen you had to do a little work to achieve roughly the same thing. In tmux you can name your sessions, as you did with screen:
$ tmux new -s remote
The first part of the command, tmux new, starts a new session, with the name of the session, remote, placed after the -s flag.
After starting tmux, your screen might look like Figure 4. Notice the line in green at the bottom of the terminal window. From left to right, it starts with the name of the session (remote) followed by a zero, which indicates the window number in this session, and the name of the application running (i.e., the Bash shell). On the right-hand side of the bottom line is the name of the system, laytonjb-desktop, followed by the time and date.
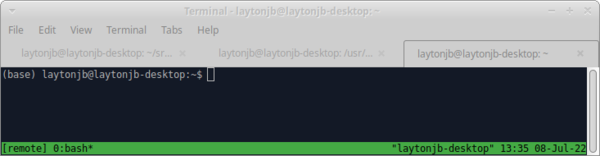 Figure 4: The tmux terminal window.
To detach from a session, press Ctrl+B-d (i.e., Ctrl+B, then d). This sequence detaches you from the session (remember that in screen it was Ctrl+A-d). You can also start an unattached tmux session by adding the -d option to the command.
One cool thing you can do with tmux is start another session under the current session by typing Ctrl+B-c to “create” a new window in the session (Figure 5). At the bottom of the terminal, you see a new window number, 1, with the 0 window running the dmesg -w command in the background.
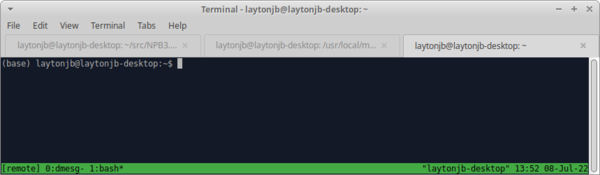 Figure 5: Terminal after creating a new tmux window.
To cycle through windows, press Ctrl+B-n (next), Ctrl+B-p (previous), or Ctrl+B-x (where x=0-9) to go to a specific window. If you type Ctrl+B-s in one of the sessions, you will see all the sessions (Figure 6).
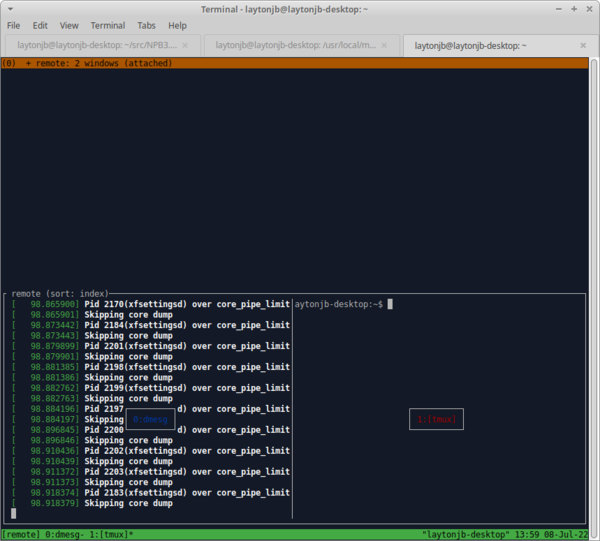 Figure 6: Terminal showing all tmux windows.
I love this capability in tmux. At the top, you see the name of the session (remote), the number of windows (2), and that the user is attached to the session. In the middle of the bottom left pane of the terminal, a small box with blue text shows 0:dmesg, which is a “snapshot” of what is happening in session window 0. In the middle of the bottom right pane is a small box with red text indicating that session window 1 is not the connected window at the moment.
With this capability you can create windows within the session and run headless programs in each one. The arrow keys let you move through the windows to select the session you want.
As with screen, if you detach from a session as previously mentioned, you can then reattach to the session when you’re in the terminal with the command,
$ tmux attach-session -t remote
where the session is named remote.
If you have more than one session or you have forgotten the name of the session, you can get a list of the sessions with either command:
$ tmux ls
$ tmux list-session
With tmux you can also rename sessions. To do so, detach from a session then use the command:
$ tmux rename-session -t remote REALLY_remote
Finally, you can kill a session with
$ tmux kill-session -t remote
aftering detaching.
Sharing a tmux Session
Sharing a tmux session occurs as in screen. If two users share an account but are on different systems, one user remote logs into the other system with the same user ID then types the following at the command line (assuming the session name is multisession):
$ tmux attach-session -t multisession
Both users will see what the other types into the session. Either person can detach from the session and reattach at another time.
Sharing a tmux Session with Multiple Users
Sharing a tmux session is easier than with screen. For example, assume you have two different users, in my case they are laytonjb and user1. They have accounts on two different systems but are part of one group named hpc_users (this point is important).
On the primary system where a session will be shared, user laytonjb starts a new session with the command:
$ tmux -S /tmp/multisessions new -s multisession
Notice that the new session is named multisession and that tmux creates a named socket, /tmp/multisessions, where the s at the end denotes a socket (you can name it whatever you want).
On that primary system in a terminal window, user laytonjb changes the group for the socket:
$ chgrp hpc_users /tmp/multisessions
I chose to have the second user, user1, log in to the primary system over SSH. On the primary system, then, user1 types:
$ tmux -S /tmp/multisessions attach -t multisession
The screenshot in Figure 7 from the desktop of user1 shows that this command worked. Notice that the tab label is user1@laytonjb-desktop but the prompt is laytonjb@laytonjb-desktop, which indicates that the user is user1 but because user laytonjb started the session, user1 now assumes the laytonjb prompt.
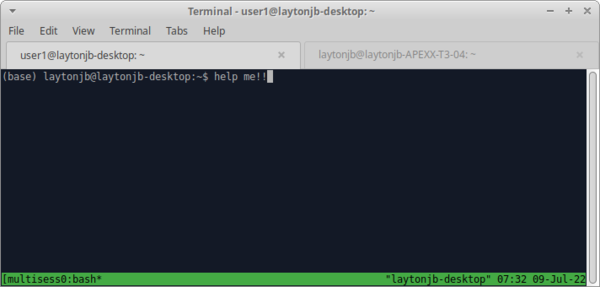 Figure 7: A tmux session as user1 on the primary system.
Figure 8 is a screenshot from the primary system. Note that because the terminal on the primary system by user laytonjb is larger than the terminal on the remote system, the session creates a bounding box to match the size of the remote system, and the rest of the field is filled with dots.
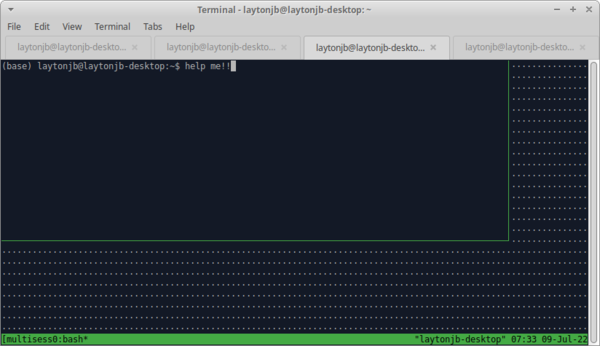 Figure 8: A tmux session on the primary system as user laytonjb.
Summary
If you have not used terminal sharing before, take a minute to think of how it could be useful. For HPC admins, the first use that pops into my head is when a user is having a problem and can’t explain what they are seeing on their terminal. You could set up a quick terminal share on a login node, have the user rerun the commands and code to recreate the problem, and then help them diagnose the issue. This process is particularly useful if either you, the user, or both are working remotely.
Of course, you can find all kinds of other uses for terminal sharing. A long-ish time ago, I used a terminal share with an engineer in Israel who was helping debug a problem. In very different time zones and almost half-way around the world, we still could work together to fix a problem.
Even on a single system, a terminal sharing tool can be very useful. If you start a session in your terminal and start a long-running process, you can detach from the session then go off and work in the main terminal. You can always reattach to the session to check the progress. Of course, you could always open another tab in your terminal, but if you’re like me, I have lots of tabs open and labeled for various projects, so using a terminal sharing session can be very helpful.