
Working with containers in high-performance computing can be difficult; a new container named Singularity comes to the rescue.
A Container for HPC
Containers have become an important part of the IT industry because (1) they are more efficient than full (hardware-level) virtualization and (2) the container workflow readily supports DevOps. In full virtualization, a system has a host operating system (OS) that runs something called a hypervisor (Figure 1, right side).
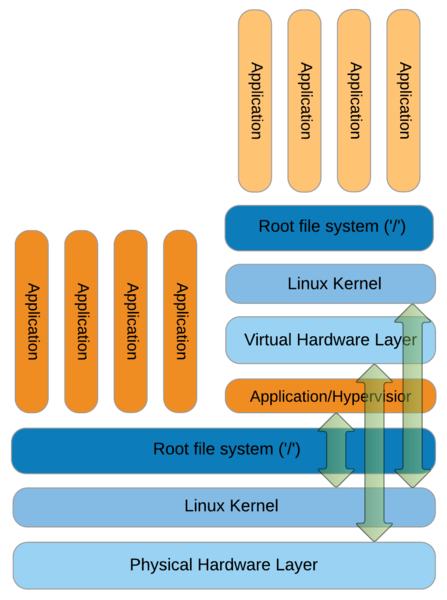 Figure 1: Virtual machine architecture.
The Hypervisor is capable of communicating directly with the host kernel, which can be very useful for some purposes (e.g., PCI-SIG [peripheral component interconnect special interest group] single root I/O virtualization [SR-IOV]). Above the hypervisor sits the virtual hardware layer, which sometimes has a bypass to the physical layer (if desired), and above that is the kernel for the OS installed on the VM. Next are the root filesystem and applications that run in the VM. Notice that the applications running on the host are much closer to the physical host hardware (Figure 1, left) than the applications running within the virtualized context. This generally results in a performance penalty when running applications within a virtualized stack.
Technically, a full virtualization is referred to as “hardware-level virtualization.” In hardware-level virtualization, each VM comprises an OS, libraries, and applications isolated from all others by its own complete OS, kernel, networking, users, and libraries. You can run multiple VMs on a single system, all independent of one another. VMs have great isolation from one another, so a problem in one VM should not affect any other VM on the host. At the same time, you might have a great deal of replication between VMs, increasing resource usage.
Containers, on the other hand, are a different form of virtualization that puts the applications much closer to the host system, thus improving performance. The architecture for containers is shown in Figure 2.
 Figure 2: Container architecture.
On the left-hand side of the figure are applications running on the host operating system along with the container daemon. This process manages the container environment on the right-hand side, and applications within the container are launched by the daemon. The container approach has much less overhead between the host kernel and the application, improving performance. A container consists of the application itself and any library or system dependencies and is referred to as “operating system virtualization.” This higher level of virtualization may allow you to use a small image or container.
Whereas in hardware-level virtualization each VM is a complete system, allowing you to run any application you want within that guest OS, in operating system virtualization, each container is isolated from others by virtualizing the namespaces in which each operating system exists.
The second aspect of containers that is so appealing is that they support the workflow for DevOps (development and operations). The developers can use and control their own development environment, including any testing and qualifications necessary. Once the application is ready to deploy operationally, they can create a container and give it (or the recipe to create it) to the operations staff for production. This allows the two teams to work together without duplication of effort and use whatever environment is desired.
As a simple example, imagine taking an application that is developed on Ubuntu and running it on a Red Hat Enterprise Linux (RHEL) system. Before containers, you would have had to take the already tested application developed on Ubuntu, move it to RHEL, run the tests on RHEL again, and then deploy it to production. Containers allow you to take the application in the Ubuntu environment and run it on a RHEL-based system without any of the “porting” or re-testing (in theory, at least).
Docker
The most popular container system at this time is Docker, which allows applications to be deployed inside a container on Linux systems. Docker uses the Linux kernel features of both cgroups and namespaces, as well as a “union” filesystem” such as AuFS. This allows the containers to be isolated from one another on a Linux system and uses cgroups for resource limiting (e.g., CPU, memory, block I/O, network), so a single container cannot consume all of the resources of the host.
Docker is very convenient for developers because the development and production environments can be different. If developers are more comfortable developing in Linux Mint while the production group is more comfortable with Ubuntu, they can each control their own, different environments.
Docker unites the development and operations functions into DevOps very elegantly. An application can be developed and tested in one environment and defined via a Dockerfile and then recreated on production systems by operations. Docker saves space, uses fewer resources, and runs faster than a typical VM approach.
Docker and HPC
The enterprise IT world has put a great deal of effort into the development and use of containers. DevOps teams can use Docker to reduce time to development and deployment compared with the classic approach in which tasks are divided.
In the high-performance computing (HPC) world, the focus is not necessarily on DevOps but on the ability to use containers to move applications from system to system. The desire is somewhat along the DevOps line, but the focus is really on mobility. Researchers or users can create applications and workflows using their environment of choice and then deploy the application or workflow on the production cluster for execution. The focus is not on the DevOps process but rather on application portability.
In this article, I want to highlight two approaches to using containers in HPC. The first approach is UberCloud, which was started as “the online community and marketplace where engineers and scientists discover, try, and buy Computing as a Service.” It is where scientific applications can be performed in the cloud and where customers can purchase compute cycles.
To achieve these goals, they use a slightly altered version of Docker to make it suitable for technical computing applications. Docker packages the application and its dependencies into an “UberCloud Container.” These pre-built images are distributed through a central registry system at UberCloud.
The second approach is Shifter, developed by the National Energy Research Scientific Computing Center (NERSC). Shifter is a prototype implementation of a container system for HPC that converts images from Docker, VMs, or CHOS (a utility that creates a Scientific Linux environment on both the interactive nodes and in batch jobs on PDSF, “a networked distributed computing cluster designed primarily to meet the detector simulation and data analysis requirements of Physics, Astrophysics, and Nuclear Science collaborations”) to a common container format different from Docker. According to NERSC, this format allows images to be scalably distributed.
NERSC chose not to use Docker for two reasons, as articulated in an article by Nicole Hemsoth and as alluded to by Gregory M. Kurtzer, the developer of Singularity:
- Security
- “… ‘simple’ Linux versioning as well as a few other issues crop up with weighty parallel file systems.”
According to the Hemsoth article, Docker requires Linux kernel version 3.10 or higher, but some users needed older OS distributions such as CentOS 6.x that still used a 2.6.x kernel.
However NERSC finds that Docker has a “well-designed and documented way of letting people easily create and maintain existing images that can then be pushed into a the cloud via Docker Hub or a private onsite hub.” Therefore, Shifter can use Dockerfiles as input.
Despite the widespread use of Docker in the enterprise IT world, it is having a difficult time being accepted in the HPC world. Although some efforts have been made to use it, as NERSC found out, Docker lacks some features to operate in an HPC world and has other features that complicate a deployment.
Moreover, as Kurtzer articulates in an interview I had with him, using Dockerfiles with HPC had a few issues. In our discussion, he mentioned the following:
- Docker emulates a VM in several aspects, such as a full filesystem, and users can escalate to root.
- Non-authorized users can get root access to a production network (a big no-no for HPC environments), which can be considered a security breach. To circumvent this security breach, networks must be isolated for Docker access so they won’t have access to HPC networks, including storage accessed over the high-performance network.
Moreover, Kurtzer mentioned that HPC tools such as resource managers and schedulers, which are necessary for shared resources, are very complex to integrate with Docker, which usually results in a cluster built on top of a cluster. This is exacerbated for certain usage modules or system architectures, especially with parallel MPI job execution.
Singularity for the Win!
Kurtzer, who works at Lawrence Berkeley National Laboratory (LBNL), is a long-time open source developer of several HPC tools, including Warewulf and CentOS, and has been looking for a container solution for researchers who were looking for “mobility of compute” so they could run their workflows anywhere.
Kurtzer took a step back from trying to find a way to use Docker to solve the problem of application portability (mobility of compute), and by focusing on this fundamental need, he created Singularity. To achieve this, he focused on the key to operating system virtualization: namespaces. Singularity uses namespaces differently from other containers because its goal is application portability and not host virtualization.
Singularity packages up only the application and its dependencies, plus a few extra things, including any specific data you want to include in the container. To accomplish this, you create a very, very simple specfile that tells Singularity a little bit about the application and how you want it to run when the container is executed.
The specfile is somewhat similar to an RPM specfile: key-value pairs define information about the container package (mostly about the application). You can also define sections in the file to input multiline information rather than just key-value pairs. One of the best ways to learn how to write specfiles for Singularity is to create one and then use it to build a Singularity container (.sapp file).
A couple of simple demos will illustrate some aspects of Singularity. First, I build Singularity from the latest version on GitHub (which for HPC requires MPI). The first step is to clone Git locally:
$ git clone -b 1.x https://github.com/gmkurtzer/singularity.gi
Afterward, I just followed the installation directions from the Singularity website on a CentOS 6.6 workstation:
$ cd singularity
$ sh ./autogen.sh
$ ./configure --prefix=/usr/local
$ make
$ sudo make install
$ sudo make install-perms
Note that I installed singularity into /usr/local, which is in my path (always check your $PATH). I can then type the command singularity, which returns high-level help output.
The first example I tried was to create a simple Singularity container for the command /bin/echo. The file example.sspec contains the following:
Name: echo
Exec:  /bin/echo
From this file, Singularity creates the container echo.sapp. The specfile uses the value for the Name key and executes the binary /bin/echo. Singularity then examines /bin/echo for its dependencies (e.g., libraries or sharable objects). Without including the dependent libraries and packages in the container, you have no guarantee that an application will run on a different system, because the other system might not have the required libraries to run the application or it might have different versions that wouldn’t work with the specified application.
Once you are happy with the .sspec file, you can run the command
singularity build
to create the .sapp file. Listing 1 shows the output from that command on the CentOS 6.6 system.
Listing 1: Singularity Build
[laytonjb@home4 TEST]$ singularity build example.sspec
Creating temporary container path...
Singularity App Container Name: echo.sapp
Running build scriptlet
Evaluating: packages
Building the runtime level: 1
Installing file: /bin/sh
Installing file: /lib64/libtinfo.so.5
Installing file: /lib64/libc.so.6
Installing file: /lib64/ld-linux-x86-64.so.2
Installing file: /lib64/libdl.so.2
Installing file: /usr/bin/strace
Installing file: /lib64/libnss_files.so.2
Installing file: /lib/libc.so.6
Installing file: /lib/ld-linux.so.2
Installing file: /lib64/libnss_dns.so.2
Installing file: /lib/libresolv.so.2
Evaluating: Exec
Installing file: /bin/echo
Evaluating: files
Running install scriptlet
Creating template configs
Including sanitized /etc/passwd
Including sanitized /etc/group
Found /etc/group in container, sanitizing it...
Cleaning up device files
Running post scriptlet
Defining container shell environment
Building singularity main runscript
Building singularity test runscript
Building singularity exec runscript
Running test...
Hello from within the container... (no test code defined)
Including specfile
Writing metadata
Creating output SAPP container
WROTE: echo.sapp
Cleaning up temporary files...
After the container was built, I looked at its size:
$ ls -s
total 2448
2444 echo.sapp*     4 example.sspec
Although it is not a large container, it is larger than the bare /bin/echo binary because of the included dependencies.
In addition to the application /bin/echo, Singularity also includes /bin/sh and strace, because these two small applications can be very useful when running the container, particularly if you have a problem.
Singularity also includes a sanitized version of /etc/passwd and /etc/group so that standard users and groups are defined – an important point that differentiates Singularity from other containers.
Singularity also does a quick test from the container (hello) to make sure the container itself functions as it should; then, it creates the .sapp file and finishes.
If you have Singularity installed on your system, one of the other really, really cool things it does is allow you to run the example.sapp file like any other binary:
$ ./echo.sapp "hello world"
hello world
To check it, you run the echo command on the host machine (i.e., not the container):
$ /bin/echo "hello world"
hello world
The output is the same, so I am confident the Singularity container worked correctly.
The second example better illustrates how the container can interact with files both in the container and outside the container. To achieve this, I’ll use the grep command. The .sspec file is very similar to that for echo.
Name: grep
Exec: /bin/grep
When I first created the Singularity container for this article, I left a space at the end of the name. Singularity caught this and replaced the space with an underscore (_). If you don't want underscores in your container names, don't leave any spaces in the container name in the .sspec file.
In the interest of space, I won't show the output from the singularity build, which you can turn off using the --quiet option:
$ singularity --quiet build example.sspec
Running test...
Hello from within the container... (no test code defined)
WROTE: grep.sapp
$ ls -s
total 2584
   4 example.sspec  2580 grep.sapp*
Interestingly, the size of the container is about the same as for /bin/echo. To better understand how the singularity container works and interacts with files, it can be run in several ways.
First, I’ll execute the container by piping data from the host system to the container. Piping the contents of the .sspec file through the container as a simple test:
$ cat example.sspec | ./grep.sapp -i name
Name:grep
The next way to use the container is to feed a local file to the container on the command line:
$ ./grep.sapp -i name example.sspec
Name:grep
One last test is to take the container from one system and move it to another. Obviously, because I am using operating system-level virtualization, the other host system also has to be running a Linux kernel, but it can be a different distribution and even kernel version. For this particular test, I used a Linux Mint 17.2 system.
I installed Singularity on the Linux Mint system using the same commands I used for the CentOS 6.6 system (it’s very simple to build and install). I copied over the container to the new system and executed it like any other binary (Listing 2).
Listing 2: Executing a Copied Container
laytonjb@laytonjb-Lenovo-G50-45:~/TMP/TEST > vi foo.txt
laytonjb@laytonjb-Lenovo-G50-45:~/TMP/TEST > more foo.txt
bar bar, bar, everyday a bar bar.
laytonjb@laytonjb-Lenovo-G50-45:~/TMP/TEST > ls -s
total 2584
   4 foo.txt  2580 grep.sapp
laytonjb@laytonjb-Lenovo-G50-45:~/TMP/TEST > grep everyday foo.txt
bar bar, bar, everyday a bar bar.
laytonjb@laytonjb-Lenovo-G50-45:~/TMP/TEST > ./grep.sapp everyday foo.txt
bar bar, bar, everyday a bar bar.
I created a simple file in the directory and grep’d it for the string everyday. I also used the Singularity version of grep to look for everyday in the file. As you can see, the container executed correctly, achieving mobility of compute!
The next example is for an application in the container that uses MPI libraries – specifically OpenMPI – as do many typical HPC applications. To accomplished this, I write a .sspec file with the MPI application in the usual way. Singularity would then include all of the dependent libraries and MPI components automatically.
Singularity creates a container just for the MPI application itself and the dependent libraries; then, the container is executed with the mpirun command on the host system. (It has to be installed on all of the nodes that are going to use it. A centralized filesystem works best for this.) The mpirun command communicates with the binary via the Process Management Interface (PMI) used by OpenMPI (Figure 3).
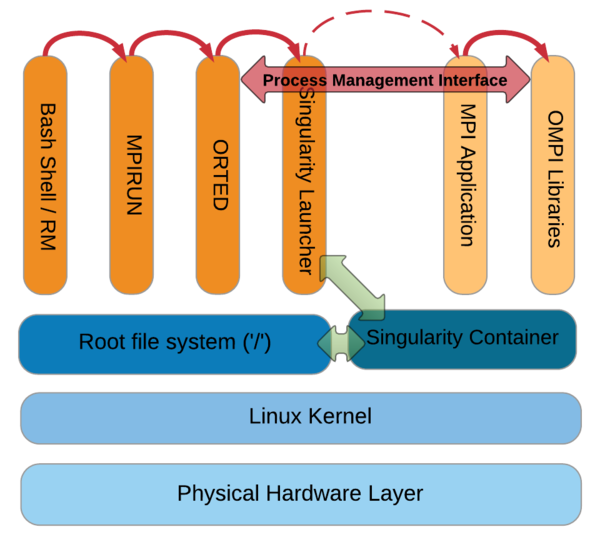 Figure 3: MPI application process for Singularity.
To test an MPI application, I built the latest version of OpenMPI from GitHub. The process is very similar to that for Singularity and begins by cloning:
$ git clone https://github.com/open-mpi/ompi.git
Next, I just followed the installation directions from the OpenMPI website (Listing 3). Be sure that /usr/local/bin is in your $PATH and /usr/local/lib is in your $LD_LIBRARY_PATH. I used a very simple Fortran program to test MPI (Listing 4).
Listing 3: Installing OpenMPI on a Node
laytonjb@laytonjb-Lenovo-G50-45:~/TMP > cd ompi
laytonjb@laytonjb-Lenovo-G50-45:~/TMP/ompi > sh ./autogen.pl
laytonjb@laytonjb-Lenovo-G50-45:~/TMP/ompi > ./configure --prefix=/usr/local
laytonjb@laytonjb-Lenovo-G50-45:~/TMP/ompi > make
laytonjb@laytonjb-Lenovo-G50-45:~/TMP/ompi > sudo make install
Listing 4: Fortran Example
!  Fortran example
   program hello
   include 'mpif.h'
   integer rank, size, ierror, tag, status(MPI_STATUS_SIZE)

   call MPI_INIT(ierror)
   call MPI_COMM_SIZE(MPI_COMM_WORLD, size, ierror)
   call MPI_COMM_RANK(MPI_COMM_WORLD, rank, ierror)
   print*, 'node', rank, ': Hello world'
   call MPI_FINALIZE(ierror)
   end
The code was compiled with mpif90 to create the binary. Running the binary on a single four-core node produces the following output:
> mpirun -np 4 -hostfile ./hostfile ./hello
 node           1 : Hello world
 node           2 : Hello world
 node           3 : Hello world
 node           0 : Hello world
A specfile was created for the application that is very similar to the other specfiles:
Name: hello_mpi
Exec: hello
The container then was created as in the previous two examples. The .sapp container is a little larger than the previous ones.
> ls -sh
total 6.1M
 16K hello  4.0K hello.f90  6.0M hello_mpi.sapp  4.0K hello_mpi.sspec  4.0K
hostfile
Executing the container is very simple: You execute it like any other MPI binary:
> mpirun -np 4 -hostfile ./hostfile hello_mpi.sapp
 node           0 : Hello world
 node           1 : Hello world
 node           3 : Hello world
 node           2 : Hello world
Whoop, there it is: The exact same output I saw when the binary was run outside of the container. MPI with containers – what a wonderful thing.