
Warewulf 4 is ready to help you build an HPC cluster.
Warewulf 4
Some of the early articles I wrote for HPC ADMIN were about Warewulf 3, a cluster provisioning and management tool. The first article was published a little more than nine years ago. People seemed to enjoy the article series, so I thought I would bring you up to date with Warewulf 4.
The Warewulf tool allows you to configure a cluster head node (at least one) and boot compute nodes into a stateless (i.e., “diskless,”) configuration. It’s all open source with a good number of people behind it. Warewulf 3 is used by OpenHPC, and in an upcoming version, OpenHPC will switch over to Warewulf 4.
Warewulf 3 was very widely used and still is. Early attempts to create a Warewulf 4 did not really stick; then, the original developer, Greg Kurtzer, started working on a new version and formed a company, CIQ, to develop it and the next generation of HPC tools, Fuzzball. While doing all of this work, CIQ also started Rocky Linux.
Kurtzer wanted to update Warewulf 4 with more modern concepts. For example, the Virtual Node File System (VNFS), which manages the node operating systems (OSs) in Warewulf 3, now can be a container. However, you can still use the VNFS from a chroot filesystem if you want and convert it to a container. Warewulf 4 has gone beyond just a simple group of compute nodes that create a cluster to defining many “roles” and using them to boot various nodes in the cluster that have different functions (e.g., login, storage, or visualization nodes). You can have different types of compute nodes on the basis of hardware differences or node OS images based on a scheduler so that some nodes use Slurm or some nodes use Kubernetes.
Currently in Warewulf 4, only stateless nodes are accommodated. In the past, Warewulf allowed for stateful nodes (i.e., nodes that put the image on local storage). Of course, a few requests have been made for this in Warewulf 4, but stateless booting is much more popular than stateful. You can read a bit more about stateless nodes in the Warewulf documentation.
In this article, I cover how to configure a head node and boot stateless compute nodes for a simple configuration.
Configuration
The physical configuration I used to illustrate the installation of Warewulf was very simple (Figure 1): just two nodes – a head node and one compute node – and a single internal Gigabit Ethernet (GigE) switch (unmanaged in this case).
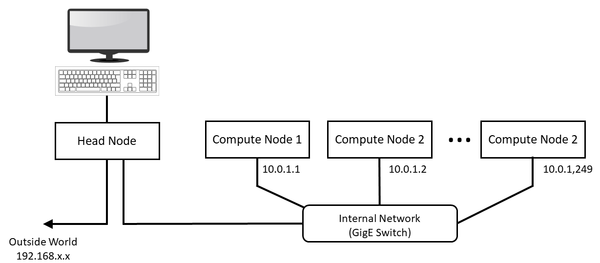 Figure 1: Physical configuration.
The head node has two GigE network interface cards (NICs), with one on the motherboard connected to the local LAN using the Dynamic Host Configuration Protocol (DHCP). This NIC is my home network (192.168.x.x). The second NIC is connected to a private Ethernet network (10.0.0.1, subnet mask 255.255.252.0), which follows the network addressing discussed in the Warewulf documentation. I only have this one cluster network, with no intelligent platform management interface (IPMI), storage, or additional nodes. I will use the head node as a network filesystem (NFS) server.
One step I did have to take, which I learned the hard way, was to check the BIOS of all the nodes, except the head node, to make sure they would boot as the first choice in the preboot execution environment (PXE). You also need to make sure that PXE can use the Unified Extensible Firmware Interface (UEFI) instead of 32-bit Legacy booting. Many times the container for the compute image is too large for Legacy booting. If you have trouble, use the Warewulf mailing list to ask for help.
Head Node Installation
I began with a freshly installed Rocky 8.6 distribution. I accepted the defaults to a Server with a GUI installation. I did make some changes to the OS. I can’t stand the Gnome desktop, so I installed the Mate desktop, but this change shouldn’t affect anything. Once I installed the OS, I disabled the firewall on head node:
$ sudo systemctl stop firewalld
$ sudo systemctl disable firewalld
I believe there are some simple steps for configuring Warewulf 4 while keeping the firewall up (see the documentation), but for illustrative purposes, I disabled the firewall.
Additionally, I disabled SELinux for the purposes of this article, but it’s possible to keep it functioning while using Warewulf. Disabling SELinux is the subject of a number of articles online. It requires a reboot to complete.
Don’t be afraid to add packages to your head node installation. They are unlikely to interfere with Warewulf. However, Warewulf can take care of installing and configuring three packages it uses for provisioning nodes:
- dhcp
- tftp
- nfs-utils
One more thing, when you create a user such as administrator or some other account that will be the primary Warewulf administrator, be sure to allow that user to be an administrator on the system so they can use sudo to run commands.
The next step is to install Warewulf. The documentation covers several different methods, from cloning the Git repo to downloading the source. In general, the head node needs access to the outside world (i.e., to a local repository that holds the RPMs and their dependencies).
I chose to use binary RPMs because they are a little easier for me to update Warewulf. Listing 1 shows the results of the documentation guidance.
Listing 1: Warewulf Installation
$ sudo yum install -y https://repo.ctrliq.com/rhel/8/ciq-release.rpm
$ yum install -y warewulf

CIQ Stable                                                        12 kB/s |  32 kB     00:02
Last metadata expiration check: 0:00:01 ago on Fri 04 Nov 2022 02:42:11 PM EDT.
Dependencies resolved.
=================================================================================================
 Package                  Architecture   Version                         Repository         Size
=================================================================================================
Installing:
 warewulf                 x86_64         4.3.0-1.git_235c23c.el8         ciq               8.3 M
Installing dependencies:
 bind-export-libs         x86_64         32:9.11.36-3.el8_6.1            baseos            1.1 M
 dhcp-common              noarch         12:4.3.6-47.el8                 baseos            206 k
 dhcp-libs                x86_64         12:4.3.6-47.el8                 baseos            147 k
 dhcp-server              x86_64         12:4.3.6-47.el8                 baseos            529 k
 tftp-server              x86_64         5.2-24.el8                      appstream          49 k

Transaction Summary
=================================================================================================
Install  6 Packages

Total download size: 10 M
Installed size: 31 M
Downloading Packages:
(1/6): dhcp-common-4.3.6-47.el8.noarch.rpm                       902 kB/s | 206 kB     00:00
(2/6): dhcp-libs-4.3.6-47.el8.x86_64.rpm                         3.1 MB/s | 147 kB     00:00
(3/6): tftp-server-5.2-24.el8.x86_64.rpm                         123 kB/s |  49 kB     00:00
(4/6): dhcp-server-4.3.6-47.el8.x86_64.rpm                       3.9 MB/s | 529 kB     00:00
(5/6): bind-export-libs-9.11.36-3.el8_6.1.x86_64.rpm             579 kB/s | 1.1 MB     00:02
(6/6): warewulf-4.3.0-1.git_235c23c.el8.x86_64.rpm               746 kB/s | 8.3 MB     00:11
-------------------------------------------------------------------------------------------------
Total                                                            799 kB/s |  10 MB     00:13
CIQ Stable                                                       1.6 MB/s | 1.7 kB     00:00
Importing GPG key 0xD71AB47F:
 Userid     : "Ctrl IQ, Inc. "
 Fingerprint: 0BF7 3422 0FF7 326C 5DE9 E196 E97E 8F85 D71A B47F
 From       : /etc/pki/rpm-gpg/RPM-GPG-KEY-ctrliq
Key imported successfully
Running transaction check
Transaction check succeeded.
Running transaction test
Transaction test succeeded.
Running transaction
  Preparing        :                                                1/1
  Installing       : dhcp-libs-12:4.3.6-47.el8.x86_64               1/6
  Installing       : dhcp-common-12:4.3.6-47.el8.noarch             2/6
  Installing       : bind-export-libs-32:9.11.36-3.el8_6.1.x86_64   3/6
  Running scriptlet: bind-export-libs-32:9.11.36-3.el8_6.1.x86_64   3/6
  Running scriptlet: dhcp-server-12:4.3.6-47.el8.x86_64             4/6
  Installing       : dhcp-server-12:4.3.6-47.el8.x86_64             4/6
  Running scriptlet: dhcp-server-12:4.3.6-47.el8.x86_64             4/6
  Installing       : tftp-server-5.2-24.el8.x86_64                  5/6
  Running scriptlet: tftp-server-5.2-24.el8.x86_64                  5/6
  Running scriptlet: warewulf-4.3.0-1.git_235c23c.el8.x86_64        6/6
  Installing       : warewulf-4.3.0-1.git_235c23c.el8.x86_64        6/6
  Running scriptlet: warewulf-4.3.0-1.git_235c23c.el8.x86_64        6/6
  Verifying        : tftp-server-5.2-24.el8.x86_64                  1/6
  Verifying        : bind-export-libs-32:9.11.36-3.el8_6.1.x86_64   2/6
  Verifying        : dhcp-common-12:4.3.6-47.el8.noarch             3/6
  Verifying        : dhcp-libs-12:4.3.6-47.el8.x86_64               4/6
  Verifying        : dhcp-server-12:4.3.6-47.el8.x86_64             5/6
  Verifying        : warewulf-4.3.0-1.git_235c23c.el8.x86_64        6/6

Installed:
  bind-export-libs-32:9.11.36-3.el8_6.1.x86_64      dhcp-common-12:4.3.6-47.el8.noarch
  dhcp-libs-12:4.3.6-47.el8.x86_64                  dhcp-server-12:4.3.6-47.el8.x86_64
  tftp-server-5.2-24.el8.x86_64                     warewulf-4.3.0-1.git_235c23c.el8.x86_64

Complete!
I apologize for the length, but I wanted you to see what Warewulf installed (it’s not too much). For this article, Warewulf 4.3 was the current stable release, but the Warewulf 4.4 release candidate is out now.
Once installed, you can configure Warewulf 4 on the head node (also called the host node).
Configuring Warewulf on the Head Node
The configuration files for Warewulf are in /etc/warewulf. The primary command you will use to interact with Warewulf is wwctl. The first file you should examine is /etc/warewulf/warewulf.conf. My version of this file is shown in Listing 2.
Listing 2: warewulf.conf
WW_INTERNAL: 43
ipaddr: 10.0.0.1
netmask: 255.255.252.0
network: 10.0.0.0
warewulf:
  port: 9873
  secure: false
  update interval: 60
  autobuild overlays: true
  host overlay: true
  syslog: false
  datastore: ""
dhcp:
  enabled: true
  template: default
  range start: 10.0.1.1
  range end: 10.0.1.255
  systemd name: dhcpd
tftp:
  enabled: true
  tftproot: ""
  systemd name: tftp
nfs:
  enabled: true
  export paths:
  - path: /home
    export options: rw,sync
    mount options: defaults
    mount: true
  - path: /opt
    export options: ro,sync,no_root_squash
    mount options: defaults
    mount: false
  systemd name: nfs-server
The default warewulf.conf can be different because it will be based on the IP addresses of the primary NIC in the head node. You will likely have to edit the file, so I’ll walk you through that.
If you refer back to Figure 1 for my setup, the internal cluster network should be 10.0.0.1 (Listing 2, line 2). I also changed the netmask so I’d have room to add nodes, although this is my home cluster, so I won’t have many nodes. This netmask must also match the host’s subnet mask for the cluster’s private interface. Otherwise, you run the danger of the various networks not being compatible, and nodes may not be able to communicate.
I made the network 10.0.0.0 so that it can address anything I am likely to put on the cluster network. You can pick whatever you want to match the number of nodes you think you are likely to need or use.
The next thing I changed was the range of cluster IP addresses. In the dhcp section of warewulf.conf, I changed the range start point to 10.0.1.1 and the last point to 10.0.1.255. If you need to go larger than 254 nodes, you can change the range end to a different IP address (e.g., 10.0.255.255, which would give you 65,636 nodes). Just be sure the subnet mask matches the address range.
For this tutorial, I left everything else the same. Take a look the subsequent sections, particularly the nfs section. By default, Warewulf exports /home and /opt. You can NFS export whatever you want. You can also change whether the compute nodes mount filesystems from nodes other than the head node. You can easily change NFS mountpoints later and just reboot the nodes.
The Warewulf documentation explains the other variables in /etc/warewulf/warewulf.conf.
Another file in /etc/warewulf is worth mentioning: nodes.conf is a simple, flat text file in YAML format that acts as the database of the compute nodes (pretty much anything that gets an image from Warewulf). You can edit this file by hand, but you should know what the various fields mean before you proceed, because you could fairly easily change or remove things in the file that will cause corruption, forcing you to redo all of the compute node configuration. If you are going to edit the file by hand, I would recommend using a good YAML lint tool to make sure at least the YAML is correct. Overall, wwctl is recommended to make changes to nodes. This tool updates the nodes.conf file and preventscorruption. Keeping a copy of nodes.conf in a safe place is a good idea, so if it gets corrupted, you can restore it easily.
Initializing Warewulf
At this point, Warewulf has been installed and configured. Now you can initialize it and have it start the needed system services. The general command with some sample output is shown in Listing 3.
Listing 3: Initializing Warewulf
$ sudo wwctl configure --all
[sudo] password for laytonjb:
Building overlay for localhost.localdomain: host
Enabling and restarting the DHCP services
Created symlink /etc/systemd/system/multi-user.target.wants/dhcpd.service --> /usr/lib/systemd/system/dhcpd.service.
Building overlay for localhost.localdomain: host
Enabling and restarting the NFS services
Created symlink /etc/systemd/system/multi-user.target.wants/nfs-server.service --> /usr/lib/systemd/system/nfs-server.service.
Updating system keys
Setting up key: ssh_host_rsa_key
Setting up key: ssh_host_dsa_key
Setting up key: ssh_host_ecdsa_key
Setting up key: ssh_host_ed25519_key
Skipping, authorized_keys already exists: /root/.ssh/authorized_keys
Writing PXE files to: /var/lib/tftpboot/warewulf
Enabling and restarting the TFTP services
Created symlink /etc/systemd/system/sockets.target.wants/tftp.socket --> /usr/lib/systemd/system/tftp.socket.
This command does quite a bit, and you can use it to great effect when administering clusters. I’ll walk through the output so you can gain a better understanding of what it did.
To begin, it builds an overlay for the local host. (I didn’t give it a name, so it’s known as localhost.localdomain) then configures and starts the DHCP service from a template in /etc/warewulf/dhcpd and updates the head node’s /etc/hostsfile according to the template in /etc/warewulf/hosts.tmpl. Next, it configures the NFS server on the head node from the entries near the end of /etc/warewulf/warewulf.conf. Note that it will update /etc/fstab in the system overlay, as well. Finally, it starts the NFS server service and exports the filesystem (exportfs -a).
Warewulf authenticates with SSH keys and uses passwordless SSH for communicating between nodes. After configuring NFS, it will configure keys, creating the appropriate one in /etc/warewulf/keys. Look in that directory to see what Warewulf created.
The last service the wwctl configure -all command configures is TFTP by copying the appropriate binary PXE/iPXE blobs to the tftp root directory and enabling and starting the tftp service.
Warewulf has accomplished quite a lot, and the defaults should be good enough to start. However, you can easily change anything, if needed, including changing the templates and rerunning the command. Only do this if you know what you’re doing, though.
Checking the Services
System services don’t always come up the way I intend, so I always, always check them. I think this is very important, particularly after a reboot of the head node. I’ll start with DHCP (Listing 4). The first lines of data with date stamps can be ignored. They are only saying that it is ignoring requests from the enp2s0 NIC, which is the NIC to the outside world; enp3s0 is the NIC to the cluster network. Overall, the DHCP system service is up and functioning.
Listing 4: Checking DHCP Service
$ sudo systemctl status dhcpd
  dhcpd.service - DHCPv4 Server Daemon
   Loaded: loaded (/usr/lib/systemd/system/dhcpd.service; enabled; vendor preset: disabled)
   Active: active (running) since Sat 2022-11-05 08:51:10 EDT; 35s ago
     Docs: man:dhcpd(8)
           man:dhcpd.conf(5)
 Main PID: 4866 (dhcpd)
   Status: "Dispatching packets..."
    Tasks: 1 (limit: 48440)
   Memory: 9.7M
   CGroup: /system.slice/dhcpd.service
           |-4866 /usr/sbin/dhcpd -f -cf /etc/dhcp/dhcpd.conf -user dhcpd -group dhcpd --no-pid

Nov 05 08:51:10 localhost.localdomain dhcpd[4866]:
Nov 05 08:51:10 localhost.localdomain dhcpd[4866]: No subnet declaration for enp2s0 (192.168.5.18).
Nov 05 08:51:10 localhost.localdomain dhcpd[4866]: ** Ignoring requests on enp2s0.  If this is not wh>
Nov 05 08:51:10 localhost.localdomain dhcpd[4866]:    you want, please write a subnet declaration
Nov 05 08:51:10 localhost.localdomain dhcpd[4866]:    in your dhcpd.conf file for the network segment
Nov 05 08:51:10 localhost.localdomain systemd[1]: Started DHCPv4 Server Daemon.
Nov 05 08:51:10 localhost.localdomain dhcpd[4866]:    to which interface enp2s0 is attached. **
Nov 05 08:51:10 localhost.localdomain dhcpd[4866]:
Nov 05 08:51:10 localhost.localdomain dhcpd[4866]: Sending on   Socket/fallback/fallback-net
Nov 05 08:51:10 localhost.localdomain dhcpd[4866]: Server starting service.
Listing 5 shows the output for the TFTP service. Now that TFTP is up and running, check NFS (Listing 6).
Listing 5: Checking TFTP Service
$ sudo systemctl status tftp
 tftp.service - Tftp Server
   Loaded: loaded (/usr/lib/systemd/system/tftp.service; indirect; vendor preset: disabled)
   Active: active (running) since Sat 2022-11-05 08:51:11 EDT; 1min 8s ago
     Docs: man:in.tftpd
 Main PID: 4961 (in.tftpd)
    Tasks: 1 (limit: 48440)
   Memory: 236.0K
   CGroup: /system.slice/tftp.service
           |-4961 /usr/sbin/in.tftpd -s /var/lib/tftpboot

Nov 05 08:51:11 localhost.localdomain systemd[1]: Started Tftp Server.
Listing 6: Checking NFS Service
$ sudo systemctl status nfs-server
nfs-server.service - NFS server and services
Loaded: loaded (/usr/lib/systemd/system/nfs-server.service; enabled; vendor preset: disabled)
Drop-In: /run/systemd/generator/nfs-server.service.d
|-order-with-mounts.conf
Active: active (exited) since Sat 2022-11-05 08:51:10 EDT; 1min 29s ago
Main PID: 4924 (code=exited, status=0/SUCCESS)
Tasks: 0 (limit: 48440)
Memory: 0B
CGroup: /system.slice/nfs-server.service

Nov 05 08:51:10 localhost.localdomain systemd[1]: Starting NFS server and services...
Nov 05 08:51:10 localhost.localdomain systemd[1]: Started NFS server and services.
You can also verify with the sudo exportfs command. By default, you should see two filesystems exported: /home and /opt.
If the services are not running, the commands
$ sudo systemctl enable --now tftp
$ sudo systemctl start tftp
enable and start the services. If you don’t use the --now option, they start on the next boot. Strictly speaking, the second command shouldn't be necessary, but I like to use it to be sure. (It won’t hurt to use it.)
All of the dependent services have been started and are running at this point, so it’s time to start the Warewulf daemon itself (Listing 7).
Listing 7: Starting the Warewulf Daemon
$ sudo systemctl enable --now warewulfd
Created symlink /etc/systemd/system/multi-user.target.wants/warewulfd.service --> /usr/lib/systemd/system/warewulfd.service.
$ sudo wwctl server status
SERV   : Warewulf server is running at PID: 5127
As part of your system checks, you should also check warewulfd. Although I’ve never had any problems with it, it is always good to check.
At this point, all services should be up and running. If you like, look at the Warewulf logs, which should be pretty empty because the cluster is newly created:
$ sudo more /var/log/warewulfd.log
[Sat Nov  5 08:53:25 EDT 2022] SERV   : Starting HTTPD REST service on port 9873
As expected, nothing is really in there. Now you're ready to tackle the compute nodes.
Container Management for Compute Nodes
If you have used Warewulf before, you are familiar with VNFS. As the name suggests, it’s a virtual filesystem that is basically the OS image for the compute nodes. In Warewulf 3 and before, it was created in a chroot directory, which in effect is a container but is really a directory on the head node system that serves as a root directory. Warewulf 4 has moved to using the term “container” more explicitly and using the container apparatus (container) for creating and using compute node OS images.
Warewulf 4 does not restrict you to using a container for your OS image. You can still use chroot to create the VNFS and then very easily convert it to a container.
Warewulf supports importing an image from any Open Container Initiative (OCI)-compliant registry, meaning you can import from a public registry or from a private registry – either Docker or Singularity (Apptainer, too, I suppose, but I don’t know for sure).
The container for the compute nodes is not just an ordinary container. It has to be bootable and should have a limited version of systemd to make it lighter weight for container purposes.
If you pull and try to boot a container such as docker://rockylinux, it will not boot properly; rather, it will boot into single-user mode and get stuck. It is better to look for containers in Docker Hub and even ask on the Warewulf mailing list or Slack channel about bootable containers. Right now (November 2022), I see five containers under the Warewulf account.
I chose to pull a Rocky 8 container from the warewulf repo on Docker Hub (Listing 8). A quick note in case it is subtle: the head node needs access to the outside world to pull the container unless you have added it to a local repository.
Listing 8: Pull Container on Docker Hub
[laytonjb@localhost ~]$ sudo wwctl container import docker://warewulf/rocky rocky-8
Getting image source signatures
Copying blob 1a930d163dca done
Copying blob d3ca234f568b done
Copying blob 3b38e1016650 done
Copying config aff218cbc1 done
Writing manifest to image destination
Storing signatures
2022/11/05 08:56:13  info unpack layer: sha256:1a930d163dcafa193dc2c3c005d9c220ae1c07a48cad5f7feed0066ada0b998f
2022/11/05 08:56:15  info unpack layer: sha256:d3ca234f568b088b991388a0e9e8b61b05ac8627522f10fe16df2b81d51c0748
2022/11/05 08:56:22  info unpack layer: sha256:3b38e1016650813dc5e3bb98cabcc9bf6167399caee7806bc1ca9f3df9825f2e
Updating the container's /etc/resolv.conf
uid./gid not synced, run
wwctl container syncuser --write rocky-8
to synchronize uid/gids.
Building container: rocky-8
Created image for VNFS container rocky-8: /var/lib/warewulf/container/rocky-8.img
Compressed image for VNFS container rocky-8: /var/lib/warewulf/container/rocky-8.img.gz
The Warewulf container documentation has good information on importing a container from a private repository, creating containers from scratch with something like chroot, and building a container from Singularity.
$ sudo wwctl container list
CONTAINER NAME            NODES  KERNEL VERSION
rocky-8                   0      4.18.0-372.13.1.el8_6.x86_64
Houston, we have our first container. Before going any further, I want to show you that you can update, change, and modify your container very easily. Just like other containers, you can exec into that container, poke around, and make changes if you like (Listing 9). Notice that when you exit the container, it is automatically rebuilt, even if you have made no changes. Later in this article and in future articles, modifying containers on the head node will be important.
Listing 9: Modifying Containers on the Head Node
[laytonjb@localhost keys]$ sudo wwctl container exec rocky-8 /bin/bash
[rocky-8] Warewulf> cat /etc/rocky-release
Rocky Linux release 8.6 (Green Obsidian)
[rocky-8] Warewulf> exit
exit
+ LANG=C
+ LC_CTYPE=C
+ export LANG LC_CTYPE
+ dnf clean all
0 files removed
Rebuilding container...
Created image for VNFS container rocky-8: /var/lib/warewulf/container/rocky-8.img
Compressed image for VNFS container rocky-8: /var/lib/warewulf/container/rocky-8.img.gz
Compute Node Kernel
Compute nodes need a Linux kernel to boot. Warewulf allows you to separate the kernel from the container, which can give you great flexibility; however, you have to check that the container can boot and function with a different kernel.
The simplest way is to install the desired kernel in the container or use the one that comes with the container. Warewulf will locate the kernel in an uploaded container by default and use it for any node that uses that container. Note that it can use the same container for nodes but have them boot with different kernels, but please test the combination before putting it in production.
Combining a container with a kernel is done with a profile. Personally, I like building containers with specific kernels rather than mixing and matching, but I can see the utility of being able to use separate kernels.
You can see the kernel used in the container with the command:
$ sudo wwctl container list
CONTAINER NAME            NODES  KERNEL VERSION
rocky-8                   0      4.18.0-372.13.1.el8_6.x86_64
To get a list of available kernels, use the command:
$ sudo wwctl kernel list
KERNEL NAME                         KERNEL VERSION            NODES
4.18.0-372.9.1.el8.x86_64
I won’t spend more time discussing kernels, so I suggest you read the appropriate section in the Warewulf documentation and perhaps ask questions on the Warewulf mailing list or Slack channel.
Configuring Compute Nodes
You’re almost ready to start booting compute nodes, but you need to configure them in Warewulf before doing so. Recall that /etc/warewulf/nodes.conf is the database of compute nodes in a simple flat text YAML format. You can get the list of defined compute nodes with the command:
$ sudo wwctl node list -a
The command at this point should have no output, unless you or someone else with Warewulf access has created one. If you see that any node has been created that you don’t expect, you might want to uninstall Warewulf and start over.
Adding a node is as simple as:
$ sudo wwctl node add --netdev eth0 --hwaddr XX:XX:XX:XX:XX:XX --ipaddr 10.0.1.1 --netmask 255.0.0.0 n0001
You don't have to know the MAC address (-hwaddr …); however, I like knowing them for my nodes before booting. This information can be found by booting the nodes and going into the BIOS and looking for the MAC address. (If you have more than one NIC, it is likely the first.)
If you are using Warewulf with servers, your hardware provider should have a list of MAC addresses. If they rack the servers, they should have a list as they are installed in the rack.
In my case, I knew the MAC address of the first node I was to boot (I looked in the BIOS), so I used it to associate the MAC address to the IP address and the node (n0001). I like to start with node 1 rather than node 0, but that is personal preference and is a little different than in the Warewulf documentation. One important thing to note is that the IP address matches the one I used in /etc/warewulf/warewulf.conf to define the start of the address range.
If you don't know the MAC address of the compute node, you can boot the nodes one by one and have Warewulf capture the MAC–node name association. When you define a node in Warewulf for which you don’t know the MAC, you use the command:
$ sudo wwctl node add NODENAME.CLUSTER --ipaddr aaa.bbb.ccc.ddd --discoverable
The key is to add the option --discoverable, which marks a field in nodes.conf named Discoverable to true so that a MAC address can be assigned to a node that doesn't currently have one. You can also leave out the --netdev option, which defaults to eth0. You can do this for any or all nodes in the cluster.
Now boot the next node. Warewulf assigns the next discovered MAC to the next node listed as discoverable in nodes.conf. The MAC gets added to the entry for the node and discovery is set to false so it won’t be assigned to a different node.
The key point is to do this one node at a time. Power on a node and make sure it gets the proper IP address and continues to boot, and you can access it over SSH. Be sure to check the nodes under Warewulf’s control with:
$ sudo wwctl node list -a
You should see the current node, the MAC address, and that the discoverable flag is false.
If you are using Warewulf to provision and manage nodes other than compute nodes, you might want to add an extension to the node name, such as node0001.cluster. You can also use node name extensions to help delineate what nodes are doing what. For example, you could label the nodes by rack such as n0001.rack1.cluster, and so on. Choose a naming scheme that works for you and helps you administer the system. Just be sure to document it!
When first booting a Warewulf cluster, I like to be cautious. Therefore, I used an extremely large subnet mask to make sure the head node and the compute node can communicate. After I use this large netmask, I go back and edit the node properties to have it match the head node netmask. You can get a list of the defined nodes as in Listing 10.
Listing 10: List of Defined Nodes
$ sudo wwctl node list -a
################################################################################
NODE                 FIELD              PROFILE      VALUE
n0001                Id                 --           n0001
n0001                Comment            default      This profile is automatically included for each node
n0001                Cluster            --           --
n0001                Profiles           --           default
n0001                Discoverable       --           false
n0001                Container          --           --
n0001                KernelOverride     --           --
n0001                KernelArgs         --           (quiet crashkernel=no vga=791)
n0001                SystemOverlay      --           (wwinit)
n0001                RuntimeOverlay     --           (generic)
n0001                Ipxe               --           (default)
n0001                Init               --           (/sbin/init)
n0001                Root               --           (initramfs)
n0001                AssetKey           --           --
n0001                IpmiIpaddr         --           --
n0001                IpmiNetmask        --           --
n0001                IpmiPort           --           --
n0001                IpmiGateway        --           --
n0001                IpmiUserName       --           --
n0001                IpmiInterface      --           --
n0001                IpmiWrite          --           false
n0001                default:DEVICE     --           eth0
n0001                default:HWADDR     --           c8:5a:cf:0a:a8:68
n0001                default:IPADDR     --           10.0.1.1
n0001                default:IPADDR6    --           --
n0001                default:NETMASK    --           (255.0.0.0)
n0001                default:GATEWAY    --           --
n0001                default:TYPE       --           --
n0001                default:ONBOOT     --           true
n0001                default:PRIMARY    --           true
The values listed in parentheses are values that can be changed with wwctl.
At this point, I like to assign the container to the node with a simple command:
$ sudo wwctl node set --container rocky-8 n0001
Are you sure you want to modify 1 nodes(s): y
$ sudo wwctl node list -a  n0001 | grep Container
n0001                Container          --           rocky-8
One thing a friend recommended that I thought was a really good idea was to add a password to the root account in the container so I could log in to the compute node with a monitor and keyboard. This step really helps with debugging, particularly with misconfigured networks.
To create a password for the root account, you must install the passwd tool in the container. I won’t show all the output of this process because it can be a bit long, but I least wanted to show you the steps. By the way, this is a great way to illustrate how to update the container.
To add packages to the container, exec into the container:
$ sudo wwctl container exec rocky-8 /bin/bash
[rocky-8] Warewulf>
Once “inside” the container, you can use yum to install passwd, the package for the password tool (Listing 11), then create a password for the root user (Listing 12). Again, notice that on exit, the container is rebuilt.
Listing 11: Installing passwd
[rocky-8] Warewulf> yum install passwd
Failed to set locale, defaulting to C.UTF-8
Rocky Linux 8 - AppStream                                             2.2 MB/s |  11 MB     00:05
Rocky Linux 8 - BaseOS                                                1.4 MB/s | 9.0 MB     00:06
Rocky Linux 8 - Extras                                                 12 kB/s |  12 kB     00:00
Dependencies resolved.
...
Listing 12: Creating a Password Root
[rocky-8] Warewulf> whereis passwd
passwd: /usr/bin/passwd /etc/passwd /usr/share/man/man1/passwd.1.gz
[rocky-8] Warewulf> passwd root
Changing password for user root.
New password:
Retype new password:
passwd: all authentication tokens updated successfully.
[rocky-8] Warewulf> exit
exit
+ LANG=C
+ LC_CTYPE=C
+ export LANG LC_CTYPE
+ dnf clean all
25 files removed
Rebuilding container...
Created image for VNFS container rocky-8: /var/lib/warewulf/container/rocky-8.img
Compressed image for VNFS container rocky-8: /var/lib/warewulf/container/rocky-8.img.gz
The passwd tool is installed and you have a password for root that you can use to check the compute nodes.
Booting Nodes
At this point, you can boot compute nodes. For the first compute node, I would plug in a monitor and keyboard to watch the boot process and debug what is happening. After that, you can just turn on the power to the node.
You should see the node get the correct the IP address over DHCP; then you should see iPXE get copied over, and the node starts booting. The container is copied over the node and pivot boots into the container. Finally, you should see a prompt on the monitor plugged into the node indicating that the node is ready to be used.
Because only SSH is used for authentication, you won’t be able to log in to the compute node as a user; however, the rootuser has a password, so you can log in as root with the monitor and keyboard. When you do this, poke around the compute node and make sure everything looks correct. For example,
- check that the NFS exported files have mounted (use the mount command),
- look at the local IP address (ip addr show),
- ping the host node with the IP address (ping 10.0.0.1), and
- check the hostname of the node (more /etc/hostname).
These are just a few things you can do to check the compute node, but you can do whatever you like to satisfy that the compute node is up and working correctly.
At this point, you might go back to the host node and check out the compute node. The first thing to do is ping the IP address of the compute node (Listing 13) then ping the hostname of the compute node (Listing 14).
Listing 13: Pinging the Compute IP Address
$ ping 10.0.1.1
PING 10.0.1.1 (10.0.1.1) 56(84) bytes of data.
64 bytes from 10.0.1.1: icmp_seq=1 ttl=64 time=1.50 ms
64 bytes from 10.0.1.1: icmp_seq=2 ttl=64 time=2.56 ms
^C
--- 10.0.1.1 ping statistics ---
2 packets transmitted, 2 received, 0% packet loss, time 1002ms
rtt min/avg/max/mdev = 1.503/2.032/2.562/0.531 ms
Listing 14: Pinging the Compute Hostname
$ ping n0001
PING n0001-default (10.0.1.1) 56(84) bytes of data.
64 bytes from n0001-default (10.0.1.1): icmp_seq=1 ttl=64 time=2.20 ms
64 bytes from n0001-default (10.0.1.1): icmp_seq=2 ttl=64 time=2.44 ms
^C
--- n0001-default ping statistics ---
2 packets transmitted, 2 received, 0% packet loss, time 1002ms
rtt min/avg/max/mdev = 2.200/2.321/2.443/0.130 ms
Being able to pin the hostnames is a good sign because the default host overlay that takes care of the hostnames doesn’t always work in Warewulf version 4.3. If you can’t ping the hostname, you need to rerun the wwctl configure -a command and reboot the compute node (Listing 15). This problem should be fixed in Warewulf 4.4 or a later version.
Listing 15: Enabling Services
$ sudo wwctl configure -a
Building overlay for localhost.localdomain: host
Enabling and restarting the DHCP services
Building overlay for localhost.localdomain: host
Enabling and restarting the NFS services
Updating system keys
Skipping, key already exists: ssh_host_rsa_key
Skipping, key already exists: ssh_host_dsa_key
Skipping, key already exists: ssh_host_ecdsa_key
Skipping, key already exists: ssh_host_ed25519_key
Skipping, authorized_keys already exists: /root/.ssh/authorized_keys
Writing PXE files to: /var/lib/tftpboot/warewulf
Enabling and restarting the TFTP services
After pinging the compute nodes, try to SSH into the node as a user to make sure authentication is working:
$ ssh 10.0.1.1
[laytonjb@n0001 ~]$ logout
Connection to 10.0.1.1 closed.
That operation was successful, so now try using the hostname:
$ ssh n0001
Warning: Permanently added 'n0001' (ECDSA) to the list of known hosts.
Last login: Thu Nov 17 13:58:01 2022 from 10.0.0.1
[laytonjb@n0001 ~]$ ls -s
total 24
 0 Desktop     0 Downloads   0 Pictures   0 Templates   4 ww4-2_notes.txt
 0 Documents   0 Music       0 Public     0 Videos     20 ww4_notes.txt
That was successful too, and you can see the files on the compute node, so I would say you can successfully boot compute nodes now.
Review and Debugging Tips
The work in this article accomplished some great things. Overall, on the head node Warewulf 4 was configured for booting one group of compute nodes. To do this, Warewulf was installed, configured, and initialized on the head node; a container OS was imported for use on the compute nodes; and after one small update to allow root to log in locally, the first compute node was configured with the container, IP address, MAC address, and kernel in the container. Finally, the first compute node booted. You could do even more if you wanted.
If you need to debug as you are bringing up the compute node:
- Be sure to check the BIOS of your compute nodes so the first boot option is DHCP and it can use UEFI. Legacy mode for DHCP is not likely to work because the size of the container is too large (Legacy mode is 32-bit). You can test this on a compute node by rebooting it even if Warewulf is not configured. The node should come up looking for a DHCP server (plug in to the node a monitor, keyboard, and mouse).
- Check the netmask defined for your compute nodes with the netmask for the host node’s cluster interface. (Be sure it is the network interface used for the cluster network.) Make sure they are the same or at least compatible. This bit me a few times when I didn’t pay close enough attention and fat-fingered the subnet mask.
- Always, always, always check the status of dhcpd, tftp, nfs-server, and warewulfd system services, as described in a subsection in this article. I found that if I shut down the head node for a bit and then rebooted, one of the services almost always failed to start. I don’t know why, even though I enabled them with the enable --now option every time and checked them. For some reason, though, they didn’t always start.
- Plug a monitor and keyboard into your compute node when you are booting it for the first time. It can save you a lot of headaches, especially if you give the root account a password by installing the passwd tool. You can check whether DHCP is working, whether tftp is working, and whether the node is booting into the container. If the node comes up with a prompt, you can log in as root locally on the node and test network connectivity, NFS, and a few other things. Use ping to check the IP address and the node name.
- After booting your first compute node, check that the network on the host and compute node use hostnames and not just IP addresses. If this doesn’t work, run the command wwctl configure -a on the head name again and reboot the compute node.
Summary
Booting compute nodes is a huge step forward in building your cluster. Without this step, everything following is kind of meaningless. However, I am still a few steps away from having what I think is a modern cluster with compilers, MPI libraries, and a resource manager (aka a job scheduler). Moreover, my compute nodes have GPUs in them, and they are currently not configured.
In subsequent articles I will explore how to configure GPUs in relation to Warewulf 4 to illustrate how you build a modern cluster with all of the tools and accelerators (GPUs).