
GlusterFS stores data across the network and can be used as a storage back end in cloud environments.
Diving In
Software-defined storage, which until recently was the preserve of large storage solution vendors, can be implemented today with open source and free software. As a bonus, you can look forward to additional features that are missing in hardware-based solutions. GlusterFS puts you in a position to create a scalable, virtualized storage pool made up of regular storage systems grouped to form a network RAID and with different methods of defining a volume to describe how the data is distributed across the individual storage systems.
Regardless of which volume type you choose, GlusterFS creates a common storage array from the individual storage resources and provides it to clients in a single namespace (Figure 1). The clients also can be applications, such as cloud software, that use the GlusterFS server storage back end for virtual systems. In contrast to other solutions of this kind, GlusterFS requires no dedicated metadata servers to find a file in the storage pool. Instead, a hash algorithm is used that allows any storage node to identify a file in the storage pool. This is a huge advantage over other storage solutions, because a metadata server is often a bottleneck and a single point of failure.
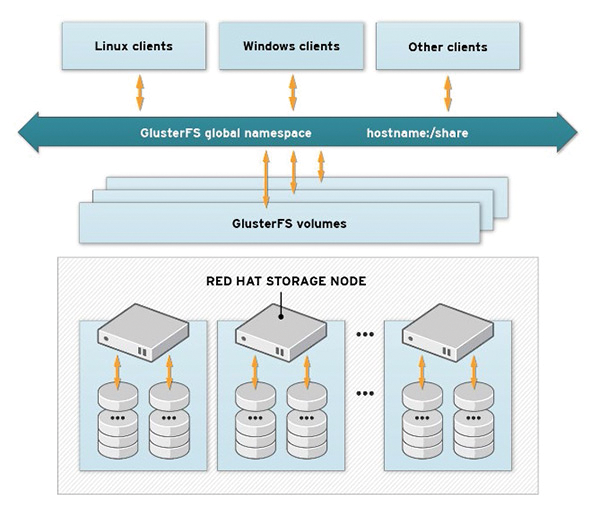 Figure 1: Client systems access the desired GlusterFS volume via a single namespace. (Red Hat CC BY-SA 3.0 [1])
When you look under the hood of GlusterFS, it is striking that the filesystem is implemented in user space and that access takes place via a Filesystem in Userspace (FUSE) interface. This makes working with the filesystem very easy and very flexible, albeit at the cost of performance. However, the libgfapi library enables direct access to the filesystem. Qemu, for example, uses it to store images of virtual systems on GlusterFS without detouring via a FUSE mount.
As already mentioned, the filesystem is created on a volume that can be distributed across multiple systems. The individual systems are connected either via TCP/IP or InfiniBand Remote Direct Memory Access (RDMA). The storage volume is then available via a native GlusterFS client or via the Network Filesystem (NFS) or Server Message Block (SMB) protocol. GlusterFS can distribute the data across the individual storage systems, as well as mirror the data, with the use of translators.
For distributed and mirrored data, the smallest unit is the file itself; in the case of striping, individual chunks of a file are distributed across the systems. This approach scales well, especially if you need to manage large files. The performance in this mode increases almost linearly with the number of systems. When mirroring data, GlusterFS creates many copies of a file. The modes can also be combined. For example, combining distributed and mirrored data gives you a balance between performance and data security.
Disperse mode, which can be understood as a kind of RAID 5 configuration, is relatively new. For fault tolerance and high availability, you also can mirror a storage volume to a remote site by means of georeplication. If disaster strikes and a server fails in a distributed storage volume, the data can be quite easily recovered.
Gluster volumes can also be extended, possibly without further ado: To do so, you simply add an extra brick to the volume. In Gluster terminology, bricks are the directories of a storage system from which a volume is composed. The bricks for a single volume will usually, but not necessarily, reside on different systems. To enlarge the trusted storage pool, you simply add additional servers to the existing federation.
The example here is based on Fedora 22 and is designed to provide back-end storage for virtual systems based on Qemu/KVM and the libvirt virtualization framework. The glusterfs packages are included in the regular Fedora software repository and can be simply installed using the dnf package manager:
dnf install glusterfs glusterfs-cli glusterfs-server
As an alternative to installing the GlusterFS Community Version, you can also buy the commercial Gluster Storage product by Linux distributor Red Hat. It comes with typical enterprise features (e.g., you can access the Linux distributor's support services).
Installing GlusterFS
To avoid making the example unnecessarily complex, my setup consists of two systems. Each provides one brick that will be replicated between the two systems. On both systems, the glusterfs service is started by systemd (Listing 1).
Listing 1
GlusterFS Service
# systemctl start glusterd.service
# systemctl status glusterd.service
  glusterd.service - GlusterFS, a clustered file-system server
    Loaded: loaded (/usr/lib/systemd/system/glusterd.service; disabled; vendor preset: disabled)
    Active: active (running) since Thu 2015-08-27 21:26:45 CEST; 2min 53s ago
  Process: 1424 ExecStart=/usr/sbin/glusterd -p /var/run/glusterd.pid (code=exited, status=0/SUCCESS)
  Main PID: 1425 (glusterd)
    CGroup: /system.slice/glusterd.service ??1425 /usr/sbin/glusterd -p /var/run/glusterd.pid
Aug 27 21:26:45 gluster2.example.com systemd[1]: Starting GlusterFS, a clustered file-system server...
Aug 27 21:26:45 gluster2.example.com systemd[1]: Started GlusterFS, a clustered file-system server.
On both computers, a dedicated block device was mounted under /storage/. The bricks from which the GlusterFS volumes will be generated later are set up on this device. In this example, only one brick per system is used. However, this is only possible if you previously added all the storage systems to the trusted storage pool mentioned earlier. It makes no difference which storage system you log onto to create the trusted storage pool. In this example, the first system (gluster1) is used for this purpose:
# gluster peer probe gluster2
Probe successful
The local system automatically belongs to the trusted storage pool and does not need to be added. The output from gluster peer status should now list the other system as a peer on both systems. The following command generates a replicated volume between two storage systems. The volume needs to be enabled after this:
# gluster volume create gv0 replica gluster1:/storage/brick1/gv0/ gluster2:/storage/brick1/gv0/
volume create: gv0: success: please start the volume to access data
# gluster volume start gv0
volume start: gv0: success
Because the transport mode is set to TCP/IP by default, you do not need to specify it. If you prefer InfiniBand rather than TCP/IP, specify rdma transport as a further argument when you create a volume. A volume produced in this way can give you additional features. For example, you might allow access only from a specific network:
# gluster volume set gv0 auth.allow 192.168.122.*
volume set: success
An overview of all the available Gluster options can be found online [2]. After setting up the volume, you can enter the volume info command for details (Listing 2).
Listing 2
Getting Volume Details
# gluster volume info gv0
Volume Name: gv0
Type: Replicate
Volume ID: 4f8d25a9-bbee-4e8c-a922-15a7f5a7673d
Status: Started
Number of Bricks: 1 x 2 = 2
Transport-type: tcp
Bricks:
Brick1: gluster1:/storage/brick1/gv0
Brick2: gluster2:/storage/brick1/gv0
Options Reconfigured:
auth.allow: 192.168.122.*
Fastest Client Access with FUSE
Various methods are available for finally accessing a volume produced in this way. Native access via FUSE provides the best performance, or you could create an NFS or SMB share for the volume for access over the network. However, I recommend that you use the native client, not only for better performance, but also because it ensures transparent access to the individual bricks, regardless of the storage server used to mount the volume. The use of NFS or SMB is interesting if you want to set up the GlusterFS volume to configure a highly available data server by means of NFS-Ganesha [3] or CTDB [4]. The native client is used if you run the mount command as follows:
mount -t glusterfs gluster1:/gv0 /mnt/glusterfs/
To provide permanent access to the volume, add a corresponding line to your etc/fstab file. At this point, it is important to note that it does not matter which storage system you use for access because it is merely used to read the metadata, which states exactly how the volume is composed. This is where you find all the systems that provide the bricks for the volume.