
Environment Modules are an indispensable tool for high-performance computing that allow you to switch between and among versions of compilers, libraries, and applications.
Warewulf 4 – Environment Modules
At the risk of repeating myself, HPC is high-performance computing, not MHC (medium-performance computing) or LHC (low-performance computing), which means developers strive to make applications and tools run as fast as possible. Therefore, compiler and library combinations are required that achieve the best performance over a range of inputs for an application. These combinations are definitely not the same in every case. The applications, compilers, and libraries must all be tuned for a particular architecture to get the best performance. The idea of “performance portability” is nonsense. You must address a specific combination and tune for that.
The target system will have a variety of compilers, debuggers, libraries, and so on that can be used to achieve the best performance. Setting up a specific combination of these elements becomes a headache because you have to specify paths to use the elements you need. Environment modules as a concept are used to change your environment easily to specific paths, compilers, and tools. If you want to try a different environment, you then change modules with a couple of commands to use those tools.
If you want to pair the gcc compilers with a version of the mpich library earlier than that you are currently using, environment modules allow you to change the paths quickly to this combination. When you are done, you just “purge” the environment modules and load what you want (or modify what tools and library modules are loaded). If the modules are coded correctly, you have no worries about crossing paths. Documenting which modules you used can easily be put in a script that loads the modules and builds the application or library.
From this impassioned introduction, I hope you can see why environment modules have been on every HPC system on which I've ever worked; I use them on my desktops and laptops, too.
You really have only two predominant tools in this category: TCL-based Environment Modules and the Lua-based Lmod environment toolset that uses modules written in Lua and can also use TCL-based modules. For this article I use Lmod.
Design of an Lmod Layout
The key to using and taking advantage of Lmod, or really any environment module tool, is to plan its installation and use it carefully, especially for stateless clusters such as those built with Warewulf 4. The planning includes where the Lmod binaries will be installed, where the Lmod module files will go, the structure of the module files, where the compiler and libraries used in modules are located, and where tools and libraries built with the modules are located. This last consideration is important because it includes where things like MPI libraries or profilers are located, as well as where compilers and their associated tools are located. I discuss these concerns as the article progresses.
My Warewulf 4 cluster currently runs Rocky 8.6 (soon to be 8.7). A container used for the stateless compute nodes is the same as the head node (Rocky 8.6). Both /home and /opt are NFS shared from the head node to the compute nodes. The nodes are all connected by Gigabit Ethernet. In the previous articles I added a root password for the container and configured Network Time Protocol (NTP) and timezone capability. Slurm was installed on both the server (head) and client (compute) nodes. Also, the latest article presented how to install GPU drivers and integrate GPU resources into Slurm (at least on a basic level).
For my situation I want to keep the container as small as possible yet allow the compute nodes to compile and run applications. Some larger clusters only want users to build applications on login nodes and run on the compute nodes. I don’t want to take the time to sort out the runtime from the compile parts and run bits. Therefore, I don't mind compiling on the compute nodes.
As a general rule, rather than install the compilers in the container, I will install them in shared NFS storage. The one exception to this rule is if the compiler comes in RPMs, then I will install it in the compute node container as well. If I can run the command
yum install <package>
to install the compiler, I will install it on the head node and the compute node container. If I build the compilers from source or from some sort of installable TAR file, then I will install them in shared NFS space (/opt/apps).
Now that I have a general approach to the location of compilers, I need an approach for where to locate binaries or libraries built with Lmod that are used in further Lmod module files. The location I'm choosing for these binaries is, /opt/apps/<compile>/<library or application>/<app>. For example, /opt/apps/GNU-8.5/MPICH-4.1 is where MPICH 4.1 binaries and libraries belong. Another example is /opt/apps/GNU-8.5/<app1>, where an application built with the gnu-8.5 compilers will be located. Note that the version of the GNU compilers is based on the version of gcc – in this case 8.5. The other compilers gfortran and g++ can have different versions.
Module Layout
Given where I want to locate the Lmod module files, the general layout of files is shown in Figure 1. Three subdirectories appear at the top. The first I want to mention is Core, which contains the first set of module files and is typically where compiler module files are located – and possibly pre-built applications. In this case, only the compiler module files are listed. Under Core reside two subdirectories, one for each type of compiler: gnu and nvidia.
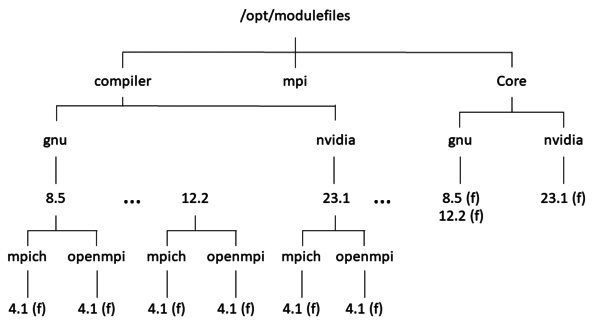 Figure 1: General module file layout.
Each subdirectory has individual files with versions of each compiler type. For example, gnu has versions 8.5 and 12.2. The label after each compiler version (f) indicates that these are files. Figure 2 shows the path (in green) to the file when loading the gnu/8.5 module. After loading this module, the module files under compiler are available, but only those associated with gnu/8.5/ (Figure 3).
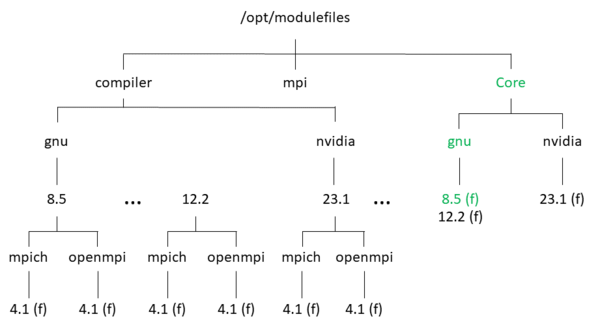 Figure 2: Path to the gnu/8.5 module.
 Figure 3: Path to mpich 4.1 module.
After the compiler is loaded, Lmod then makes the path to /opt/modulefiles/compiler/gnu/8.5 available to the user, who can then get a list of MPI libraries available, including mpich and openmpi. For this example, the MPI library, mpich/4.1, is loaded, as shown in red.
Head Node – Lmod Installation
To install Lmod on the head node, you need to install the prerequisites first:
- lua
- lua5.1-bitop
- lua-devel
- lua-json
- lua-lpeg
- lua-posix
- lua-term
- tcl
- tcl-devel
To install all of these on Rocky 8, you need to install the PowerTools repo, which is where many of these packages are stored. From an article by Heyan Maurya, the command to install the PowerTools repo is:
$ sudo dnf config-manager --set-enabled powertools
Now it’s just a simple matter of installing each package. Pay attention to name of the bitop package because it is different from the package names in the Lmod docs. Installing the packages is an exercise left to the reader.
After installing the prerequisites, the next step is to download and configure Lmod:
$ ./configure --with-module-root-path=/opt/modulefiles
This command tells Lmod that the module files will be in /opt/modulefiles. Be sure you create this directorybefore installing Lmod:
$ sudo mkdir /opt/modulefiles
It’s always good to be cautious, even if Lmod would create the directory for you. To build and install Lmod, run the command:
$ sudo make install
After installing Lmod, you have a few small steps left to configure it so that it works when users log in. If you read an article I wrote on Lmod back in 2018, you will see a discussion about the three commands to run:
$ sudo ln -s /usr/local/lmod/lmod/init/profile /etc/profile.d/z00_lmod.sh
$ sudo ln -s /usr/local/lmod/lmod/init/cshrc /etc/profile.d/z00_lmod.csh
$ sudo ln -s /usr/local/lmod/lmod/init/profile.fish /etc/profile.d/z00_lmod.fish
The commands create links from specific Lmod init files in /usr/loal/lmod/lmod/init to the general profile.d directory for the system. This process does not require any additional space.
The next step is to create or copy the Lmod module files in /opt/modulefiles. I have a set of module files I previously created that I adapt for new systems. To make things a bit simpler, I will list just a couple of them that go with a later example.
The first example is for the internal compilers that come by default for the system. For Rocky 8 it is the GNU 8.5 tools. I create a module file that allows me build libraries that depend on these compilers. A key aspect of this module is that when the module is unloaded, it will not erase the paths to these compilers (e.g., /usr/bin). Otherwise, the system will become broken. (Believe me, I made that mistake but once.) My Lua version of the module file is shown in Listing 1. This module will go in /opt/modulefiles/Core/gnu and is named 8.5.lua.
Listing 1: Lua Module File
-- -*- lua -*-
------------------------------------------------------------------------
-- GNU 8.5.0 compilers - gcc, g++, and gfortran. (Version 8.5.0)
------------------------------------------------------------------------

help(
[[
This module loads the gnu-8.5 compilers (8.5.0). The
following additional environment variables are defined:

CC (path to gcc compiler wrapper )
CXX (path to g++ compiler wrapper )
F77 (path to gfortran compiler wrapper )
F90 (path to gfortran compiler wrapper )

See the man pages for gcc, g++, gfortran (f77, f90). For
more detailed information on available compiler options and
command-line syntax.
]])

-- Local variables
local version = "8.5"
local base = "/usr/bin/"

-- Whatis description
whatis("Description: GNU 8.5 compilers (8.5.0)")
whatis("URL: www.gnu.org")

-- Normally, at this point, the module takes care of $PATH,
-- $LD_LIBRARY_PATH, $MANPATH, etc. However, since the compilers are
-- already installed, we don't modify these environment variables.
-- For example, don't add "/usr/bin" to path since it will get remove
-- that path from $PATH. You won't be able to access any binaries in
-- /usr/bin rendering your system useless.

-- Environment Variables
pushenv("CC", pathJoin(base,"gcc"))
pushenv("cc", pathJoin(base,"gcc"))
pushenv("CXX", pathJoin(base,"g++"))
pushenv("cxx", pathJoin(base,"g++"))
pushenv("FC", pathJoin(base,"gfortran"))
pushenv("fc", pathJoin(base,"gfortran"))
pushenv("f90", pathJoin(base,"gfortran"))
pushenv("F90", pathJoin(base,"gfortran"))

-- Setup Modulepath for packages built by this compiler
local mroot = os.getenv("MODULEPATH_ROOT")
local mdir = pathJoin(mroot,"Compiler/gnu", version)
prepend_path("MODULEPATH", mdir)

-- Set family for this module (mpi)
family("Compiler")
The second module I present is for MPICH, built with the default compilers (Listing 2). This module file will go in /opt/modulefiles/compiler/gnu/8.5/mpich/4.1.lua. Notice that the binaries associated with MPICH 4.1 are installed into /opt/apps/GNU-8.5/MPICH-4.1/. Because this example uses modules, do not put this into $PATH in your .bashrc file or the system .bashrc file. Lmod takes care of that for you.
Listing 2: MPICH Module File
-- -*- lua -*-
------------------------------------------------------------------------
-- mpich-4.1 (4.1) support. Built with gnu-8.5 (8.5.0), specifically gcc
------------------------------------------------------------------------


help(
[[
This module loads the mpich-4.1 MPI library built with gcc-8.5.
compilers (8.5.0). It updates the PATH, LD_LIBRARY_PATH,
and MANPATH environment variables to access the tools for
building MPI applications using MPICH, libraries, and
available man pages, respectively.

This was built using the GNU compilers, version 8.5.0.

The following additional environment variables are also defined:

MPICC   (path to mpicc compiler wrapper   )
MPICXX  (path to mpicxx compiler wrapper  )
MPIF77  (path to mpif77 compiler wrapper  )
MPIF90  (path to mpif90 compiler wrapper  )
MPIFORT (path to mpifort compiler wrapper )

See the man pages for mpicc, mpicxx, mpif77, and mpif90. For
more detailed information on available compiler options and
command-line syntax. Also see the man pages for mpirun or
mpiexec on executing MPI applications.
]])


-- Local variables
local version = "4.1"
local base = "/opt/apps/GNU-8.5/MPICH-4.1/"

-- Whatis description
whatis("Description: MPICH-4.1 with GNU 8.5 compilers")
whatis("URL: www.mpich.org")


-- Take care of $PATH, $LD_LIBRARY_PATH, $MANPATH
prepend_path("PATH", pathJoin(base,"bin"))
prepend_path("PATH", pathJoin(base,"include"))
prepend_path("LD_LIBRARY_PATH", pathJoin(base,"lib"))
prepend_path("MANPATH", pathJoin(base,"share/man"))


-- Environment Variables
pushenv("MPICC", pathJoin(base,"bin","mpicc"))
pushenv("MPICXX", pathJoin(base,"bin","mpic++"))
pushenv("MPIF90", pathJoin(base,"bin","mpif90"))
pushenv("MPIF77", pathJoin(base,"bin","mpif77"))
pushenv("MPIFORT", pathJoin(base,"bin","mpifort"))
pushenv("mpicc", pathJoin(base,"bin","mpicc"))
pushenv("mpicxx", pathJoin(base,"bin","mpic++"))
pushenv("mpif90", pathJoin(base,"bin","mpif90"))
pushenv("mpif77", pathJoin(base,"bin","mpif77"))
pushenv("mpifort", pathJoin(base,"bin","mpifort"))


-- Setup Modulepath for packages built by this compiler/mpi
local mroot = os.getenv("MODULEPATH_ROOT")
local mdir = pathJoin(mroot,"mpi/gnu", "8.5","mpich","4.1")
prepend_path("MODULEPATH", mdir)


-- Set family for this module (mpi)
family("mpi")
Compute Node Container – Lmod Installation
To install Lmod in the compute node container, you just follow the same steps as for the head node, but in the container. However, you have one extra prerequisite and a couple of things you can do to reduce the size of the image. The additional prerequisite is to install gcc into the container so you can build Lmod. Without it, your build will fail.
Exec into the container where you want to install Lmod (this step is left up to the reader). First, install the PowerTools repo as before for the head node. After that, install gcc, which is a particular prerequisite for the compute node container. Then, install the rest of the prerequisites for Lmod in the exact same way as for the head node.
Next, download Lmod into the container. You build and install it in the same way as the head node with the same options for configure. Now, build and install it with the single command as for the head node and run the same three link commands:
$ sudo ln -s /usr/local/lmod/lmod/init/profile /etc/profile.d/z00_lmod.sh
$ sudo ln -s /usr/local/lmod/lmod/init/cshrc /etc/profile.d/z00_lmod.csh
$ sudo ln -s /usr/local/lmod/lmod/init/profile.fish /etc/profile.d/z00_lmod.fish
You should now have the links to the files located in the container but, as noted for the head node, without using any more storage space.
You don't have to copy the module files to /opt in the container because those are from the NFS-mounted storage and will get mounted as the compute nodes boot.
At this point, you can remove packages in the container to reduce the size of the container or you can leave them. The choice is up to you. To better understand the effect of removing them, look at the size of packages from the yum install <package> output.
When you install a package with yum, the output tells you how much space was used for the installation. Table 1 shows the packages for Lmod in the container and the corresponding spaced used.
| Package | Size (KB) |
|---|---|
| lua | 553 |
| lua-devel | 194 |
| lua5.1-bitop | 515 |
| lua-json | 227 |
| lua-term | 18 |
| lua-posix | 1,126 |
| tcl | 4,505 |
| tcl-devel | 927 |
| gcc | 48,128 |
| Total | 56,193 |
From the table, the prerequisites for Lmod in the container added close to 55MiB. That’s not much because the container image, once in memory on the compute node, is more than 1GB (only 5.5% of a 1GB image). However, you can't remove all the prerequisites or Lmod will stop working.
After Lmod is installed and you are confident it’s working, you can remove the lua-devel, tcl-devel, and gcc packages from the container without affecting Lmod with yum remove <package>. You will have removed 49,250KB (47MiB, or about 4.9% of a 1GB image), most coming from gcc.
You can remove these packages and save the space if you want. It’s your choice. Personally, I remove lua-devel and tcl-devel but leave gcc in case I need to compile on the compute node. Although this step doesn’t reduce the container size by much, around 1MiB, I typically try to do everything I can to reduce the size of an image, which can reduce the attack surface of the image.
After you are done with the container, exit and save it.
Initial Lmod Testing – Head Node
This section is not intended to be documentation on the use of Lmod. For that, consult the Lmod docs. However, before booting the compute nodes with the updated container, it’s good to test that Lmod is working on the head node.
The first command is to check that modules are available on the head node. Listing 3 shows what you should see, although the exact details can be different depending on the modules you have built.
Listing 3: Modules on the Head Node
$ module avail

-------------------- /opt/modulefiles/Compiler/gnu/8.5 --------------------
   mpich/4.1    openmpi/4.1

-------------------------- /opt/modulefiles/Core --------------------------
   gnu/8.5    lmod (D)    nvhpc/20.11    settarg (D)

------------------ /usr/local/lmod/lmod/modulefiles/Core ------------------
   lmod    settarg

  Where:
   D:  Default Module

If the avail list is too long consider trying:

"module --default avail" or "ml -d av" to just list the default modules.
"module overview" or "ml ov" to display the number of modules for each name.

Use "module spider" to find all possible modules and extensions.
Use "module keyword key1 key2 ..." to search for all possible modules matching any of the
"keys".
You need to load the gnu/8.5 compiler module before the MPI library (the MPI library depends on a specific compiler):
$ module load gnu/8.5
$ module list

Currently Loaded Modules:
  1) gnu/8.5
I used the module list command to list all loaded modules. Notice that the gnu/8.5 module is listed. At this point, you can find what modules are available for the loaded gnu/8.5 module (Listing 4). The module is named after the version of the gcc compiler.
Listing 4: GNU 8.5 Modules
$ module avail

-------------------- /opt/modulefiles/Compiler/gnu/8.5 --------------------
   mpich/4.1    openmpi/4.1

-------------------------- /opt/modulefiles/Core --------------------------
   gnu/8.5 (L)    lmod (D)    nvhpc/20.11    settarg (D)

------------------ /usr/local/lmod/lmod/modulefiles/Core ------------------
   lmod    settarg

  Where:
   L:  Module is loaded
   D:  Default Module

If the avail list is too long consider trying:

"module --default avail" or "ml -d av" to just list the default modules.
"module overview" or "ml ov" to display the number of modules for each name.

Use "module spider" to find all possible modules and extensions.
Use "module keyword key1 key2 ..." to search for all possible modules matching any of the
"keys".
Notice the (L) next to gnu/8.5, which indicates that that particular module is loaded. The output from module avail lists all modules dependent on gnu/8.5. Modules that are not dependent on it, are not listed.
The output from module avail once gnu/8.5 is loaded presents what modules you can load that use gnu/8.5. In this case, I will load the mpich/4.1 module, although I could load the openmpi/4.1 module if I wanted. (I do not discuss the openmpi/4.1 module in this article.) After loading the mpich/4.1 module, I list all the loaded modules:
[laytonjb@warewulf ~]$ module load mpich/4.1
[laytonjb@warewulf ~]$ module list

Currently Loaded Modules:
  1) gnu/8.5   2) mpich/4.1
All of the correct modules are loaded, so Lmod on the head node looks good.
Initial Lmod Testing – Compute Node
To test a compute node, you must first boot a compute node. After booting, check that /opt is mounted with the mount command. To check Lmod, I’ll walk you through the same steps used on the head node. First, check the available modules after using ssh to log in to the first compute node (Listing 5).
Listing 5: Checking Lmod on the Compute Node
[laytonjb@warewulf ~]$ ssh n0001
Last login: Sun Feb 12 09:10:32 2023 from 10.0.0.1
[laytonjb@n0001 ~]$ module avail

-------------------------- /opt/modulefiles/Core --------------------------
   gnu/8.5    lmod (D)    nvhpc/20.11    settarg (D)

------------------ /usr/local/lmod/lmod/modulefiles/Core ------------------
   lmod    settarg

  Where:
   D:  Default Module

If the avail list is too long consider trying:

"module --default avail" or "ml -d av" to just list the default modules.
"module overview" or "ml ov" to display the number of modules for each name.

Use "module spider" to find all possible modules and extensions.
Use "module keyword key1 key2 ..." to search for all possible modules matching any of the
"keys".
Next, load the gnu/8.5 module, list the modules loaded,
$ module load gnu/8.5
$ module list

Currently Loaded Modules:
  1) gnu/8.5
and list the available modules that have been built with the gnu/8.5 module or are dependent on it (Listing 6).
Listing 6: Available and Dependent Modules
$ module avail

-------------------- /opt/modulefiles/Compiler/gnu/8.5 --------------------
   mpich/4.1    openmpi/4.1

-------------------------- /opt/modulefiles/Core --------------------------
   gnu/8.5 (L)    lmod (D)    nvhpc/20.11    settarg (D)

------------------ /usr/local/lmod/lmod/modulefiles/Core ------------------
   lmod    settarg

  Where:
   L:  Module is loaded
   D:  Default Module

If the avail list is too long consider trying:

"module --default avail" or "ml -d av" to just list the default modules.
"module overview" or "ml ov" to display the number of modules for each name.

Use "module spider" to find all possible modules and extensions.
Use "module keyword key1 key2 ..." to search for all possible modules matching any of the
"keys".
Finally, you can load mpich/4.1 and list the loaded modules:
$ module load mpich/4.1
$ module list

Currently Loaded Modules:
  1) gnu/8.5   2) mpich/4.1
The Lmod installation in the compute node seems good.
Test Example – No Slurm
When I haven’t built or run any applications, I like to do another check on the Lmod installation to make sure that an application can be built and executed by Lmod on the head and compute nodes. Then, I run the application with Slurm on the compute node to make sure Lmod is working correctly. (Note: I didn't configure Slurm to let it run jobs on the head node, so I don’t test that scenario).
For this example, I use a simple application that computes an approximate integral to a function. It is MPI code written in Fortran, so I needed to install gfortran into the container. I also needed to install a library named libatomic. For some reason this library didn’t get installed automatically. I will leave these steps to the user.
On the head node I load the gnu/8.5 and mpich/4.1 modules and compile the code.
$ mpif90 quad_mpi.f90 -o quad.exe
Next, I run the code with four MPI processes on the head node outside of Slurm to make sure it works (Listing 7). The answer in the output is correct according to the answers from the site where I downloaded the code. (You can also compute the integral by hand for an analytical solution if you like.)
Listing 7: Testing Code on the Head Node
$ mpirun -np 4 ./quad.exe

QUAD_MPI
  FORTRAN90/MPI version
  Estimate an integral of f(x) from A to B.
  f(x) = 50 / (pi * ( 2500 * x * x + 1 ) )

  A        =    0.00000
  B        =    10.0000
  N        =      9999999
  Exact    =   0.4993633810764567

  Use MPI to divide the computation among
  multiple processes.
  Process        1 contributes MY_TOTAL =   0.498098
  Process        2 contributes MY_TOTAL =   0.954910E-03
  Process        3 contributes MY_TOTAL =   0.318308E-03

  Estimate =   0.4993711897633686
  Error    =   0.780869E-05
  Time     =   0.584414E-01

QUAD_MPI:
  Normal end of execution.
Next, I like to build and test the sample source code on the compute node to make sure it can run successfully there. I built the executable as quad2.exe on the compute node so that the executable name is different from that compiled on the head node. Listing 8 shows the output.
Listing 8: Testing Code on the Compute Node
$ mpirun -np 4 ./quad2.exe

QUAD_MPI
  FORTRAN90/MPI version
  Estimate an integral of f(x) from A to B.
  f(x) = 50 / (pi * ( 2500 * x * x + 1 ) )

  A        =    0.00000
  B        =    10.0000
  N        =      9999999
  Exact    =   0.4993633810764567

  Use MPI to divide the computation among
  multiple processes.
  Process        2 contributes MY_TOTAL =   0.954910E-03
  Process        1 contributes MY_TOTAL =   0.498098
  Process        3 contributes MY_TOTAL =   0.318308E-03

  Estimate =   0.4993711897633686
  Error    =   0.780869E-05
  Time     =   0.612482E-01

QUAD_MPI:
  Normal end of execution.
Again, this is the correct answer.
To help locate missing libraries, I execute the binary on the compute node that was built on the head node (Listing 9).
Listing 9: Looking for Missing Libraries
$ mpirun -np 4 ./quad.exe

QUAD_MPI
  FORTRAN90/MPI version
  Estimate an integral of f(x) from A to B.
  f(x) = 50 / (pi * ( 2500 * x * x + 1 ) )

  A        =    0.00000
  B        =    10.0000
  N        =      9999999
  Exact    =   0.4993633810764567

  Use MPI to divide the computation among
  multiple processes.
  Process        2 contributes MY_TOTAL =   0.954910E-03
  Process        1 contributes MY_TOTAL =   0.498098
  Process        3 contributes MY_TOTAL =   0.318308E-03

  Estimate =   0.4993711897633686
  Error    =   0.780869E-05
  Time     =   0.612482E-01

QUAD_MPI:
  Normal end of execution.
Again, the answer is correct.
Finally, I'll run the binary built on the head node with Slurm. I did not build MPICH with Slurm support for this article, so I wrote a very simple Slurm job script to run the code:
#!/bin/bash

# Job name:
#SBATCH --job-name=quad_test

# Number of MPI tasks
#SBATCH -n 8

# Number of tasks per node
#SBATCH --tasks-per-node=8


## Command(s) to run (example):
module load gnu/8.5
module load mpich/4.1

mpirun ./quad.exe
I asked for eight MPI processes in the script – I only have one compute node right now. Notice that I don’t have to specify the number of MPI processes on the mpirun command line. Perhaps the most important thing to note is that I loaded the two modules I used to build the executable in the script. If I didn’t load them, the executable would not execute.
Next, I submitted the script to Slurm with the command
$ sbatch quad_1.job
The return from Slurm was Submitted batch job 34. I immediately checked the output of squeue and sinfo -a to see the job running (Listing 10). The job ran so quickly that I could not see it in the queue or in the sinfo -a output. I can check the output, though, as shown in Listing 11. The results match the previous output, so Slurm can run MPI jobs. Now I have Lmod installed on the head node and in the container.
Listing 10: squeue and sinfo
$ squeue
      JOBID PARTITION     NAME     USER ST       TIME  NODES NODELIST(REASON)
$ sinfo -a
PARTITION AVAIL  TIMELIMIT  NODES  STATE NODELIST
normal*      up 1-00:00:00      1   idle n0001
Listing 11: Checking for Running Job
$ more slurm-34.out

QUAD_MPI
  FORTRAN90/MPI version
  Estimate an integral of f(x) from A to B.
  f(x) = 50 / (pi * ( 2500 * x * x + 1 ) )

  A        =    0.00000
  B        =    10.0000
  N        =      9999999
  Exact    =   0.4993633810764567

  Use MPI to divide the computation among
  multiple processes.
  Process        2 contributes MY_TOTAL =   0.954910E-03
  Process        1 contributes MY_TOTAL =   0.498098
  Process        3 contributes MY_TOTAL =   0.318308E-03

  Estimate =   0.4993711897633686
  Error    =   0.780869E-05
  Time     =   0.612482E-01

QUAD_MPI:
  Normal end of execution.
Summary
Environment Modules are one of the most indispensable tools in HPC. They allow you to use a combination of tools, such as a compiler and MPI library, to build and tune an application for your system.
I used Lmod to show how you can build and use it for environment modules on a Warewulf 4 cluster. Although you can build, install, and use Lmod easily, it’s best to plan how to lay out your module files, including where the binaries will be placed, to save you some time and frustration in redoing work.
Lmod does not use much space in the filesystem. Being old school, I like to make my compute node images as small as possible. I hope this article helps you plan for installing Lmod.