
Interactive HPC applications written in languages such as Python play a very important part today in high-performance computing. We look at how to run Python and Jupyter notebooks on a Warewulf 4 cluster.
Warewulf 4 – Python and Jupyter Notebooks
The use of interactive applications in HPC is growing rapidly. Traditionally, HPC was just running input data through an application and producing some output. The programs were not “interactive.” Today, languages that that lend themselves to interactivity, such as Python, are becoming increasingly popular in HPC, not to mention artificial intelligence. These languages are easy to use, expandable, great for interactive computing and analysis, and mostly open source with thousands of developers contributing to their advancement.
This type of interactivity is not just for writing applications, but for running applications, as well. For example, you might change parts of the application on the basis of your results, do some interactive post-processing, or explore data. These applications can require a variety of compute resources such as huge amounts of memory, GPUs, many compute cores per node, and possibly multiple compute nodes.
Another feature is that although the main portion of the application is written in an “interactive” language such as Python or R, supporting libraries or modules can be written in other languages.
In this article I focus on Python. Note that when installing Python on a cluster, it can be customized for each user by installing modules into their home directory. If you have several users with similar requirements, this customization can result in wasted space from repeated installations of the same modules.
I'll walk through installing a Python environment with Anaconda on the Warewulf 4 cluster I've been writing about in previous articles. The Anaconda installation will include adjustments so that a module is only installed once but us accessible to all users. Next, I'll discuss how to run Jupyter notebooks on compute nodes with Slurm, which is a heavily requested feature today.
Python Installation
As mentioned, I want to install Python in a central location so that every user doesn’t need to install it in their own /home directory. Moreover, I want to configure it so that a module installed by one user can be used by other users, to limit the number of copies of the same packages throughout /home. Although this arrangement seems simple, some aspects require some planning.
Installing Anaconda for All Users
I have been using the Anaconda distribution of Python for years, so that is what I use in this article. To begin, I’ll walk you through the installation of Anaconda on the head node in a shared filesystem, /opt, which chose because it is a NFS shared filesystem that can be accessed by all compute nodes that mount it.
Before installing Anaconda, you should create the directory where Anaconda will be installed, then create user anaconda on the head node to manage the installation and updates, and add a password to the anaconda user:
$ sudo mkdir /opt/apps/anaconda
$ sudo adduser anaconda
From this new directory, install the latest version of Anaconda. You will probably have to install as root or withsudo, but it is installed as if you were installing it into your own account – just with a different target directory. The Anaconda installation guide explains how to do this.
After installation you should chown the Anaconda directory to the anaconda user:
$ sudo chown -R anaconda:anaconda /opt/apps/anaconda
The -R option recursively changes the owner of the files and directories to user anaconda.
The next step is to remove write permission for the group (g) and others (o) because you don’t want “them” messing up the Anaconda installation:
$ sudo chmod -R go-w /opt/apps/anaconda
However, you want to give both the group and others execute and read permissions so they can run Python:
$ sudo chmod -R go+rX /opt/apps/anaconda
The Python concept of “environments” allows you to install packages that aren’t shared in other environments. The default is called the “base” environment. To get started, copy this to create a shared_env environment; it won’t have everything users will need, but it will have enough.
I’m choosing a slightly long way of doing this because I like to keep a list of what is in the shared_env environment. The first step is to get a list of all the packages in the base environment by first going into the anaconda account with su:
$ sudo su anaconda
$ cd
Now you can create the list of packages (modules) in the base environment to use in your shared_env environment:
$ /opt/apps/anaconda3/bin/conda list -e > req.txt
This command creates a list of packages in the file req.txt in the home directory of the anaconda user that can be used to create the shared_env environment:
$ /opt/apps/anaconda3/bin/conda create -n shared_env --file ./req.txt
Notice that the two previous commands did not require root or sudo permission because useranaconda owns the target directories.
If additional packages are necessary for the base or shared_env environment, you su into the anaconda user account (remember that this user can install and remove Python packages). You will have to use the anaconda user password that was previously created. By the way, you can use the conda package and environment manager – or even pip – to install or remove the packages.
At this point, Anaconda is installed with a Python shared_env, but you want to add the ability for users to base their own environments on shared_env, where they can install the packages they need. Without some additional work, if a user creates a new environment and adds new packages, they will be installed into the user’s home directory in the location /home/$USER/.conda. If another user installs the same packages, they will be in their .conda subdirectory. You can easily see how many copies of the same packages can exist in the /home filesystem, wasting space.
With a bit more work, a shared space (e.g.,/opt) can be used by users to save Python packages and environments so that if one user installs something, it will be available to all users. The first step is to create a directory in the shared space for additional packages (Listing 1).
Listing 1: Shared Space
$ sudo mkdir -p /opt/apps/apps/conda/pkgs
[sudo] password for laytonjb:
[laytonjb@warewulf ~]$ ls -lstar /opt/apps/apps
total 12
4 drwxrwxrwx 5 root root 4096 Mar 12 11:15 ..
4 drwxrwxrwx 3 root root 4096 Mar 12 11:15 .
4 drwxrwxrwx 4 root root 4096 Mar 12 11:17 conda
Note that I chose this directory convention to make writing environment modules for Anaconda easier. You can use any directory convention you like. The permissions on this directory are then changed (Listing 2) so that others and the group can write to it.
Listing 2: Change Permissions
[laytonjb@warewulf ~]$ sudo chmod -R oug+rwx /opt/apps/apps
[laytonjb@warewulf ~]$ ls -lstar /opt/apps/apps/conda
total 12
4 drwxrwxrwx 2 root root 4096 Mar 12 11:15 pkgs
4 drwxrwxrwx 3 root root 4096 Mar 12 11:15 ..
4 drwxrwxrwx 3 root root 4096 Mar 12 11:26 .
Note that as an HPC admin, you will have to watch this directory because users have write permission. They could easily start storing work data there to get around quotas on their home directory. You can find several ways to do this if you google for how to put quotas on folders or add users to a new group and put quotas on that group.
The directory created is for installing packages. You also need space for Python virtual environments that users might create (Listing 3).
Listing 3: Space for Virtual Environments
[laytonjb@warewulf ~]$ mkdir -p /opt/apps/apps/conda/$USER/envs
[laytonjb@warewulf ~]$ ls -lstar /opt/apps/apps/conda/$USER/envs
total 8
4 drwxrwxr-x 3 laytonjb laytonjb 4096 Mar 12 11:28 ..
4 drwxrwxr-x 2 laytonjb laytonjb 4096 Mar 12 11:28 .
I did this for my user account, and if you are adding a new user, you will have to create this directory for them (and don’t forget that they need to own it). Some admins will have a “new user” script that walks through everything that needs to be done for that user (including getting them added to the Warewulf 4 overlay, as previously mentioned).
After creating this directory, the user’s .bashrc file needs to be updated so that each user has the two commands shown in Listing 4 – or they can be put in /etc/profile.d, so when any user logs in, these environment variables are defined. For my testing in this article, I just added the commands to the two user accounts I have on the system (laytonjb and testuser1; I’ll create testuser1 in a subsequent section in this article).
Listing 4: Update User .bashrcL04]
export CONDA_PKGS_DIRS="/opt/apps/apps/conda/pkgs","/opt/apps/anaconda3/pkgs","/home/$USER/.conda/pkgs"
export CONDA_ENVS_DIRS="/opt/apps/apps/conda/$USER/envs"
Every user has a directory in the shared space with a place to store Python packages and a place for any new Python environments they create. The environment variable CONDA_PKGS_DIRS points to the directories that the users share. The environment variable CONDA_ENVS_DIRS points to the user’s specific directory in the shared space (all in /opt).
At this point, you can say that Anaconda for multiple users is ready to go. However, I want to integrate it into Lmod, so in the next section I’ll create an Lmod module.
Anaconda with Modules
Anaconda is its own package; therefore, according to the module hierarchy discussed in a past Warewulf article, it should go into /opt/modulefiles/Core. The version of Anaconda I installed was 22.9.0, which is what I used for the module file I ultimately named anaconda.22.9.0.lua. I put this module, which only modifies standard environment variables for paths, in /opt/modulefiles/Core/.After loading the Anaconda module (Listing 5), you should be good to go for running Anaconda Python and packages, but to be sure, create a new user and test this out.
Listing 5: Load the Anaconda Module
-- -*- lua -*-
--------------------------------------------------------------------------------
-- Anaconda (Python) (Version 22.9.0 Python 3.9.13 (main, Aug 25 2022, 23:26:10)
--------------------------------------------------------------------------------

help(
[[
This module loads Anaconda so you can activate the Shared Environment
(shared_env). This environment has the standard packages installed.
(it's the full environment (not mini-conda).

Only the paths are modified:

/opt/apps/anaconda3/bin and /opt/apps/anaconda3/include are prepended
to $PATH

/opt/apps/anaconda3/man is prepended to $MANPATH

]])

-- Local variables
local version = "22.9.0"
local base = "/opt/apps/anaconda3/"

-- Whatis description
whatis("Description: Anaconda 22.9.0 with Python 3.9.13")
whatis("URL: https://www.anaconda.com/products/distribution")

-- Take care of $PATH, $LD_LIBRARY_PATH, $MANPATH
prepend_path("PATH", pathJoin(base,"bin"))
prepend_path("PATH", pathJoin(base,"include"))
prepend_path("LD_LIBRARY_PATH", pathJoin(base,"lib"))
prepend_path("MANPATH", pathJoin(base,"share/man"))

-- Setup Modulepath for packages built by this compiler
local mroot = os.getenv("MODULEPATH_ROOT")
local mdir = pathJoin(mroot,"Core", version)
prepend_path("MODULEPATH", mdir)

-- Set family for this module (Core)
family("Core")
Testing
You are working on a Warewulf4 cluster, so to add a new user (e.g.,testuser1) to the system (Listing 6), you have to add two more steps so that the user appears on all of the compute nodes.
Listing 6: Adding a New User
[laytonjb@warewulf ~]$ sudo useradd testuser1
[sudo] password for laytonjb:
[laytonjb@warewulf ~]$ sudo passwd testuser1
Changing password for user testuser1.
New password:
Retype new password:
passwd: all authentication tokens updated successfully.
[laytonjb@warewulf ~]$ su testuser1
Password:
Configuring SSH for cluster access
[testuser1@warewulf laytonjb]$ cd
[testuser1@warewulf ~]$
The next two steps rebuild the Warewulf overlays so that the new user is included. Then, as a matter of habit, I use the syncuser option with the wwctl container command:
[laytonjb@warewulf ~]$ sudo wwctl overlay build
[laytonjb@warewulf ~]$ sudo wwctl container syncuser --write rocky-8
After these steps, I reboot the compute nodes just to be sure the new user is on them.
The first test is to load the Anaconda Lmod module on the head node by testuser1 and the laytonjbaccount (Listing 7). You should notice in the module avail output that you can see the anaconda module in the Core directory.
Listing 7: Loading Lmod (laytonjb)
[laytonjb@warewulf ~]$ module avail

--------------------------- /opt/modulefiles/Core ----------------------------
anaconda.22.9.0 gnu/8.5 lmod nvhpc/20.11 settarg

If the avail list is too long consider trying:

"module --default avail" or "ml -d av" to just list the default modules.
"module overview" or "ml ov" to display the number of modules for each name.

Use "module spider" to find all possible modules and extensions.
Use "module keyword key1 key2 ..." to search for all possible modules matching any of the "keys".

[laytonjb@warewulf ~]$ module load anaconda.22.9.0
[laytonjb@warewulf ~]$ which conda
/opt/apps/anaconda3/bin/conda
[laytonjb@warewulf ~]$ source activate shared_env
(shared_env)
After loading Lmod, you find the conda command (the Anaconda package manager). If you didn’t load the module, you would not find conda. At the end, I show how to activate the shared_env environment, as well.
Although the exercise might be redundant, I’ll try the same thing from the testuser1 account (Listing 8). The command added to the end illustrates how to deactivate the specific Python environment (shared_env).
Listing 8: Loading Lmod (testuser1)
[testuser1@warewulf ~]$ module avail

--------------------------- /opt/modulefiles/Core ----------------------------
anaconda.22.9.0 gnu/8.5 lmod nvhpc/20.11 settarg

...

[testuser1@warewulf ~]$ module load anaconda.22.9.0
[testuser1@warewulf ~]$ source activate shared_env
(shared_env) [testuser1@warewulf ~]$
(shared_env) [testuser1@warewulf ~]$ conda deactivate
[testuser1@warewulf ~]$
The next test I want to try is having userlaytonjb install a package and use it, then show how testuser1 can use that package, toom, even though that user did not install it (illustrating the multiuser installation of Anaconda).
The package is pyfiglet, which depends on the termcolor package. User laytonjb installs termcolor and pyfiglet with conda after loading the anaconda.22.9.0 module:
(shared_env) [laytonjb@warewulf ~]$ conda install -c conda-forge termcolor
...
(shared_env) [laytonjb@warewulf ~]$ conda install -c conda-forge pyfiglet
...
Notice the Python (shared_env) in the shell prompt, which indicates this environment should allow other uses to use these installed packages without having to install them themselves.
The simple test code,
import pyfiglet
from termcolor import colored

initial_banner = "Section 1"
print( (colored(pyfiglet.figlet_format(initial_banner), color="yellow")) )
produces the output shown in Figure 1.
 Figure 1: The terminal after the script is run by user laytonjb.
I then copied the script to thetestuser1 account, changed the color to green, switched to that user account, loaded the Anaconda modules, activated the shared environment, and ran the script (Figure 2). The output tells me that testuser1 can use the Python modules termcolor and pyfiglet, even though they did not install them.
 Figure 2: The terminal after the script is run by user testuser1.
I wanted to take a closer look at the permissions in the installation of the two Python modules and at what users laytonjb and testuser1 had installed. To do this, I went to the directory /opt/apps/apps/conda/pkgs, where users can install additional Python modules, and looked at the permissions and owners of the files (Listing 9).
Listing 9: Permissions and Owners
[laytonjb@warewulf pkgs]$ pwd
/opt/apps/apps/conda/pkgs
[laytonjb@warewulf pkgs]$ ls -lstar
total 552
4 drwxrwxrwx 4 root root 4096 Mar 12 11:28 ..
0 -rw-rw-r-- 1 laytonjb laytonjb 0 Mar 14 19:28 urls
4 drwxrwsr-x 2 laytonjb laytonjb 4096 Mar 14 19:43 cache
12 -rw-rw-r-- 1 laytonjb laytonjb 11277 Mar 14 19:43 termcolor-2.2.0-pyhd8ed1ab_0.conda
4 drwxrwxr-x 4 laytonjb laytonjb 4096 Mar 14 19:43 termcolor-2.2.0-pyhd8ed1ab_0
4 -rw-rw-r-- 1 laytonjb laytonjb 159 Mar 14 19:44 urls.txt
516 -rw-rw-r-- 1 laytonjb laytonjb 526789 Mar 14 19:44 pyfiglet-0.8.post1-py_0.tar.bz2
4 drwxrwxrwx 5 root root 4096 Mar 14 19:44 .
4 drwxrwxr-x 4 laytonjb laytonjb 4096 Mar 14 19:44 pyfiglet-0.8.post1-py_0
Notice that the files are all owned by laytonjb, who installed the two Python modules; yet, user testuser1 is still able to use the modules. To understand this better, look at the file permissions in the current directory (.) and the parent directory (..) owned by root.
One last test to run is to make sure you can run a Python script with Slurm – not to get an interactive Python prompt, but as a way to run non-interactive Python programs. The following Slurm script runs the test script:
#!/bin/bash
#SBATCH --job=test_gpu_job
#SBATCH --nodes=1
#SBATCH --output=test_gpu_job%j.log
#SBATCH --gres=gpu:1

module load anaconda.22.9.0
source activate shared_env
python3 /home/laytonjb/TEST_PYTHON/test.py
You can look up the pretty simpleSBATCH options used in the script. Basically, I asked for a node with a GPU (see previous article on Warewulf 4 and GPUs). After the SBATCH options, the next two commands create the Anaconda environment: The module load command loads the anaconda module that sets paths so Python, the modules, and the Anaconda tools can be accessed, and the source activate command activates the shared environment.
The output from
[laytonjb@warewulf TEST_PYTHON]$ more test_gpu_job37.log
in Slurm looks like Figure 1 with yellow characters.
Using Anaconda Summary
To make sure you understand the steps to using Anaconda with the shared environment, remember these two easy steps:
- $ module load anaconda.22.9.0
- $ source activate shared_env
The change in your prompt tells you that everything has worked and that you can use the conda and python3 commands that comes from Anaconda. These two commands are used in a Slurm script to run non-interactive Python code.
Once you are done using Anaconda, you should follow the following two steps:
- $ conda deactivate
- $ module unload anaconda.22.9.0
If you are only using the anaconda module, you can easily just use the command module purge to unload all loaded modules. (Be careful you don’t unload something you need.)
Jupyter Notebooks
Although I do want to run Python code with Slurm, I really want to be able to run Jupyter notebooks on the compute nodes. In this section, I show you how, with a little SSH tunneling and a little scripting.
The scenario has a user that is using a Linux laptop or desktop (hereafter, computer) away from the cluster, but they can SSH into the head node or a login node of the cluster. From there, they can submit Slurm jobs. I then want them to be able to access Jupyter notebooks running on a compute node in a browser on their computer. To me, this is the classic scenario of users “logging” in to a cluster from outside and submitting jobs.
To achieve this scenario, the basic steps I followed are from code found in an article from Stony Brook on how to run a Jupyter notebook on SeaWulf. The Slurm script I used is shown in Listing 10.
Listing 10: Running a Jupyter Notebook
#!/bin/bash

#SBATCH --job=jupyter_job
#SBATCH --nodes=1
#SBATCH --output=jupyter-notebook-%j.log

module load anaconda.22.9.0
source activate shared_env

node=$(hostname -s)
user=$(whoami)
port=9001

# print tunneling instructions to the jupyter-log
echo -e "
======================
Command to create ssh tunnel:
ssh -N -f -L ${port}:${node}:${port} ${user}@192.168.5.18

Use a Browser on your local machine to go to:
localhost:${port}
======================
"

# load modules or conda environments here
module load anaconda.22.9.0
source activate shared_env

# Run Jupyter
jupyter notebook --no-browser --port=${port} --ip=${node}
If you know a little Bash coding. the script should be simple to follow. After the two commands to load the module and to activate the Python environment, the script creates three variables: node, user, and port.
The node variable obtains its value from the node on which it is running (the node that Slurm assigned to the job). The user variable obtains its value from the user running the job. Notice that these two values don’t have to be changed because they are obtained programmatically. The third variable, port, just defines a port that should be open for use and is arbitrary (just be sure you understand the difference between well-known ports (those from 0 to 1023) and the non-well-known ports (1024+).
The next section of the script echos the ssh command needed to tunnel from your computer to the compute node running Jupyter. I think it is a great idea to print the command you run in your Slurm output so you don’t have to figure it out yourself.
I did change one thing in the script: the head node or login node specific for my case (192.168.5.18, my head node). You can use either the IP or the node name, and it can be for the head node or a login node – whatever works in your specific situation.
Now, submit the job script to Slurm from the head node or a login node. You probably have already SSH’d to the head node or login node, so you can use that terminal for submitting the job. The command is simply:
$ sbatch <script>.sh
Once the job starts running, you can look in the Slurm output file, jupyter-notebook-%j.log, where %j is the job number that was echoed to the screen when you submitted the job. It might take a few seconds for the Jupyter command to run once it has been assigned to a node, so wait until you see the SSH command and the Jupyter token in the Slurm output file. You should see the command you need to run to create the tunnel from your computer to the compute node, such as:
ssh -N -f -L 9001:node0001:9001 testuser1@192.168.5.18
To run this command, open a second terminal on your computer.
A key thing to note is that this ssh command is run on your computer – not on the head node or login node. If you did run it on your head or login node, you are not tunneling GUI commands from your compute node to your browser on your computer. Again, the SSH command that is output in the Slurm output file must be on your computer.
Testing Jupyter Notebooks
Next, test the process for running a Jupyter notebook on a compute node and interacting with it on your computer. Before doing that, you want to test running a notebook on the head node or login node to make sure jupyter at least works.
Figure 3 shows the web browser running the commands:
$ module load anaconda.22.9.0
$ source activate shared_env
$ jupyter notebook
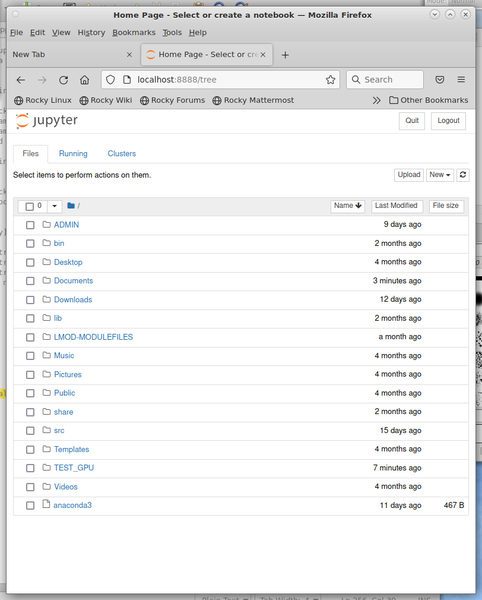 Figure 3: Jupyter notebook on the head node.
You can now go to the notebook you want or start a new one so you know Jupyter works correctly on the head node.
Once you are done with your work, you have a few options for stopping. The first is just to close the browser tab or quit the browser entirely and kill the Slurm job with the command,
$ scancel <slurmid>
where <slurmid> is the Slurm job number.
If you don’t cancel the job it will continue to run until the allotted time runs out. I’ll talk about a second option later in this article.
Testing from a Remote Node
The previous test was to make sure Jupyter notebooks at least ran on the head node. Now, I’ll move on to running them on a compute node. First, SSH to the cluster head node in a terminal from an external node (a desktop sitting next to me) with the testuser1 account. Once there, simply submit the job script to Slurm:
$ sbatch <job_script>.sh
Slurm should return your slurmid which is the same thing as the jobid.
Once the job starts running, you can look at the output file for your job number (jupyter-notebook-%j.log). In that output file should be the command you need to run on your local computer to set up a tunnel between your computer and the compute node. In my case it looked something like:
ssh -N -f -L 9001:node0001:9001 testuser1@192.168.5.18
Notice that in between the 9001 port numbers is node0001. This is the name of the compute node where the Slurm job is running.
Now you can open a new tab on your browser and enter the URL http://localhost:9001/, which leads to a login page where you enter the token created for your Jupyter job. A screenshot of my browser is shown in Figure 4.
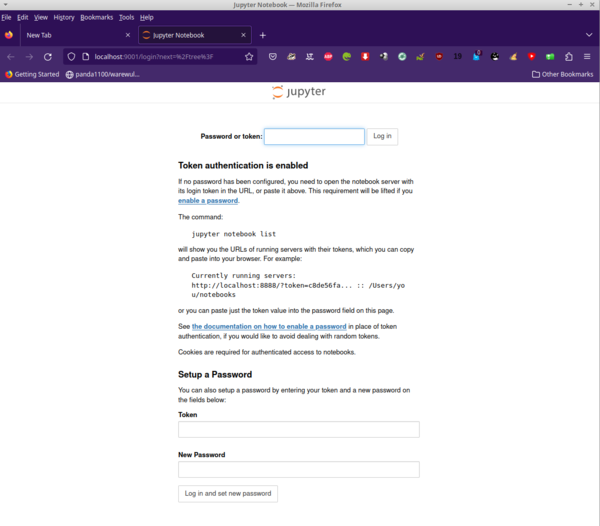 Figure 4: My browser on a remote node.
Jupyter is asking for the token that was created when Jupyter was started. You can find this token in the Slurm job output file. The text on this web page tells you how to find it. Just copy and paste it to the input box at the top of the web page (Figure 5). Now you are ready to create or open notebooks – or do whatever you want to do.
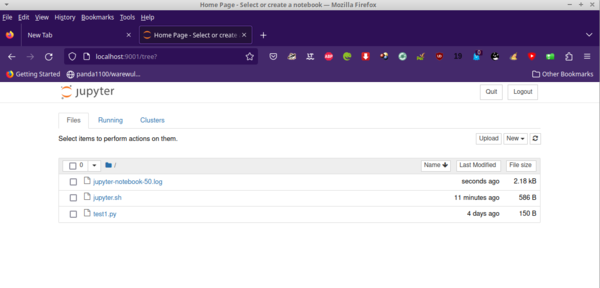 Figure 5: Jupyter notebook tab after entering token.
One quick thing to note is that the files you see in the Jupyter notebook are dependent on where you start Jupyter. In the case of Figure 5, I submitted the job from a subdirectory in the testuser1 account. You can submit your job from your home root directory or you could modify your script to start in a specific directory. You can read more on that in documentation about Jupyter notebooks.
In Figure 5, I want to point out the second way to stop your Slurm job. In the top right are two buttons, Quit and Logout (at least they are there as of this writing). If you want to stop working and stop the Slurm job, click on the Logout button. This action stops Jupyter and returns, which means the Slurm job will stop. If you click on the Quit button, the Slurm job keeps running.
Summary
Interactive HPC jobs are on the rise, particularly with Jupyter notebooks. These are not small code scripts, but rather potentially large code blocks that can take a long time to run, use lots of memory, use GPUs, use modules that depend on GPUs or lots of memory, use multiple nodes or multiple GPUs, and so on. Although running these scripts on a laptop or even a beefy desktop might not be possible, HPC clusters would have the resources needed.
In this article I focused on Python, and I hope showed you how to install Anaconda on a shared cluster to minimize the number of Python packages that are installed to minimize the space used. If you have Python code that doesn’t need any sort of interactivity, then using Slurm to run these is easy: You run them like any other application.
Python script
If you need interactivity, I showed how you can write a Slurm job to run your Jupyter notebook and then connect to the compute node from the browser on your computer along with some SSH tunneling. Thanks to the article from Stony Brook, this is a simple Slurm script.
Future Warewulf 4 Articles
I have a whole list of things I want to do with my Warewulf 4 cluster. Some are short, easy tasks, but some are more complicated. Below is a stream of thought list:
- Set user quotas
- Set quotas on shared space configured for Python
- Install Open On Demand (note that you can easily create very large compute nodes images for Warewulf 4 this way)
- Install container runtime and build tools (e.g., Docker, Singularity, Apptainer, enroot)
- Test Slurm and containers (e.g., enroot and pyxis)
- Install HPCCM for creating containers
- Install the integration between NVIDIA NGC and modules (integrating container repos with modules)
- Install and using Xalt
- System monitoring (GUI or otherwise)
- Slurm accounting
- Report creation
As you can see, I have lots of ideas, but rather than turn HPC ADMIN into Warewulf 4 ADMIN, I’m going to release future Warewulf articles slowly. I might not even write articles around these proposed topics because I can cover or revisit so many other good topics. Note that in my mind, revisiting topics is important because some core HPC capabilities never really change, and new readers might not have seen a previous article from a couple of years ago. Also, a new version of a tool might be released.
I write this while thinking, “an article on running containers on Warewulf 4 seems pretty important and fun ….” I hope I'll get to that sooner rather than later.