« Previous 1 2 3 Next »
Database availability groups – High availability with Exchange Server 2012
Safe Domicile
Setting Up Mailbox Database Copies for DAG
You can only create database copies on Mailbox servers that do not host the production copy of a database. You cannot create two copies of the same database on the same server because all copies of a database on all servers use the same path. Up to 16 copies of a Mailbox Database can be created on different Mailbox servers. You cannot create a database outside of a DAG or replicate an Exchange 2013 Mailbox Database on an Exchange 2010 server or earlier. You can create database copies using either the Exchange Management Console or the Add-MailboxDatabaseCopy commandlet in the shell.
When you create a copy, you also specify a time period for the replication delay in the transaction logs. A value of 0 disables the log replication delay. In this case, Exchange immediately transfers a transaction log after its completion to the copy server so that the database copy is always at the same level as the original. The activation preference number is used as the decision-making basis for activating the database. In a failure scenario, if Exchange detects that multiple database copies meet the same activation criteria, Exchange uses the copy with the lowest activation preference number.
The active copy of the database must be provisioned. No copy of the database may be located on the specified Mailbox server. The path for the specified database copy and its logfiles must be available on the selected Mailbox server. The server hosting the active copy and the server that will host the passive copy must be in the same DAG.
To make a copy, open the Exchange Management Console and navigate to Servers | Databases . Select the database, click the …, and choose Add database copy . This option is only available on the server that hosts the active database (Figure 3).
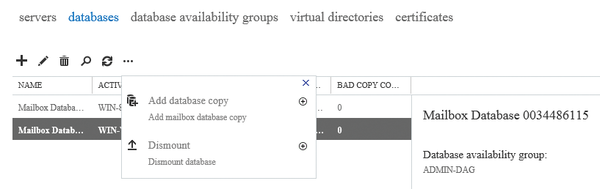 Figure 3: After creating a DAG, you can configure the Mailbox Database copies in use.
Seeding
Once you have saved the configuration, Exchange begins with seeding. The data from the source database are transferred to the database copy. If you want to make a copy in Exchange Management Shell, use the following command:
Add-MailboxDatabaseCopy -Identity <Database> \
  -MailboxServer <TargetMailboxServer> \
  -ActivationPreference<ActivationPreferenceNumber>
After starting the copy, you can see its status in Servers | Databases on the right-hand side when you click on the database. The event log lists any errors that occurred.
The Get-MailboxDatabaseCopyStatus commandlet lets you view the replication status for the database copy in the Exchange Management Shell; the Test-ReplicationHealth commandlet shows you the status of the database availability group and the replication. Again, no errors should occur here. If you switch to the script folder for Exchange 2013 Exchange Management Shell C:\Program Files\Microsoft\Exchange Server\V15\Scripts), you can enter .CheckDatabaseRedundancy.ps1 to test the replication.
If you want to remove a Mailbox Database copy, click on the database and select the Remove command for Passive in the right pane of the console. In the Exchange Management Shell, use the following command:
Remove-MailboxDatabaseCopy \
  -Identity <DatabaseCopy> -Confirm:$False
You can disable copy operations for replication temporarily. In this case, the configuration is kept, but Exchange no longer copies data from the production database to the copy. Your best bet is to perform these operations in the Exchange Management Shell using the following command:
Suspend-MailboxDatabaseCopy -Identity <DatabaseCopy> \
  -SuspendComment <Comment>-Confirm:$False
Resume-MailboxDatabaseCopy continues replication. In the Exchange Management Console, click on the Stop
link for this operation after selecting the database copy on the right-hand side of the console. You can manually trigger a replication with Update-MailboxDatabaseCopy.
Switchover
When you activate a passive Mailbox Database copy, you promote one of the Mailbox Database copies you created to the production database; in future, your users will work with this database. The previous database then becomes a passive copy. Microsoft refers to this process as a switchover.
Navigate to Servers | Databases in the Exchange Management Console. Click on the passive Mailbox Database that you want to use as a production database in the future. Click on Activate . Under certain circumstances, logged in users may need to log in again in the Outlook Web App (OWA) or restart Outlook to restore the connection.
If servers fail, or even an entire data center, you can make the Exchange infrastructure available again by switching over servers or entire data centers. In the case of a server switchover, you can switch all the active Mailbox Databases on the current Mailbox server to one or multiple Mailbox servers with appropriate Mailbox Database copies.
To perform a server switchover, use the Exchange Management Console (Figure 4). Navigate to Servers , select the desired Mailbox server, on which the productive databases are currently stored, and click on the server. Then, select Server Switchover . You can then leave the choice of which Mailbox Database copies are activated on the various servers with the copies to Exchange or manually select a target server on which Exchange will – in future – use the Mailbox Database copies as its production databases.
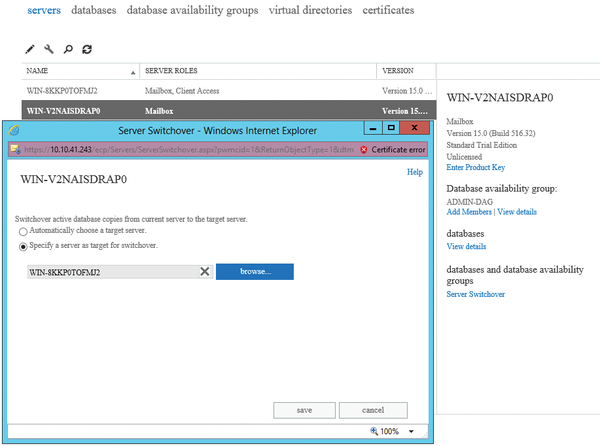 Figure 4: You can also switch all databases on a server to other servers. In this way, you can compensate for the failure of an entire Exchange server.
You can also do this in the Exchange Management Shell using the following commandlet:
Move-ActiveMailboxDatabase -Server <SourceMailboxServer> \
  -ActivateOnServer <TargetMailboxServer>
DAGs have a special mode for data centers that is disabled by default. It is useful if you are running larger DAGs that are distributed over different Active Directory sites. You can enable data center mode in the Exchange Management Shell with the Set-DatabaseAvailabilityGroup commandlet, as follows:
Set-DatabaseAvailabilityGroup -Identity <DAG> \
  -DatacenterActivationMode DagOnly
The DAG members in the primary data center must be marked as stopped to avoid accidentally provisioning the databases. To do this, you need to use the Stop-DatabaseAvailabilityGroup with the ActiveDirectorySite option for the site. You need to run the Stop-DatabaseAvailabilityGroup commandlet on all servers at the primary data center.
At the second data center – the standby center – you need to find out which servers were stopped at the primary data center. To do so, again use the Stop-DatabaseAvailabilityGroup commandlet with the ConfigurationOnly and ActiveDirectorySite options using the name of the Active Directory site with the failed primary data center as the value.
« Previous 1 2 3 Next »
Buy this article as PDF
(incl. VAT)
Buy ADMIN Magazine
US / Canada
UK / Australia
Related content
-
Changes in Exchange Server 2013
 Exchange Server 2013 sees Microsoft complete the latest version of its groupware solution. In this article, we introduce new features in the server and reveal which features have been eliminated.
 -
Working with the Exchange Management Shell
 We take a close look at the Exchange Management Shell – an essential tool for Exchange administrators.
 -
Making Small Business Server 2011 fit for 2014
 Never change a running system: If you are happy with your Small Business Server, you don't need to upgrade to the latest Windows server, but you should stay up-to-date. We show the pitfalls of installing updates.
 -
IceWarp: MS Exchange Mail Server for Linux
Admins who use Microsoft servers don’t have to rely on Exchange for email with alternatives like the IceWarp mail server.
-
Hands-on Exchange rights management
 Exchange Server 2013 provides a comprehensive, role-based rights management feature. Rights and roles can be managed in the Exchange console, with PowerShell, or with additional tools. We demonstrate all three options.
Subscribe to our ADMIN Newsletters
Subscribe to our Linux Newsletters
Find Linux and Open Source Jobs
Most Popular
Support Our Work
ADMIN content is made possible with support from readers like you. Please consider contributing when you've found an article to be beneficial.
