« Previous 1 2 3 Next »
Build your own cloud with antMan
Workers
Accessing antMan
A few more steps will complete setting up antMan before it is usable – and some might seem a little strange. The next phase depends on the device you use to access antMan, which relies exclusively on a web-based GUI. That is, it can only be controlled in the browser if you do not want to use the APIs and the corresponding command-line interface tools directly. On macOS or Linux you can skip the following step; just type http://myantsle.local in your browser and you should see the antsle configuration interface.
If you use Windows, this process stopped working properly in Windows 10, so you have two options: Either enter ip as root on the server and connect to the displayed IP address on port 3000 in your browser, or download the latest version of iTunes for Windows or Bonjour Printing Services [3] from Apple. The problem that caused the http://myantsle.local
URL to stop working in current Windows versions is in the operating system's Bonjour code, and it can only be repaired by installing the patched software from Apple. Either way, at the end of this step, you should have the antsle login page on your screen. Enter the user credentials for the system (i.e., root
and the password you just assigned).
What follows now is what the provider refers to as "antMan onboarding." Basically, every instance of the software, even if it uses the free Community Edition, needs to log in to antHill. Otherwise, you will be unable to launch any antlets. It is also important for you to select the correct option in the menu that appears. If you have a previously installed edgeLinux and antMan on the same system as the installation described here, be sure to select Reinstall with existing serial number . Otherwise, you will see an error message that an antMan subscription already exists for this system with this serial number.
Starting the First Instance
After completing the edgeLinux setup, you can now use antMan to run virtual instances. Because this example only refers to the free community version of antMan, many of the configuration parameters leave little room to maneuver. Software-defined networking, for example, is practically impossible in the free edition because the set of supported functions does not include virtual extensible local area network (VXLAN), virtual LAN (VLAN), or trunk connections. Accordingly, the multitenant capability of your single-node cloud is limited.
The setup described here is best suited for a single organization that wants to run its own workloads without physical or logical separation. For this to happen, antMan defines its own network, known as the antlet address space, out of the box. The virtual instances running in antlet are each given an IP address in this space. The software implements external access, either with a load balancer or port forwarding in libvirt. In terms of storage, the Community Edition also offers little room to maneuver. In the previous step, you created a ZFS pool from which antMan sources the storage for your virtual instances as you proceed.
The network and storage are already created for you, but an operating system is still missing for the first virtual instance. antMan does a great job kitting out its product with a variety of ready-to-run templates. The most popular Linux distributions (e.g., Ubuntu 20.04 and Debian GNU/Linux 11) are available, as are various versions of Windows Server. If you want to use Windows, you will of course have to purchase a license on top of antMan. You will notice that some of the templates in the list are a bit old and lack newer options. Ubuntu 22.04, for example, would be equally desirable as CentOS 8, but neither can be found. Instead, a current Windows 11 image is available.
To create an antlet now, click Create in the upper right corner of the antlets pane in the Dashboard. Enter a name for the server and select a template. Now you can decide whether to create a virtual machine (VM) with KVM or with Linux containers (LXC). The selection cannot be changed later without completely recreating the instance. You need to make sure the selection is correct here. Use the default values for RAM, vCPUs, the IP address, and the zpool. When it comes to the Compression value, antMan wants to know if it should enable compression for the ZFS volume you are creating. This action saves space, which you pay for in CPU time. The function is disabled by default. If you accept the default Inherit value here, the new ZFS volume inherits the value from the pool.
antMan then creates the new instance and configures it as desired, but does not start it. As the next step, you need to click antlets in the left sidebar and then Start to the right of the instance you just created. After doing so, the VM comes to life. After a short wait, you can then log in. All antlet templates use root and antlet as the default username/password combination.
Bridging and Virtual NICs
If antMan's fairly rigid network concept in the standard configuration is not to your liking, you can set up bridging as a complementary feature. The system's physical NIC then acts as a bridge, connecting virtual instances directly to the rest of the physical network. The first configured network card in antMan is always configured as a bridge by default. To view its configuration, click Network in the sidebar (Figure 2) and enter a static address for your NIC under Interfaces .
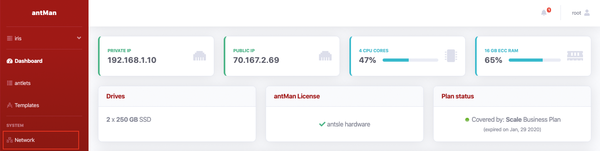 Figure 2: The Network section of the antMan web interface gives you immediate access to all of the switches and buttons you need for the network.
For each instance that will use this bridge, configure an additional virtual NIC that is connected directly to the bridge by clicking on the Virtual Network tab in the details of the antlet, where the first local interface is usually stored. Add another interface with New virtual NIC , select the bridge interface, and leave the model set to VirtIO for Linux and e1000 for Windows (Figure 3). Next, click the Create Virtual NIC button and restart the antlet.
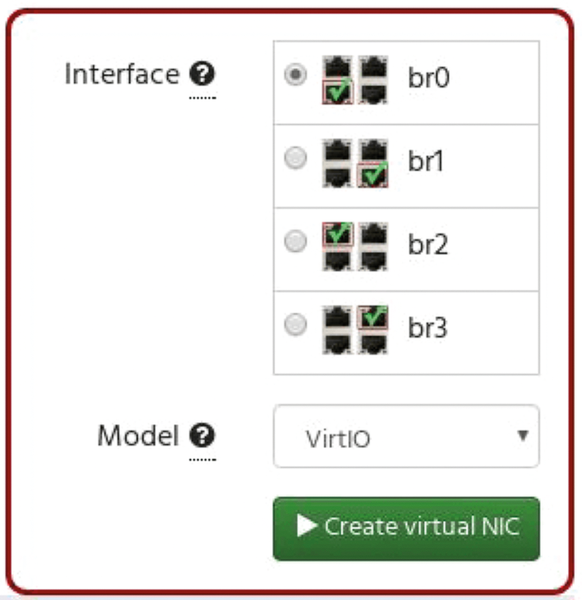 Figure 3: The first Ethernet interface found basically uses a bridge into which new VMs can plug.
A new network card then appears in the VM, but antMan has nothing to do with its configuration. Instead, you can either set up a static IP address for this interface or point to a DHCP server outside antMan that is already running on the local network.
« Previous 1 2 3 Next »
Buy this article as PDF
(incl. VAT)
Buy ADMIN Magazine
US / Canada
UK / Australia
Related content
-
Automated OpenStack instance configuration with cloud-init and metadata service
 Today's OpenStack has become a mature product with automated asset configuration tools, including cloud-init, a powerful script that saves time by automatically configuring a large number of virtual servers in the cloud.
 -
Your own AWS-compatible cloud with Eucalyptus
 If you don't trust the cloud services of Amazon or cannot store customer data there for privacy reasons, you can create your own Eucalyptus cloud that is compatible with the Amazon tools and can be installed in a flash.
 -
Building Big Iron in the Cloud with Google Compute Engine
 Google Compute Engine removes the technical and financial headaches of maintaining server, networking, and storage.
 -
Goodbye cloud VMs, hello laptop VMs
 Multipass lets you launch and run Ubuntu virtual machines, use cloud-init to configure the VMs, and prototype cloud launches locally in minutes.
 -
Network performance in the world's favorite data center
 We launch a network performance test on EC2 to answer the question: Is the cloud as fast as expected?
Subscribe to our ADMIN Newsletters
Subscribe to our Linux Newsletters
Find Linux and Open Source Jobs
Most Popular
Support Our Work
ADMIN content is made possible with support from readers like you. Please consider contributing when you've found an article to be beneficial.
