Supercharge Your Website with Amazon CloudFront
If you are like me, you remember the good old days of the Internet: the sweet sounds of a 28.8Kbps modem and the long, slow, and painful load time it took to display a single page. Never mind that those pages in the early days were loaded with cheesy animated GIFs, bulky stock graphics, and the ever-loathed <blink> tag. Thank goodness those trying times are over – or are they?
Today the vast majority of us are spoiled with DSL high-speed broadband and fiber connectivity, yet sometimes we still experience slow page loads. Statistics show that as consumers, we are quite responsive to slow page load times. We who create and maintain websites generally acknowledge that website performance matters.
In this article, I explore how to improve your little corner of the web running WordPress and make it deliver optimally via Amazon CloudFront and a potent plugin, W3 Total Cache. How your site performs can help or hinder your success online, whether you are a simple WordPress website, blog, or elegant e-commerce effort.
According to an Akamai study on web performance:
- 47% of people expect a website to load in two seconds or less.
- 40% will abandon a web page if it takes longer than three seconds to load.
- 79% of online shoppers who experienced a lackluster experience indicated they were less likely to buy from the site again.
Why Load Time Matters
At this point, it should be abundantly clear that users negatively respond to an underperforming website. As a result, it is imperative that you work to improve site performance. Slow load times can have many other negative effects on your web efforts, such as:
Bad User Experience – You want a visitor to your site to have a positive perception and response to your online efforts, but a slow site damages that potential. When your site lags behind established norms, it can affect the user experience, your brand, and your very online success.
E-commerce Abandonment – As shown in the statistics above, e-commerce is very sensitive to load times. Every second counts, with costs in lost visitors and, more importantly, sales. Bottom line, you can improve your online efforts or lose out to competitors.
Low Conversions – Faster load times mean more conversions. Conversions can be any action you want the user to complete, such as a sale, joining a mailing list, or getting a follow on Twitter. Your success can be negatively affected by a slow site that makes these valuable opportunities disappear.
Bounce Rate – A slow-loading site leads to a high bounce rate, meaning more users “bounce” or leave your website rather than continue on it. Obviously, this is a lost opportunity for a conversion, sale, or whatever outcome you seek.
Traditional Website Performance Bottlenecks Abound
Website administrators today can build their sites in so many different ways, including building everything on standard hardware, taking advantage of virtualization, or using a hosted solution (shared, VPS, etc.) Other supernumerary private/public cloud environments include market players such as Amazon, Google, Rackspace, Red Hat, and so on. No matter how you build, you certainly can't say you lack choice, but sometimes you can improve on performance and scalability. Without planning, WordPress can present some thorny performance issues.
The problems of website performance are literally everywhere in infrastructure, protocols, web server/database configurations, networking gear, network latency, and on and on. I could spend 1,000 pages discussing the problems that influence page load time and never address the bigger picture I endeavor to tackle in this article. Herein, I focus on a simple way to improve WordPress performance via caching and a Content Delivery Network (CDN).
Caching/CDN-Powered WordPress
In the case of WordPress, a key performance factor is that pages, posts, comments – almost everything – is dynamically generated with each user visit. For example, if you visit a WordPress site, PHP code pulls data stored in a MySQL database and generates a page that you then view in your browser. This process sounds slow, and it certainly can be. Thankfully, with a CDN and caching, you can dramatically improve this situation.
With caching, you take some of the overhead of dynamically generated pages and improve this potential bottleneck. Additionally, you can move some commonly accessed content into a CDN, dramatically improving load times. The CDN moves the content closer to the user on more well connected, low-latency servers, which is a win all around. Before I continue, I’ll explore the basics of a CDN.
What Is a CDN?
A CDN acts as a distributor. It moves the job of distributing content that would be served by your web server (or more likely server farm) to more efficient servers geographically dispersed and closer to the user visiting your site. Content is algorithmically directing a more efficient infrastructure for delivering it. It is more efficient than traversing the same network to the same old web server and downloading files. The CDN directs a client (browser) to download files from a more local source within the CDN network. This has the effect of dramatically reducing the page load time.
The CDN copies the content placed in it to the geographically dispersed nodes of its CDN network. When a server in Boston, Massachusetts, gets a user visiting from Paris, France, latency becomes an issue. Were they to download all of the resources from the site in Boston, the performance might not be optimal. With a CDN and caching in place, the French visitor is able to load the content placed in the CDN from a more local server in Paris, dramatically improving load time. This means more optimized web performance and a generally happier enduser.
Types of CDNs
The origin push type of CDN requires a manual push or upload of content into the CDN. That is to say, the user (you) manually pushes content into the CDN and then links to it on your site. This allows more control over what is uploaded and minimizes uploaded content.
An origin pull CDN doesn’t require a manual upload of the content to the content network. Instead, the CDN automatically loads files without user intervention. That is to say, it tests to see whether it has the requested content, and if not, it automatically loads it from the original server. Origin pull has the benefit of automating the propagation of your content into the CDN and therefore is optimal for caching and CDN configuration. Herein I will be describing an origin pull CDN in Amazon CloudFront. In this case, your CDN will also automatically rewrite URLs to point to those in the CDN and not on the original web server.
Baseline Your Website Before You Begin
Taking a baseline of your site performance before you start is vital. In the interest of limiting the scope of this article, I'll use Google PageSpeed Insights, which you can use to test any site for which you would like to improve the performance (Figure 1). With your page speed results, Google gives you copious detail on what you can improve upon. These details give clear tips on what you need to work on to improve your site performance.
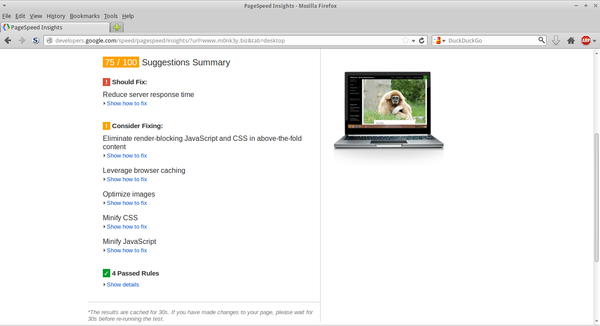 Figure 1: My Pre-optimized Google PageSpeed Insights site scores: desktop 75/100; mobile 62/100.
Performance Boosters
To improve your site responsiveness, you can use Amazon CloudFront along with the powerful WordPress plugin W3 Total Cache. A quick overview of the features and functionality of each is in order.
CloudFront is an impressive content delivery web service from the cloud giant Amazon. It offers low-latency, high-speed data transfer by serving user requests with a global network of edge locations. As a CDN, it is a powerful, cost-effective way to boost the performance of your WordPress site. CloudFront offerings and W3 Total Cache make for even more WordPress bliss.
W3 Total Cache (W3TC) is a web performance optimization plugin for WordPress. It employs a variety of features that boost the performance of a WordPress installation, such as:
- Browser caching. Enables HTTP compression that reduces server load and site load time.
- Content delivery network. Allows hosting of static files in a CDN (Amazon CloudFront, Akamai, MaxCDN, and Rackspace, among others) to improve load time.
- Database caching. Caches the database to improve post, page, and feed creation time.
- Object caching. Improves performance of highly dynamic sites that use the Object Cache API.
- Minify. Optimizes the size of HTML, CSS, and JS, improving site performance.
- Monitoring. Allows setting up the server and application monitoring via the New Relic service.
- Network performance and security. Allows configuration of the CloudFlare service to accelerate and protect your website.
- Page caching. Enables page caching and reduces site response time.
- Reverse proxy. Supports HTTP reverse cache or Varnish for the web application accelerator.
All of these compelling features together mean that a webmaster with few resources can dramatically improve the performance of a site, regardless of whether it is hosted on inexpensive shared hosting, a VPS, or a cloud instance. This plugin packs a great performance punch that I will explore later. For now, I’ll demonstrate the first step of setting up Amazon CloudFront.
Setting Up Amazon CloudFront
For the sake of focus, I’m going to assume you have an Amazon account set up and ready to go. If not,you need to create an Amazon account and then log in to your Amazon account at: https://console.aws.amazon.com/cloudfront/home. Next, click on Create Distribution (Figure 2), and select Web | Continue . Under Origin Settings, enter the full address for your website (rather than my example site www.m0nk3y.biz ) and a descriptive Origin ID (Figure 3). Leave all the other options at the defaults and scroll down to Distribution Setting, where you add your CNAME settings.
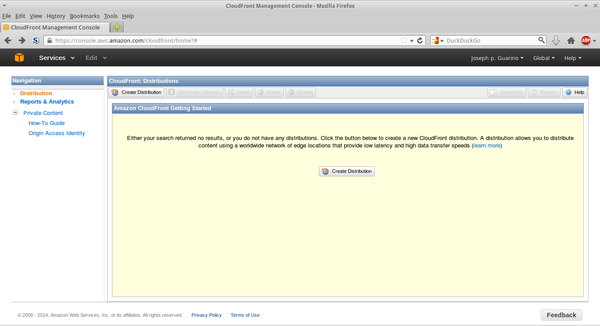 Figure 2: Creating a CloudFront distribution.
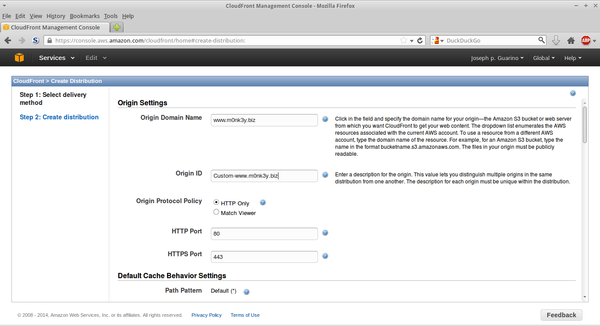 Figure 3: Origin settings.
Adding a CNAME
Stop at Alternate Domain Names (CNAMEs) settings (Figure 4). This option allows you to use a CNAME you set up in your DNS servers rather than the autogenerated CloudFront names (e.g., d1234.cloudfront.net ). Finally, click Create Distribution . This can take some time, so grab a coffee or, if it’s after 5pm, a nice cold one.
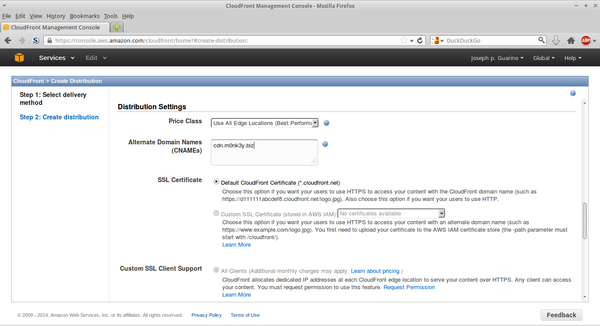 Figure 4: Distribution settings.
Once this process has completed, you will see CloudFront Distributions with the distribution you have just created and a status listed as In P rogress . Be patient; it could take a few minutes until the status switches to Deployed . Next, simply select the checkbox next to to your new distribution and click on Distribution Settings (Figure 5).
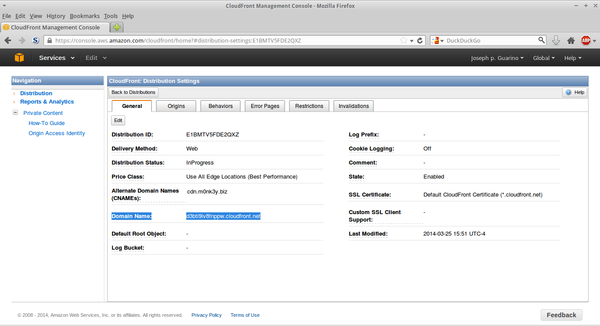 Figure 5: A new CloudFront distribution.
Set Up A CNAME Record in Your DNS Server
At this point, you need to go to your DNS server and add a CNAME record to map the Amazon CloudFront server (listed in Figure 5 after Domain Name) to the name you specified earlier. Simply copy the full hostname from the Domain Name listed and use this to create a CNAME record.
In this example, d3bti9iv8fnppw.cloudfront.net should point to cdn.m0nk3y.biz . Because of supernumerary DNS servers, as well as cloud or hosted DNSs, I’ll assume you added a CNAME record as needed in your own DNS server. Also be mindful that it could take time for these changes to propagate. Then, to validate that your DNS changes have been made, simply dig for that record. If you see that it points to the correct location, you are ready to go to the next step.
Amazon IAM
Amazon Identity and Access Management (IAM) allows you to control access to all your Amazon Web Services (AWS) services and resources. You can use IAM to create users and groups, just as you would in any operating system, to control access to services and resources.
The rule of least privilege is a maxim for a reason. Just as on a Linux server you generally don’t log in as root (or run services as root), so too with your Amazon AWS root account. Your AWS root account credentials are for managing your AWS configuration and not for access to the APIs, CLI, or, in this case, your AWS CloudFront bucket. Here, you are going to create a specific user for accessing your bucket.
To add an IAM user, go to the upper right-hand portion of the AWS console and click on < your username> | Security Credentials ; then, on the far left, go to Users then Create New Users ; name the user whatever you would like and click C reate (Figure 6).
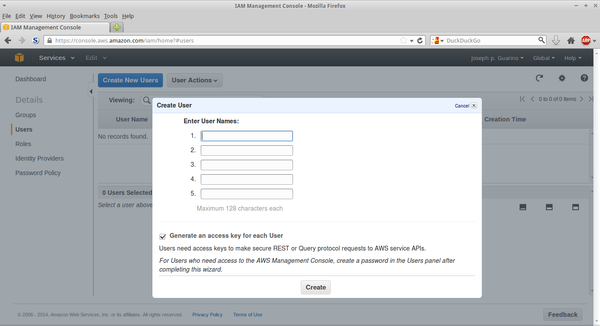 Figure 6: Creating a new user.
Once the user is created, go to the bottom of the page and click on the P ermissions tab. Under User Policies , click Attach User Policy and select your desired policy template or create a more granular one with the policy generator. If you don’t already have multifactor authentication (MFA) set up for your AWS root account, you should set it up immediately. You can use virtual MFA applications such as AWS MFA or Google Authenticator. Even better, use a hardware MFA key fob. Either way, I hope you are using 2FA/MFA everywhere at this point.
Now that AWS CloudFront is all set up, you should log in to WordPress and install and configure W3TC.
Installing W3 Total Cache
Installing a plugin in WordPress is as easy as pie, but this one has some tricky aspects to it, so follow along carefully.
First, if you have any other caching plugin, you should disable and remove it – no need to create conflicts or other issues with multiple plugins stepping on each others’ toes. Next, you temporarily need to
chmod 777 wp-content/
chmod 777 wp-content/uploads/
via FTP, SSH, or cPanel.
From the dashboard, go to Plugins | Add New , type in W3 Total Cache , and click Install Now (Figure 7).
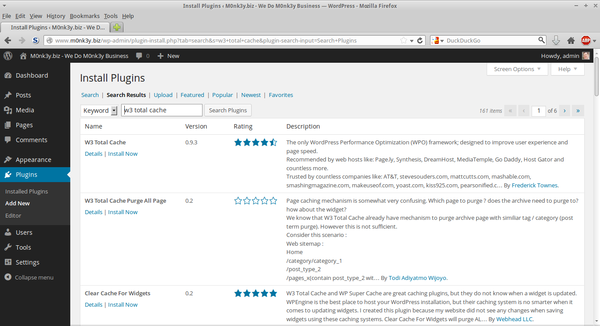 Figure 7: Installing the W3TC plugin.
Last, you need to activate the plugin and go back via FTP, SSH, or cPanel to change the permissions with:
chmod 755 wp-content/
chmod 755 wp-content/uploads/
If you forget this step to reset the permissions to 755, expect to be hacked or defaced or to become part of a cybercriminal’s bot network: rwx for everybody is a recipe for disaster.
W3TC Configuration
Now that W3TC is installed, the Performance link shows up in the left-hand panel, which allows you to configure W3TC. Before you begin, it is a good idea to click on Performance and hit the compatibility check button (Figure 8) to ensure you have the dependencies you might need to deploy various features. Then, simply go to General Settings (Figure 9).
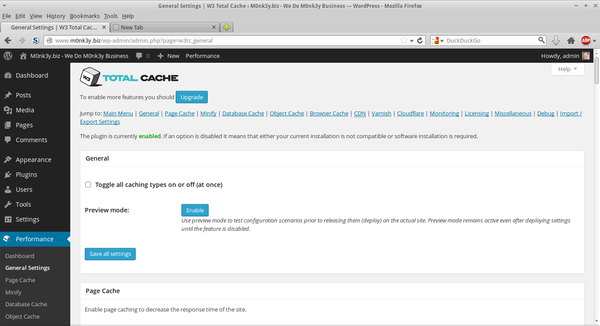 Figure 8: Checking compatibility.
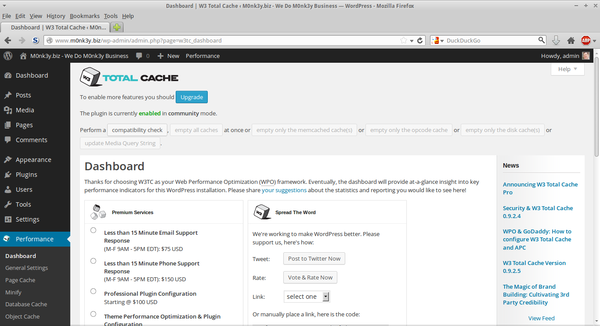 Figure 9: Configuring W3TC.
Unless you are installing this in a server over which you have full management control (i.e., root access), it is important to research what your provider supports. Taking a moment to speak with a shared or managed hosting provider will help assure that you can configure W3TC as you desire.
Now that the core configuration is taken care of, you can set the basic W3TC settings.
 Figure 10: Setting up Page Cache and Minify.
In this example, I enable page caching on the Page Cache screen by selecting Enable and Page cache method: Disk: Enhanced . On the Minify screen, I can optimize the size of HTML, CSS, and JS, improving site performance. Next, enable Minify by selecting the Enable radio button and checking Auto next to Minify mode. Leave all other settings at their default values.
Because you are working in a shared hosting environment in this example, you should disable the Database Cache and Object Cache by making sure the Enable box isn’t checked. However, the Browser Cache Enable box should be checked to enable HTTP compression, which reduces server load and site load time. Under CDN, select the Enable checkbox, and for Origin Pull/Mirror, choose Amazon CloudFront from the drop-down box. Click Save all settings to finish (Figure 11).
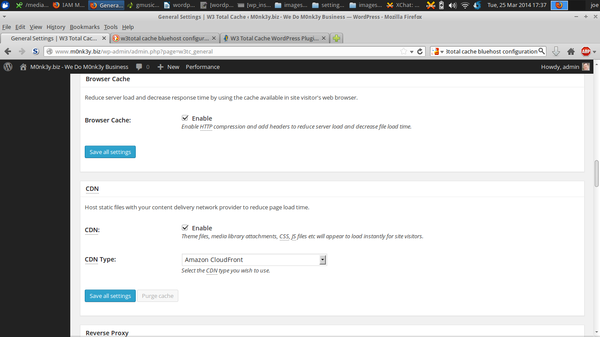 Figure 11: CDN configuration.
You can safely ignore all other options on the remainder of the W3TC page because they are not relevant to the configuration for this example. From here, you now move on to finalizing your CDN configuration.
Configuring W3TC to Use AWS CloudFront CDN
Now that you have enabled your CDN, you need to configure it. Again in the left panel, select CDN and go to the Configuration section: Enter the Access Key ID and your Secret key and CNAME information (Figure 12). Now simply click Test CloudFront distribution , and it should return Test Passed . You are now good to go, so click Save all settings .
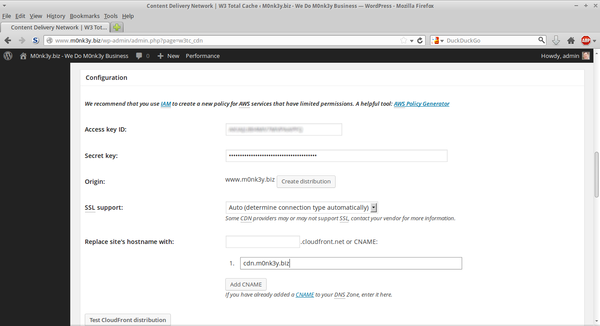 Figure 12: Configuring the CDN.
Now that W3TC is all set up, you need to give your site a moment to copy its contents into the CDN. Have patience because it might take awhile for the contents to show in the CDN and for your site to show up properly.
After a few moments you should open a browser window (clearing the cache is a good idea) and load your website. To validate that your media library images, theme, CSS, and JavaScript are coming from the CDN, view your source in Firefox with (Ctrl+U) or right-click and go to Inspect Element . If you see the address of your previously created CDN CNAME and the images load properly, you are good.
Finally, you should perform a new speed test. In this case, I get the improvements shown in Figure 13.
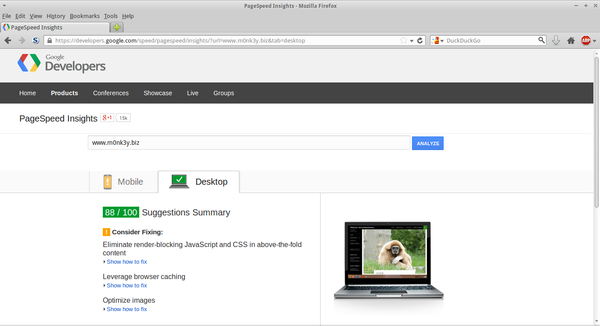 Figure 13: Post-optimized Google PageSpeed Insights site scores: desktop 88/100; mobile 73/100.
These results look quite a bit better! You have begun the journey to improving your WordPress website performance, but like most things, it’s an ongoing journey – not a destination. You will always have more to learn and improve upon. It is my hope that this article helps you realize you can dramatically improve your website performance without spending an arm and a leg or suffering undue complexity. WordPress with W3TC and Amazon CloudFront can be that winning combination to accelerate your web efforts.
Related content
-
Supercharge your Website with Amazon CloudFront
 Users who lose interest in websites that don't respond in the expected time take their clicks elsewhere. We look at ways to improve your WordPress website performance.
 - Amazon to Offer DDoS Protection of AWS Users
- Amazon Cloud Accelerated with Memcache
- Amazon Cloud Accelerated with Memcache
-
Controlling Amazon Cloud with Boto
 The Boto Python module helps admins manage resources in the Amazon Cloud. We introduce you to the tool.
Subscribe to our ADMIN Newsletters
Subscribe to our Linux Newsletters
Find Linux and Open Source Jobs
Most Popular
Support Our Work
ADMIN content is made possible with support from readers like you. Please consider contributing when you've found an article to be beneficial.
