
Photo by Michael D on Unsplash
Secure and seamless server access
Lightning
Typically, developers invest considerable time and effort to secure their Internet property with methods such as access control lists and rotating IP addresses or with complex solutions like Generic Routing Encapsulation (GRE) protocol tunnels and virtual private networks (VPNs). In 2018 Cloudflare introduced the Argo Tunnel as a solution to alleviate this problem. Individuals can create a secure and private connection between their source server and Cloudflare, even without a publicly accessible IP address and port.
Cloudflare Tunnel [1] allows you to access your servers and applications securely from anywhere in the world. It creates an encrypted tunnel between your secured server and Cloudflare's network, allowing you to bypass firewalls, geolocation constraints, and all other network restrictions (Figure 1). You can access your server from anywhere without worrying about security threats or network limitations. The Cloudflare architecture removes the public entry point; thus, attackers find no vulnerable places with a potential for attack.
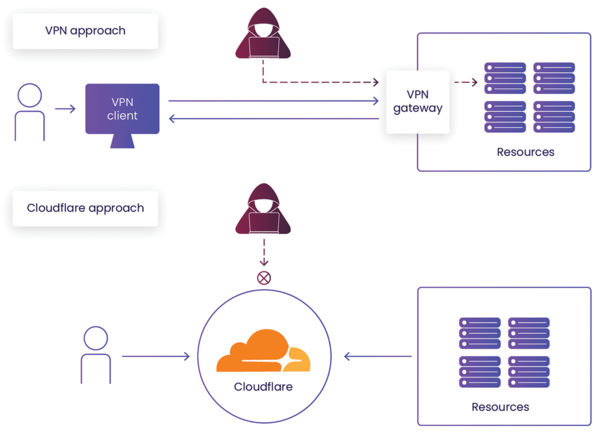 Figure 1: A VPN keeps an open entry to resources at the VPN appliance gate. Cloudflare Tunnel initiates a connection to Cloudflare Access, which then controls admission.
How It Works
Cloudflare Tunnel installs and runs a lightweight software client (the cloudflared daemon) on your server (Figure 2). Once the client is installed, it establishes an encrypted tunnel between your server and Cloudflare's network. Note that the host initializes a connection to Cloudflare. This tunnel is then used to transmit data securely between your server and any remote client that connects to it.
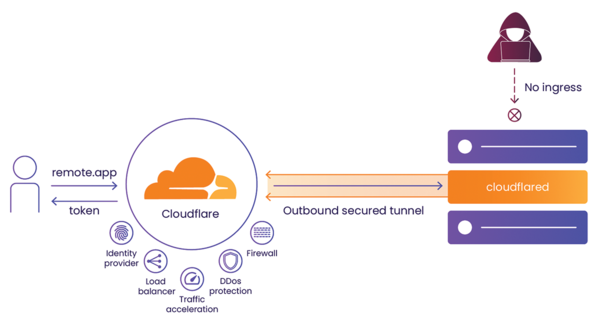 Figure 2: A tunneled connection provides no public access, only a tunneled connection from a daemon on a host to Cloudflare, which offers a variety of additional features.
A key benefit of Cloudflare Tunnel is that it uses the same infrastructure that powers Cloudflare's global content delivery network (CDN). Therefore, you get access to Cloudflare's reliable high-performance network, which can help improve the speed and reliability of your server connections.
Another benefit of Cloudflare Tunnel is that it supports multiple protocols, including HTTP, HTTPS, SSH, TCP, and UDP, so you can securely access a wide range of applications and services. Also, in the case of HTTP(S), you do not have to install any software (e.g., a VPN client).
Finally, all traffic goes through the Cloudflare infrastructure; thus, you have access to many Cloudflare tools and services such as identity providers to authenticate and authorize users, traffic acceleration to speed up the connections between globally spread data centers, DDoS protection, and traffic monitoring and alerting.
Getting Started
To begin, you must sign up for a Cloudflare account and go to the Zero Trust dashboard. Once there, you can configure your tunnels, which later allows you to specify which applications and services you want to tunnel and the access policies you want to enforce, with a range of authentication options including basic authentication, API keys, and OAuth. In this way you can control who has access to your tunnels and what they can do once connected.
Tunnel as Code
A simple example of the creation and deployment of Cloudflare Tunnel is presented in my GitHub repository [2]. The process to create a tunnel comprises several steps – assuming you have a Cloudflare account and zone:
1. Create a tunnel and collect its secret token.
2. Add a tunnel configuration specifying the tunnel behavior.
3. Add a DNS entry for Tunnel – it has to redirect traffic from the public DNS to an entry in the Argo Tunnel domain.
4. On the to-be-secured host, download and install the cloudflared daemon.
5. Run the cloudflared daemon while passing a secret token value as a parameter.
An example that uses Terraform [3] and a Google Compute Engine instance starts with the creation of a tunnel (Listing 1). First, a random hash is needed with at least 32 bytes. The tunnel's name does not matter, although I would recommend naming it as the host to which it will be attached.
Listing 1
Terraform Cloudflare Tunnel
resource "random_id" "tunnel_secret" {
    byte_length = 32
    keepers = {
        # Generate a new id each time you change any entries here
        tunnel_name = var.hostname
        salt = "init"
    }
}
resource "cloudflare_tunnel" "server" {
    account_id = var.cf_account_id
    name         = var.hostname
    secret        = random_id.tunnel_secret.b64_std
    config_src  = "cloudflare"
}
The second step is to configure the tunnel (Listing 2) – for example, with connection timeout, heartbeat period, or other option, and all with default values that are acceptable for a standard setup. Of most import are the ingress rules, which define the fully qualified hostname (FQHN) on which this tunnel should act. This example sets the <server_name>.<domain--name> of interest. You can also specify the path expected after the FQHN to further customize routing. The last element is the service to which the tunnel should redirect traffic.
Listing 2
Configure Tunnel
resource "cloudflare_tunnel_config" "server" {
  account_id = var.cf_account_id
  tunnel_id  = cloudflare_tunnel.server.id
  config {
    origin_request {
      connect_timeout = "1m0s"
      tcp_keep_alive  = "1m0s"
    }
    ingress_rule {
      hostname = "${var.hostname}.${var.cf_tunnel_primary_domain}"
      path     = ""
      service  = "http://localhost:80"
    }
    ingress_rule {
      hostname = "${var.hostname}-ssh.${var.cf_tunnel_primary_domain}"
      path     = ""
      service  = "ssh://localhost:22"
    }
      ingress_rule {
      service = "http_status:404"
    }
  }
}
In this example, when Cloudflare receives a connection addressed to
${var.hostname}.${var.cf_tunnel_primary_domain}it is sent through the tunnel to the connected host. The traffic is then redirected to the NGINX service on localhost (i.e., on the tunnel running the host itself) on port 80. Because you can have many ingress rules, you can configure a single host as a bastion, which redirects traffic to other hosts by replacing the localhost value.
Notably, the last rule should be http_status:404, which will result in a 404 error when someone tries to use the tunnel but does not type the correct FQHN. Of course, you can implement your own catch-all rule.
The final step configurable in the Zero Trust dashboard is to set a DNS entry of type CNAME (Listing 3). Cloudflare generates a special random hostname for the tunnel, <hash>.cfargotunnel.com , where <hash> is something like:
f99fbf8ba1945738cc292667441e6858e69d8f9f
Listing 3
DNS Entry for New Tunnel
data "cloudflare_zone" "tunnel" {
  account_id = var.cf_account_id
  name = var.cf_tunnel_primary_domain
}
resource "cloudflare_record" "tunnel_dns" {
  zone_id = data.cloudflare_zone.tunnel.id
  name    = var.hostname
  value   = "${cloudflare_tunnel.server.id}.cfargotunnel.com"
  type    = "CNAME"
  proxied = true
}
resource "cloudflare_record" "tunnel_dns_ssh" {
  zone_id = data.cloudflare_zone.tunnel.id
  name    = "${var.hostname}-ssh"
  value   = "${cloudflare_tunnel.server.id}.cfargotunnel.com"
  type    = "CNAME"
  proxied = true
}
and the CNAME record makes it human-usable to the Cloudflare (or any other) DNS that points to the target. Note that the DNS entry will be created automatically when you create a tunnel in the Zero Trust dashboard directly [4].
When the tunnel is up and running, you can finally proceed to deploy it on a host.
Buy this article as PDF
(incl. VAT)
Buy ADMIN Magazine
US / Canada
UK / Australia
Related content
-
Infrastructure as Code with Terraform
 Application releases can take place several times a day. Terraform helps you roll out virtual machines automatically in your data center or in the cloud, and you adapt the manual only when it changes.
 -
Domain name resolution with DNS over HTTPS
 The new DNS over HTTPS standard from the Internet Engineering Task Force is meant to eliminate some of the known vulnerabilities of the Domain Name System.
 -
DNS name resolution with HTTPS
 Now that web content is encrypted by HTTPS, the underlying name resolution is often unprotected. We look at the classic DNS protocol and investigate whether DNS over HTTPS could be the solution to ensure the confidentiality of DNS requests.
 - Cloudflare Launches New DNS Service
-
Remote maintenance and automation with RPort
 Firewalls and network address translation often stand in the way of access to remote systems, but the free RPort software works around these obstacles and supports remote maintenance through a tunnel locally, in the cloud, and from your home office.
Subscribe to our ADMIN Newsletters
Subscribe to our Linux Newsletters
Find Linux and Open Source Jobs
Most Popular
Support Our Work
ADMIN content is made possible with support from readers like you. Please consider contributing when you've found an article to be beneficial.
