« Previous 1 2 3 Next »
Searching for security flaws and exploits with Burp Suite
On Patrol
Many automated web security tools are available in the market today, but even the best of these tools have limitations. Many web vulnerabilities are difficult – or even impossible – to detect without human interaction. Some of the best tools for web security analysis take the form of a browser (with a few simple add-ons) and an attack proxy. This article describes how attack proxies work and shows how to look for web vulnerabilities using the popular attack proxy Burp Suite.
Attack proxies vary in functionality, price, and reliability, so for consistency, I'll use Burp Suite throughout these examples. Burp Suite includes a tool for intercepting traffic (the "proxy" module itself), as well as modules for spidering sites, repeating and manipulating individual requests, sequencing random values, decoding traffic, and more. Each of these components provides unique insight into the application's functionality and security ramifications, but all require an intelligent person to decode the results.
Installation and Configuration
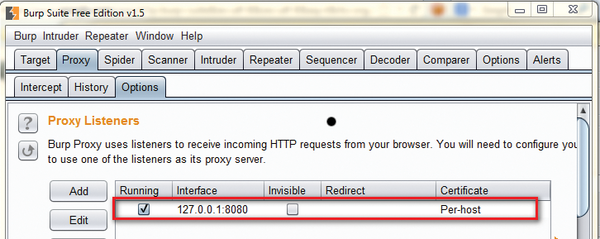
After you download the free edition of Burp Suite [1], simply double-click the .jar file to run the file. Once the application is running, click Proxy | Options
, and check the Proxy Listeners
Section (Figure 1) to identify the IP Address and port the proxy is listening on. The default port is 127.0.0.1:8080.
...
Buy ADMIN Magazine
Related content
-
Credential harvesting at the network interstice
 To thwart credential harvesters at the network interstice, you must understand how attackers exploit browser transactions.
 -
Session cookies as targets for criminals
 Session data stored on user hard disks can be targeted by criminals to bypass the need for a password or second factor in active user sessions.
 -
Identity and access management with Authelia
 Add access controls to web applications that do not have their own user administration; however, this useful gatekeeper requires a reverse proxy.
 -
Network backup with Burp, Obnam, and Backshift
 The well-known free backup solutions Bacula and Amanda now have some competition. Burp, Obnam, and Backshift are three promising newcomers that impress with interesting features.
 -
Pentest your web server with Nikto
 Check your web servers for known vulnerabilities.
Subscribe to our ADMIN Newsletters
Subscribe to our Linux Newsletters
Find Linux and Open Source Jobs
Most Popular
Focus On Self-Hosting
• Self-Hosted Collaboration with Forgejo
• Self-Hosted PaaS with Coolify
• Build and Host Docker Images
• Self-Hosted Pritunl VPN Server with MFA
• Self-Hosted Chat Servers
Support Our Work
ADMIN content is made possible with support from readers like you. Please consider contributing when you've found an article to be beneficial.
