Lead Image © Chris Dorney, 123RF.com

Lead Image © Chris Dorney, 123RF.com

DebOps delivers easy Ansible automation for Debian-based systems

Pre-Assembled

Article from ADMIN 42/2017
By
Ansible is a simple and sensible automation solution, except for the time needed to create new roles and playbooks. The DebOps collection of Ansible playbooks for Debian-based Linux systems solves this problem.

Special Thanks: This article was made possible by support from Linux Professional Institute [1].

Enterprise-grade automation solutions like Puppet and Chef are very powerful, but they require a huge amount of learning. Ansible has gained popularity as an alternative to Puppet and the other similar enterprise automation tools. The strict but simple Ansible syntax lets you define roles that are essentially self-documenting (Figure 1), which makes access far easier and ensures that you can integrate your existing knowledge faster.

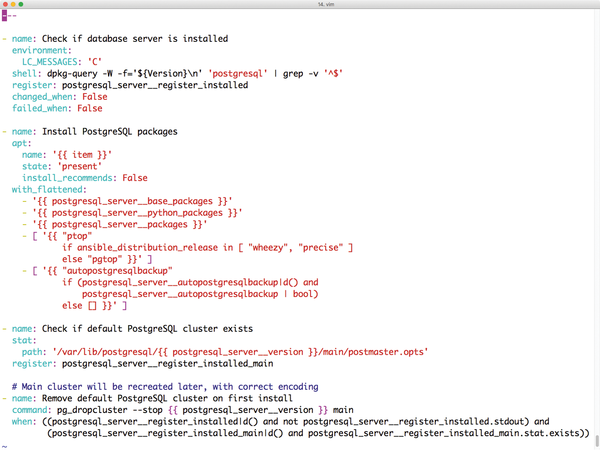
Figure 1: Ansible relies on YAML and takes an approach that forces playbooks to document themselves.

Even though Ansible is simpler than Puppet or Chef, writing your own roles takes time. Wouldn't it be great if you had a library of prebuilt Ansible recipes for standard services that you could install in seconds by pressing a button?

DebOps [2] is a huge collection of prebuilt Ansible roles that you can use on fresh Debian systems.

What Is DebOps?

The collection of prebuilt Ansible roles currently totals more than 110. The authors also provide userland tools composed in Python for these roles. A tool called debops is part of the collection; you call debops with the appropriate parameters to launch an Ansible playbook for the desired effect.

The debops tool helps you install and maintain your DebOps Ansible roles, thanks to the debops-init and debops-update commands, whereas debops-defaults helps you find the correct configuration for your system, and debops-padlock makes it possible to encrypt and store sensitive passwords. The debops-task command is a wrapper for the ansible command. Note that after debops is run once and ansible.cfg is generated, you can use the ansible command directly.

The best way to approach DebOps is quite simply learning by doing, but be careful: The solution may make your life easier, but it comes with some pitfalls that you need to avoid at all costs. Having console access to a host in the beginning (either physical, through out-of-band VNC access to the VM console, or through the attach command of a container) can be an useful debugging tool. Also, check out the project's Getting Started guide online [3].

DebOps – Hands On

To get started, you'll need at least two Debian systems that are newly installed and are still plain vanilla. In theory, this example would also work with a single host, but that would not be very relevant to real-world IT practice: Tools like Ansible are typically used to automate the configuration of multiple systems. This example is based on the assumption that Ansible is running on a central automation host, which logs on to other systems via SSH.

DebOps is designed for Debian, but it is also supposed to work with the Debian-based Ubuntu. (Most of the packages on both systems are similar and many system tools have the same name.) Our tests revealed some issues with the Ubuntu support at various points, although other tasks completed successfully on both Debian and Ubuntu systems.

The first step is to install Ansible. It is included with the latest Debian and Ubuntu versions, but the default versions are naturally a bit outdated. It is better to pick up suitable packages [4] from Ansible upstream to make sure you have the latest version for your own system. You can normally install the packages using your own package management system.

Once you have set up Ansible, you can move on to installing DebOps. A prebuilt DebOps package exists for Debian, but it is only in the experimental branch and is fairly ancient. The DebOps developers recommend installing DebOps using the pip Python package tool [5]. The command is

pip install debops

which puts DebOps in /usr/local/bin/debops, where it is now ready for use.

The next step largely depends on whether you supervise your hosts in a team with other administrators or whether you work on your own. If you set up DebOps as a normal user, all the configuration files end up in your home directory. If you want co-workers to benefit from DebOps, as well, define the following parameters in a file named /etc/debops.cfg:

[paths]
data-home: /usr/local/debops

The /etc/debops.cfg file is useful only if you plan on having multiple users and you want all of them to use the same codebase; otherwise it's not needed.

Now you need to run the debops-update command from a regular user account. The command downloads all the debops-playbooks available on GitHub for Ansible and stores them in ~/.local/share/debops/debops/. This is followed by debops-init with the destination directory for the Ansible configuration.

The Ansible configuration is not in the data-home directory in DebOps. If you work as root, you can call the debops-init <local-setup> command below /root. The rest of the path is the typical folder structure that Ansible expects (Figure 2).

Figure 2: Laying the foundations for your automation with debops-init.

As the administrator, you will want to pass in many configuration parameters to DebOps along the way. The debops command is a wrapper for the ansible-playbook command, and it ultimately calls ansible with the correct parameters. Ansible expects ansible.cfg, which DebOps generated previously from the available configuration values. After debops is run once and ansible.cfg is generated, you can use the ansible command directly.

Make sure you do not change anything in the ansible.cfg file created with the ansible command, because DebOps will overwrite any changes later. Instead, /etc/debops.cfg or (preferably) .debops.cfg are available for configuration in the directory previously created by debops-init.

Connection Required

Once Ansible is set up on the configuration server, the next question is how to set up the connection with other servers (i.e., the ones you want DepOps to configure). One thing is clear: Ansible does not rely on its own client-server protocol but uses the well-established SSH to perform commands. The next step is to set up Ansible and the other servers so that the login works.

One option is to create an unprivileged user account, which is then given root privileges via sudo. However, this approach is a little time consuming, because you then need to enter the sudo password manually each time you run Ansible, unless you want to store it in the DebOps configuration. It is also possible to enable sudo without the user's password and instead manage access based on SSH keys.

On paper, this solution has significant advantages; the login is carried out via an SSH key that doesn't require a password. Because SSH keys are already standard in most setups, you immediately switch off the password login via SSH.

If you want to take the risk, you could theoretically generate an SSH key with an empty password and store its public part on all target servers for root with ssh-copy-id. In .debops.cfg in the configuration directory, the [ansible defaults] section then needs to be extended to include the remote_user = root entry. This ensures that Ansible actually uses the root account.

All hosts in the Ansible inventory layout used by DebOps should be included in the [debops_all_hosts] inventory group so that a common configuration can be applied. The current naming scheme for group names is [debops_service_<role_name>]. Therefore, to enable PostgreSQL server support on a host, it needs to be included in the [debops_service_postgresql_server] inventory group:

[debops_service_postgresql_server]
server1.example.net

From previous painful experience, the DebOps developers have learned that they need to check the condition of the target systems. The DebOps documentation recommends you enter the command

debops-task all -m setup

after you set up the connection and the inventory file.

Buy this article as PDF

Express-Checkout as PDF
Price $2.95
(incl. VAT)

Buy ADMIN Magazine

SINGLE ISSUES
 
SUBSCRIPTIONS
 
TABLET & SMARTPHONE APPS
Get it on Google Play

US / Canada

Get it on Google Play

UK / Australia

Related content

comments powered by Disqus
Subscribe to our ADMIN Newsletters
Subscribe to our Linux Newsletters
Find Linux and Open Source Jobs


Support Our Work

ADMIN content is made possible with support from readers like you. Please consider contributing when you've found an article to be beneficial.

Learn More”>
	</a>

<hr>		    
			</div>
		    		</div>

		<div class=