
Lead Image © bowie15 , 123RF.com
Docker and Podman environments on Windows and Mac machines
For Young and Old
If you are running a Linux system, you will not have much trouble using either Docker or Podman as a container manager. The software is available from the repositories of almost all the well-known Linux distributions. However, the situation is different if you want to set up an environment for developing container applications on a Windows or Mac system. For this, you have to resort to external software. Docker Desktop [1] provides a Docker environment for these systems, with other components in addition to the Docker engine and the command-line client. For example, you also get the container orchestration tool Kubernetes [2] delivered free with the software.
Older Systems Locked Out
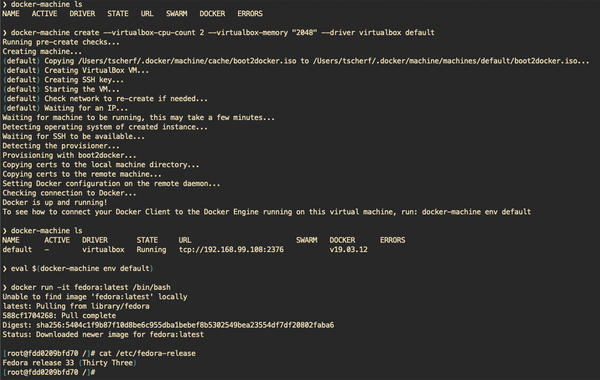
An older Windows or Mac machine, however, can be problematic. Docker Desktop requires at least Windows 10 or macOS 10.14, although you can still resort to Docker Machine [3] in this case, which creates a virtual Linux system on the local host that you can then use to access the Docker engine. The example in Figure 1 uses VirtualBox [4] on a Mac for the virtual machine setup. You can either download VirtualBox as an installation archive directly from the website, or if you want to install it on a Mac system, you can install it with the Homebrew package manager [5].
...
Buy this article as PDF
(incl. VAT)
Buy ADMIN Magazine
Related content
-
Simplify your migration from Docker to Podman
 Podman has become an attractive alternative to Docker, not least because it does not require a central daemon. In this article, we look at how to set about changing the guard and how you can use Podman Desktop to do so.
 -
Managing containers with Podman
 The Podman container management tool does not use a daemon in the background, like its counterpart Docker, and can operate in non-privileged mode.
 -
Integrating Podman and systemd
 With the integration of Podman and systemd, you can put any software inside a container under the control of systemd and see almost no difference between running the service directly on the host or inside a container.
 -
Red Hat Container Development Toolkit for container-based applications
 Vagrant software makes it possible to set up a development environment quickly and efficiently. The Container Development Kit takes advantage of this feature to create a container-based environment built on Red Hat Enterprise Linux under Windows, Mac OS X, or Linux.
 -
OCI containers with Podman
 The Podman alternative to Docker is a daemonless container engine with a run time that executes on request in root or user mode.
Subscribe to our ADMIN Newsletters
Subscribe to our Linux Newsletters
Find Linux and Open Source Jobs
Most Popular
Focus On Self-Hosting
• Self-Hosted Collaboration with Forgejo
• Self-Hosted PaaS with Coolify
• Build and Host Docker Images
• Self-Hosted Pritunl VPN Server with MFA
• Self-Hosted Chat Servers
Support Our Work
ADMIN content is made possible with support from readers like you. Please consider contributing when you've found an article to be beneficial.
