« Previous 1 2 3 Next »
Clustering with the Nutanix Community Edition
The Right Track
To be clear, the Community Edition of Nutanix was developed for testing purposes only; it is not a replacement for the production version. The Community Edition does not give you all the possibilities that you have with the commercial version. For example, the Community Edition only supports two hypervisors: Acropolis (AHV) by Nutanix and ESXi by VMware. The basic setup of a private enterprise cloud from Nutanix built on the Community Edition includes the hypervisor, the Controller Virtual Machine (CVM) and associated cloud management system, the Prism element for single-cluster management, and Prism Central for higher level multicluster management (Figure 1).
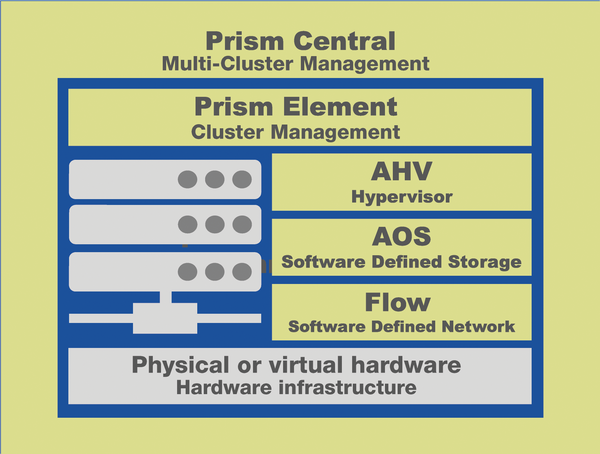 Figure 1: A schematic representation of the components of the management environment.
With the Community Edition, you can set up a one-, three-, or four-node cluster. All other conceivable cluster combinations are reserved exclusively for the commercial version. The individual components of the Community Edition, such as AHV; the AOS cloud operating system, which is based on the individual CVMs in the cluster; and the cloud management system, cannot be mixed with components of the production version. Therefore, you cannot manage a Community Edition cluster with Prism Central from the production version. Conversely, you cannot use Prism
...Buy this article as PDF
(incl. VAT)
Buy ADMIN Magazine
Related content
-
A REST API automation strategy for DevOps
 Making resources available through REST APIs breaks down the automation silos that cater to the different IT and development environments and sets up an application-centric automation approach.
 -
High availability clustering on a budget with KVM
 High-availability clusters have become an important part of the system administration landscape. Tools like KVM bring the benefits of virtualization to HA clustering environments.
 -
Cluster-Aware Updating for Windows Server 2012 R2
 The Cluster-Aware Updating service gracefully handles OS and application updates within your cluster. We show you how to set up and manage this tool.
 -
Hyper-V containers with Windows Server 2016
 The release of Windows Server 2016 also heralds a new version of Hyper-V, with improved cloud security, flexible virtual hardware, rolling upgrades of Hyper-V clusters, and production checkpoints.
 -
Monitoring KVM instances with Opsview
 In emergencies, administrators need to know as quickly as possible whether computers in a private cloud are failing. A simple setup with KVM, Pacemaker, DRBD, and Opsview will help keep watch.
Subscribe to our ADMIN Newsletters
Subscribe to our Linux Newsletters
Find Linux and Open Source Jobs
Most Popular
Support Our Work
ADMIN content is made possible with support from readers like you. Please consider contributing when you've found an article to be beneficial.
