Lead Image © Dmytro Demianenko, 123RF.com

Lead Image © Dmytro Demianenko, 123RF.com

Dialing up security for Docker containers

Container Security

Article from ADMIN 44/2018
By
Docker containers are a convenient way to run almost any service, but admins need to be aware of the need to address some important security issues.

Container systems like Docker are a powerful tool for system administrators, but Docker poses some security issues you won't face with a conventional virtual machine (VM) environment. For example, containers have direct access to directories such as /proc, /dev, or /sys, which increases the risk of intrusion. This article offers some tips on how you can enhance the security of your Docker environment.

Docker Daemon

Under the hood, containers are fundamentally different from VMs. Instead of a hypervisor, Linux containers rely on the various namespace functions that are part of the Linux kernel itself.

Starting a container is nothing more than rolling out an image to the host's filesystem and creating multiple namespaces. The Docker daemon dockerd is responsible for this process. It is only logical that dockerd is an attack vector in many threat scenarios.

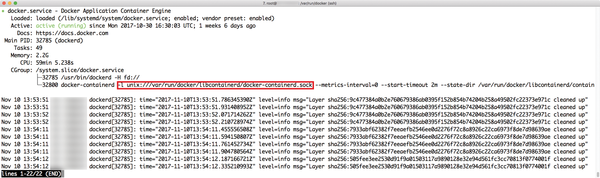
The Docker daemon has several security issues in its default configuration. For example, the daemon communicates with the Docker command-line tool using a Unix socket (Figure 1). If necessary, you can activate an HTTP socket for access via the network.

Figure 1: The Docker daemon listens on a Unix socket in the factory configuration; if you add an HTTP socket, you will definitely want to use client certificates.

The problem is: HTTP access is not secure. If you want security at the Docker daemon level, one option is to implement a system using TLS with client certificates.

To set up TLS with Docker, go to the configuration file of the Docker daemon and enable tlsverify, tlscacert, tlscert, and tlskey [1] with the corresponding files as parameters. Then store those files in the client configuration in the folder ~/.docker; use the keywords tls, tlscert, tlskey, and tlscacert to ensure that Docker also finds them; and set the environment variable DOCKER_TLS_VERIFY to 1. If you then call the Docker command at the command line, Docker automatically uses the certificates to log on to the server.

You either have to buy the appropriate certificates for this approach, or you are forced to operate a suitable certificate authority (CA) yourself. Tools like TinyCA [2] help make this task a little less painful (Figure 2).

Figure 2: A tool like TinyCA makes it easier to manage your own local SSL CA. Tiny can also handle existing CA certificates.

Privileges System

A seasoned admin will keep the amount of work performed with root system administrator privileges to the absolute minimum. With Docker containers, the root account is still a dangerous thing: Because a container is not a complete VM, user management within the container and outside it are also not completely separate. An admin who starts a container with root privileges will have to contend with a whole bunch of far-reaching authorizations.

Docker itself comes with several features to make sure that the privilege level does not become a problem. When a container is started, it creates several namespaces at kernel level in the background, one for the network connections and one for the processes within the container.

Applications within the container therefore have no way to get information about the processes outside the container – provided that there is no vulnerability in the namespace implementation of the Linux kernel. Docker also creates control groups for new containers. Control groups limit the access to resources by the container, so that a single container, for example, cannot use all the CPU power available on the host.

Because the container also requires access to central directories such as /sys, the Docker developers have adopted the concept of Linux capabilities in Docker. A Docker container itself only has the rights of an unprivileged application – unless the admin chooses otherwise. In addition, a whole series of additional capabilities, such as CHROOT to allow the chroot function to be executed in a container or SYS_RAWIO to get direct access to storage devices, provide some protection.

With the --cap add and --cap-drop options for Docker, admins can grant each container only the privileges it actually needs. For example, if a container needs to use a privileged port – one with a number lower than port 1024 – you simply activate the NET_BIND_SERVICE capability flag for the container.

Another approach found in various documents is the --privileged switch. If you start a container in privileged mode, it can do virtually everything that root is allowed to do on the host system. Unlike the truism about working as root, many users actually follow this recommendation – they give the container comprehensive permissions, although it probably doesn't need them at all.

One of the most important recommendations for safe Docker operation is to start containers in privileged mode only in absolutely exceptional cases and always check carefully whether it is absolutely necessary. The potential damage that can be caused by a privileged container running amok includes taking down the host.

Since version 1.10, Docker also supports the possibility to use separate user namespaces for containers. User administration within the container is then completely isolated from the outside. Start the Docker daemon with the --userns-remap parameter to enable separate user namespaces. If you enable this feature, the container runs in a user namespace that maps the user root of the host system to an arbitrary UID, although the service running in the container still believes it has root privileges (Figure 3).

Figure 3: If user namespaces are enabled in Docker, Docker maps the host's UID 0 to any ID that appears to be UID 0 in the container but has no root privileges on the main system.

Seccomp

Several external tools are also available to help with Docker security. One example is the seccomp function, which is part of the Linux kernel and was originally developed for Google Chrome. Seccomp is designed to limit the permitted system calls (syscalls) to the absolute minimum necessary.

Syscalls are functions anchored in the kernel on any POSIX-compatible operating system that can be called by external programs. The most popular system calls in Linux are those for interaction with files in filesystems, namely open(), read(), and write(). However, the kernel also supports system calls that deeply affect the running system, such as clock_settime(), which can change the time of the target system; mount() is also a system call.

Seccomp lets you define profiles : The profile determines which system calls a program has access to [3]. The target program must support seccomp, because it must select the profile with which it will be associated and set it using the seccomp() syscall. If a program that is restricted by a seccomp profile attempts to execute a syscall that is not explicitly allowed in the profile, the kernel of the host operating system sends the SIGKILL signal without further ado.

Seccomp functionality acts as an extension of the Linux capability system. Not all operations that an admin might want to stop a Docker container from doing can be covered by capabilities – seccomp jumps into the breach, providing a way to restrict operations that capabilities can't control. Since version 1.10, Docker is able to set seccomp profiles based on individual containers.

Buy this article as PDF

Express-Checkout as PDF
Price $2.95
(incl. VAT)

Buy ADMIN Magazine

SINGLE ISSUES
 
SUBSCRIPTIONS
 
TABLET & SMARTPHONE APPS
Get it on Google Play

US / Canada

Get it on Google Play

UK / Australia

Related content

comments powered by Disqus
Subscribe to our ADMIN Newsletters
Subscribe to our Linux Newsletters
Find Linux and Open Source Jobs


Support Our Work

ADMIN content is made possible with support from readers like you. Please consider contributing when you've found an article to be beneficial.

Learn More”>
	</a>

<hr>		    
			</div>
		    		</div>

		<div class=