Large Radius
WiFi password on a piece of paper under a keyboard? Or somewhere equally as insecure? Sloppy password practices are a nightmare for any admin; controlling access to the company network is impossible with a shared password, even if you have a manageable number of employees.
How do you implement security on a WiFi network without a shared password? One solution is IEEE 802.1X, a standard mechanism for network authentication. For enterprise WiFi hotspots, this login procedure usually goes by the name of WPA Enterprise (Figure 1).
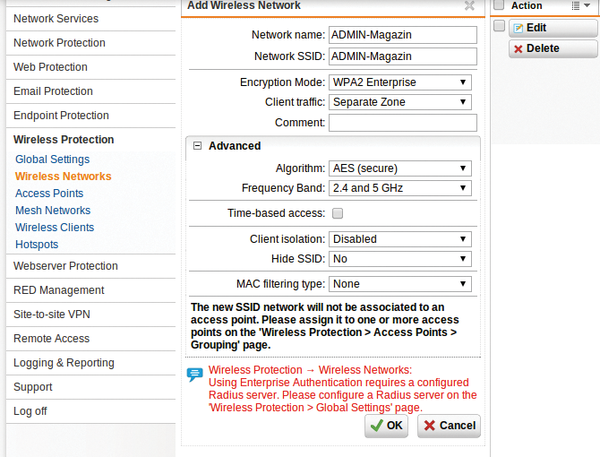 Figure 1: Some hotspots support a user-specific configuration with WPA Enterprise.
In most cases, the user database is not managed by the hotspot itself. Instead, the hotspot queries a RADIUS server on the same network (Figure 2): The central user administration actually takes place on the RADIUS server. If you take on a new employee, you enter their account on the RADIUS server, WiFi access included.
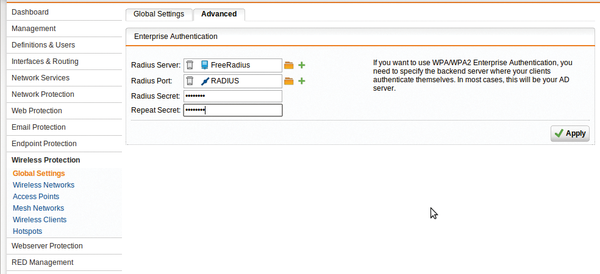 Figure 2: A RADIUS server provides user data to the WiFi hotspot.
The resolution for the acronym RADIUS – Remote Authentication Dial-In User Service – shows that the system was designed for greater tasks than the management of wireless users. It is also used by Internet providers, who rely on RADIUS servers to manage their often very numerous users.
RADIUS implements the AAA concept: authentication, authorization, accounting. The first two components play the main role in defining access controls for a wireless network. During authentication, the RADIUS server checks the username and password; in the scope of authorization, it defines optional access parameters, such as the permitted use period or time. Accounting is primarily about the typical requirements of Internet providers, especially detailed logging of transferred data volumes for statistical analysis and billing.
FreeRADIUS
FreeRADIUS is the most widely used RADIUS server. The free software offers tremendous flexibility thanks to a variety of modules and configuration options. Complete packages are available for Linux, Mac OS X, and BSD variants, as well as FreeRADIUS for Windows.
FreeRADIUS developers follow the strategy of delivering the program with a configuration that is generically useful. Adjustments to suit your own environment remain unavoidable, but defaults that are directly usable in many real-world scenarios help admins find their way around the wide range of settings.
RADIUS typically runs as a service on Linux (service freeradius start ), or you can use the radiusd or freeradius command, depending on your distribution. The FreeRADIUS server then listens for all requests in the default configuration, using the RADIUS default ports 1812 for authentication and 1813 for accounting, both of which are typically defined in /etc/services . For troubleshooting and testing, it’s useful to launch FreeRADIUS with freeradius ‑X , which outputs all debugging messages.
Other network parameters, as well as local settings for logging, threading, security, and the modules used, are located in the radiusd.conf file below the FreeRADIUS configuration directory, usually /etc/freeradius/ on Linux.
The radiusd.conf file organizes most of the options in listen blocks. Each listen block represents a virtual server instance; the preset contains two of them – one for authentication and one for the accounting server. Use the previously mentioned standard ports and accept connections from all addresses (ipaddr=* ). Virtual servers in the FreeRADIUS concept are independent instances. They can be configured individually for each specific RADIUS client.
The supplied FreeRADIUS configuration provides several sample entries for users, which are, however, commented out. The users file is responsible for the user configuration. In the simplest case, you just enter the individual users directly:
ADMIN Cleartext-Password := "magazine"
This entry assigns the property Cleartext-Password with a value of magazine to the ADMIN user. FreeRADIUS reads these entries at startup. Now, when a WiFi end user requests access permission from the hotspot, the RADIUS server compares the password sent by the client with this value and sends the appropriate response. Changes to the user database require a restart of the FreeRADIUS server.
The entire FreeRADIUS configuration directory should be readable only for the dedicated FreeRADIUS account to avoid disclosing the user passwords. If you prefer not to save these passwords in the clear in the users file, the rlm_pap module offers various algorithms that use a cryptographic hash of the password, such as MD5 and SHA-1. You pass in the algorithm used as an option and then generate the hash, for example, with sha1sum for SHA-1:
echo -n "magazine" | sha1sum
This entry in the users file,
ADMIN SHA-Password := "e3d5a52968cef277f476a78124d8e05f1d558953"
replaces the one above.
One After Another
FreeRADIUS parses the entries in users from the top down. When it finds a match, it stops processing unless the Fall-Through = Yes parameter is set. This, like other additional options, is located in the line below the user declaration and is indented with a Tab.
The users file has many additional user options, such as the time at which a user can authenticate (Login-Time ). The Reply-Message entry defines a custom response message, for example, explaining a rejection. In all, several hundred options are available that can do such things as propose user-specific network configurations at a hotspot. That said, the RADIUS server does not care whether the hotspot implements them; this is the task of the network access node. The complete list of supported FreeRADIUS attributes is available online.
The DEFAULT entry stands for all usernames and is used to specify general settings. This also means that FreeRADIUS stops processing the users file if it encounters a DEFAULT entry, unless it uses Fall-Through = Yes .
RADIUS Client
For FreeRADIUS to allow access, FreeRADIUS must first know the client that wants to authenticate a user. The client configuration is found in the clients.conf file. It contains the network parameters and security settings of the Network Access Server (NAS; for the WiFi hotspot in this example).
The client keyword, followed by a name, starts each client configuration; the configuration itself is enclosed in braces. By default, the only client is localhost. It rejects all connections that do not originate from the same computer. The name can also serve as a definition of allowed clients, such as localhost or 192.168.1.2/32 . Since FreeRADIUS Version 2, this setup is no longer required, but it still works. Otherwise, ipaddr and netmask define the permissible network parameters for this client.
A RADIUS server also requires a shared secret from the client – a password that serves as the basis for further encrypted communication. The default localhost client supplies testing123 here. To sum up, the configuration looks like this:
client localhost {
  ipaddr = 127.0.0.1
  secret = testing123
  netmask = 32
}
The optional netmask entry defines the allowed subnet. If it is missing, it is set to 32 , which corresponds to exactly one computer. As an alternative to the IP address, the ipaddr entry can also use a hostname. However, this means that if there is a problem with the DNS server, the RADIUS server fails.
The radclient tool included in FreeRADIUS makes it possible to test access at the command line. In the default configuration, the RADIUS server initially only lets you do this locally; Figure 3 shows the output.
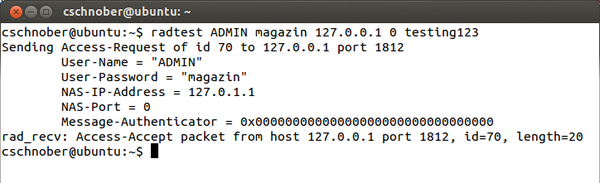 Figure 3: The radtest program helps you debug a RADIUS server.
Hints and Huntgroups
Two other configuration files and FreeRADIUS concepts go by the names of huntgroups and hints . Huntgroups are user groups whose members access the same NAS. Accordingly, a simple huntgroups configuration looks like this:
local NAS-IP-Address == 192.168.1.1
This setting assigns all users authenticated by the RADIUS client (NAS) with the IP address 192.168.1.1 to the local huntgroup. This information can be used in the users file by synchronizing the huntgroup-name attribute with the user group membership. This setup offers the option of creating different entries for a user that are enabled depending on the NAS used, which make sense, in particular, in combination with the DEFAULT user.
Hints allow detailed configuration directly via the username, with the client appending scenario-dependent prefixes or suffixes. The supplied hints file contains settings typical for IPs, which assign the matching protocols to usernames ending in .ppp , .slip , and .cslip . Then, password-based authentication continues with the remainder of the username, as defined by the Strip-User-Name = Yes parameter.
The following entry thus leads to the authentication of a user who logs in as ADMIN.ppp . After the PPP protocol has been allocated, FreeRADIUS authorizes the user as ADMIN .
DEFAULT Suffix == ".ppp", Strip-User-Name = Yes
  Hint = "PPP",
  Service-Type = Framed-User,
  Framed-Protocol = PPP
Again, a combination with DEFAULT is useful.
User Databases
FreeRADIUS also lets you store the user data in sources other than the users file. In addition to modules for various SQL databases, Active Directory Service (ADS) and LDAP are potential candidates.
For MySQL, you can enter the user data in a database with the same attributes and values as described for the users file. The SQL scripts (admin.sql and schema.sql ) create users, databases, and schemas in the sql/mysql subdirectory. Matching counterparts are available for PostgreSQL.
You then need to enable the $INCLUDE sql.conf entry in radiusd.conf , which is commented out by default. In sql.conf , the database gives you a choice between mysql , mmsql , oracle , and postgresql . Next, define the server , login , and password for access to the database in the same file.
The MySQL database created here stores the individual user entries in the radcheck table. The fields username , attribute , value , and op can be set, for example, to ADMIN , Cleartext-Password , magazine , and := to create a user with the same properties as used in the users file earlier.
The radreply table defines user-specific response messages, as well as network settings, and usergroup assigns users to groups, and radgroupreply defines group-specific responses.
Active Directory
If you prefer to rely on user data in Active Directory, you can use ntlm_auth from the Samba package. Access based on the username, domain, and password can be tested manually:
ntlm_auth --request-nt-key --domain=mydomain --username=myuser --password=mypassword
This command line exists in a similar form in the FreeRADIUS configuration file modules/ntlm_auth . You just need to modify the path for calling the program, for example, to /usr/bin/ntlm_auth and to match the domain (realm) of your ADS server. Usernames and passwords are provided directly by the requesting client. Finally, enable the module in the sites-enabled/default and sites-enabled/inner-tunnel files. The authenticate block lists the permissible authentication methods; you need to add an ntlm_auth line here. Details about configuring and troubleshooting FreeRADIUS and Active Directory Service are provided online.
Tunnel
The sites-enabled/inner-tunnel module configuration file is used, among other things, for authentication based on WPA Enterprise. The underlying 802.1X standard for WPA Enterprise defines an encrypted connection based on the EAP-over-LAN protocol (EAPOL), where EAP stands for Extensible Authentication Protocol .
With EAPOL, the user data is sent by the client through an encrypted tunnel to the access point, a WiFi hotspot in 802.1X. The access point forwards the request to the RADIUS server, which follows the usual principle to handle it. However, if the EAP protocol is used, FreeRADIUS reads the list of modules in sites-enabled/inner-tunnel instead of just sites-enabled/default .
The tunnel still needs an encryption certificate. In production, this certificate would be signed by a trusted authority. The FreeRADIUS source package provides a demo certificate for testing purposes, which is generated by running the make command in the certs subdirectory. However, the demo certificate is missing from the packages provided by most Linux distributions, because it is not signed and thus not a trusted certificate.
If you want to try EAPOL authentication, you will also find the eapol_test program in the WPA supplicant package for this; it implements various WPA encryption mechanisms for testing and analysis purposes. By default, eapol_test is not compiled but only activated if you enable the CONFIG_EAPOL_TEST = y configuration option in the sources. It is commented out in the defconfig file below the wpa_supplicant subdirectory of the WPA supplicant source package. Copy this file to wpa_supplicant/.config , remove the comments in the config file, and compile by typing make eapol_test .
The sample configuration file, peap-mschapv2.conf , is useful for testing WPA Enterprise. You need to modify the identity and password entries to authenticate a user that you created in FreeRADIUS. You can perform the test as follows:
eapol_test -c peap-mschapv2 -s <Client-Password>
The client password corresponds to the one specified in the clients.conf file. In the given sample configuration for localhost, it would be testing123 . After a successful test, you will want to disable the localhost client and all unused client entries or change the password.
Pitfalls
FreeRADIUS was designed for user management on a scale typical of Internet providers, making the default configuration packaged with FreeRADIUS very valuable. Getting started is easy; for example, you can easily set up the local WiFi hotspot for user-specific authentication and configuration instead of using a shared password – given your hotspot has WPA Enterprise capability.
Related content
-
FreeRADIUS for WiFi hotspots
 Tired of contending with shared passwords for wireless networks? Use WPA Enterprise and a FreeRADIUS server to set up a user password solution for wireless users.
 -
Microsoft Network Policy Server
 Redmond's RADIUS implementation connects systems and provides secure authorization and logging.
 -
Open source remote access to Windows
 FreeNX and the WiKID Strong Authentication System combine to create open source remote access that delivers the speed of NX with the security of SSH tunnels and Linux.
Subscribe to our ADMIN Newsletters
Subscribe to our Linux Newsletters
Find Linux and Open Source Jobs
Most Popular
Focus On Self-Hosting
• Self-Hosted Collaboration with Forgejo
• Self-Hosted PaaS with Coolify
• Build and Host Docker Images
• Self-Hosted Pritunl VPN Server with MFA
• Self-Hosted Chat Servers
Support Our Work
ADMIN content is made possible with support from readers like you. Please consider contributing when you've found an article to be beneficial.
