Kick Start
If you have tried a manual OpenStack installation before, you will have noticed that some configuration steps are identical among the various OpenStack components; that is, you perform the same operations several times. If this makes you think of automation, you are right on track, and Kickstack provides an approach to solving this problem: Based on Puppet, it offers meaningful and efficient administration of OpenStack clouds.
Cloud computing installations in particular must be able to scale massively horizontally – the perfect use case for classic system automation. So, if you want to know how to set up your own OpenStack cloud within 20 minutes, you have come to the right place.
OpenStack Automation
Regular ADMIN readers might recall reading an article a few months ago that explained how OpenStack components work [1]. The article demonstrated one thing: Installing OpenStack is no trivial matter if you want to do it manually. Various services need to be distributed to their own servers if you do not want an all-in-one setup. The problem is compounded by the many commands in the scope of the OpenStack setup that are not very intuitive and make little sense at first glance. Those who have not worked with technologies such as Open vSwitch will find it difficult to understand many of the commands in the installation of OpenStack Neutron.
Kickstack is an additional layer that resides between the admin and OpenStack, using Puppet modules that have existed for some time for all core components of OpenStack, while Kickstack takes on the automation tasks. Although normal Puppet modules can also install the OpenStack services in an automated process, it requires painstaking configuration of various Puppet parameters, so time benefits are mostly non-existent, especially compared with a manual installation.
Kickstack tidies things up radically. It automatically takes care of creating data, such as Keystone users, ensures that all services of the OpenStack environment and communications with their databases use password protection, and ensures that the OpenStack services run on the hosts previously allocated by the admin. For a variety of parameters, from which the administrator can choose in the Puppet modules, Kickstack filters out the most important ones and then does the rest automatically.
A specially introduced role system assigns specific roles to the various machines in the OpenStack installation. To understand the motivation behind this, I’ll review the components that make up OpenStack.
Service Components
OpenStack is not a massive program but a collection of components. This fact is of fundamental importance to understanding the way Kickstack or Packstack work (see the “Kickstack vs. Packstack” box). Table 1 lists the nine core components of OpenStack.
| Table 1:OpenStack Components | |
|---|---|
| Component | Function |
| Keystone | The authentication service supports user login and mutual registration of services. |
| Horizon | The dashboard makes sense only in combination with a web server. |
| Nova | The computing component that takes care of starting, stopping, and controlling virtual machines. |
| Cinder | The block storage service provides virtual machines within OpenStack with virtual, persistent block storage. |
| Glance | The image service manages images of operating systems and can deliver them to hypervisor nodes whenever needed. |
| Neutron | The network service handles all tasks related to software-defined networking (SDN) in OpenStack. |
| Ceilometer | The metering component was introduced in the Havana release and supports detailed logging of data traffic. |
| Heat | Orchestrates within an OpenStack cloud and takes much work off the admin’s shoulders. |
| Swift | The object store component offers a storage service comparable to Amazon S3 in OpenStack Clouds. |
| Kickstack vs. Packstack |
|---|
| Kickstack is not the only tool that enables automatic deployment of OpenStack using Puppet. For example, Red Hat offers the similar Packstack. Both tools rely on the same Puppet modules maintained by the same developers, so why two different tools for the same task? The answer to this question is the classic open source answer: Different communities provide multiple solutions to the same problem. In the case of Packstack and Kickstack, significant functional differences exist, as well. Packstack is tailored to work closely with Red Hat’s own OpenStack distribution, RDO. Kickstack, in turn, is more concerned with the classic Ubuntu environment running Ubuntu LTS version 12.04. Until one of the two tools is extended to support other distributions, admins will do well to select the right tool for the job. |
The crux of the matter is that even the OpenStack components are not individual programs but, in turn, break down into several modules. Virtually every service in OpenStack has its own API that exposes a RESTful API and thus ensures that the service is controllable via the HTTP protocol. From a technical perspective, it can be quite useful to expose these APIs on the Internet, as it does for Rackspace in their own OpenStack cloud. However, this approach involves a setup in which the individual component modules are distributed across different systems, because the other components do not necessarily, or should not, run where the API components do.
Further atomization takes place when individual parts of an OpenStack component must be distributed across several systems. The cinder-volume service, for example, is the interface that connects VMs on hypervisor systems with the assigned persistent storage. The service therefore runs on hosts where space is available on disks. cinder-scheduler usually runs on a different host – the component coordinates access to multiple storage back ends, if they are configured. Then you have the services that need to be available multiple times within an OpenStack installation: nova-compute , which starts virtual machines on behalf of Nova, is a good example.
Roles Not Programs
To deploy OpenStack meaningfully, it is necessary to think in terms of roles and not individual components. Obviously, it would not make much sense to distribute the services that belong to OpenStack as separate groups on different computers.
Kickstack therefore uses a different approach and assumes that a variety of different roles can be defined within an OpenStack installation more or less as factory defaults. Each role is characterized by a specific combination of services. You need to understand the group schema before starting to work with Kickstack, because the role system is central to Kickstack. Kickstack uses the roles in Table 2 by default.
| Table 2:Kickstack Roles | |
|---|---|
| Role | Function |
| Infrastructure Node | This system provides support services for OpenStack: RabbitMQ and MySQL. |
| API Node | API services for all components run centrally on this node. |
| Network Node | The network node operates the Neutron components that are responsible for the DHCP and L3 connections and thus give VMs access to the outside world. |
| Auth Node | This node operates Keystone, the ID service, which is something like the root service in OpenStack – without it, the other components cannot be used in a meaningful way. |
| Compute Node | This node primarily includes nova-api and makes a host, to which this Puppet role is assigned, for a computing node the virtual machines can run. |
| Dashboard Node | The Dashboard node runs Apache with a dashboard. It is isolated from the API services. |
| Metering Node | This node operates services that belong to the metering application Cinder (except for the API). |
| Orchestration Node | The role contains all the services required for OpenStack Heat, with the exception of the API. |
| Controller Node | This role has the various services for internal OpenStack use, composed of parts of different services. It is usually located on the same host as the Infrastructure role. |
| Storage Node | Contains the components necessary for a host to make its local storage available for use by Cinder: essentially, cinder-volume . |
| Client Node | The peculiarity of this role is that it installs all the command-line clients for the various OpenStack services; that is, binaries such as glance and nova . OpenStack itself uses the Python libraries in the background. The Client role can be deployed on the node that also has the API role. |
From the designated node roles, you can create a mixture of nodes in Kickstack; arbitrary role combinations are possible – even all-in-one installations. In this case, all roles would be assigned to a single node at the same time. That would not exactly be the typical production system, however. The trend is toward defining different node types in OpenStack, which then perform specific tasks.
Moreover, different roles can be assigned to more than one node at the same time; it would not make sense to have just a hypervisor node, for example. The Compute node can thus be assigned to an arbitrary number of nodes.
Kickstack Installation
The basic approach of Kickstack fundamentally relies on these defined roles. Working in the web interface of the Puppet Master, the admin adds the Kickstack nodes to be managed to the appropriate groups and then assigns the desired roles to each node, again in a web interface. The node itself then just needs the agent for Puppet, which implements the defined node configuration (Figure 1). For this process to work, you first need a working Kickstack installation, and this in turn inevitably means having Puppet in place.
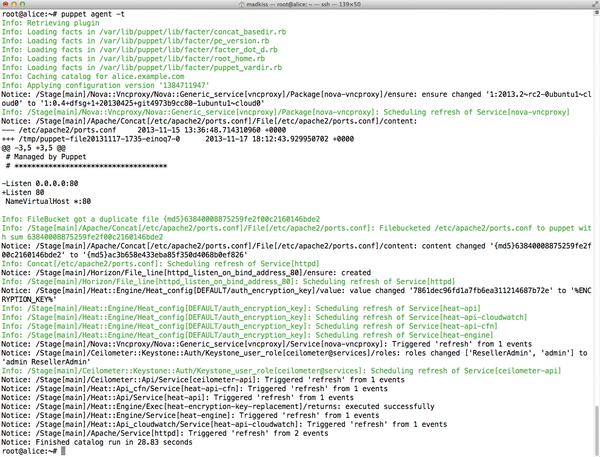 Figure 1: Running the Puppet agent on the servers applies the predefined rules.
A Suitable Lab Environment
If you want to build the sample setup described in this article, you do not need tons of hardware: The proposed installation will easily install on four Ubuntu LTS version 12.04 virtual machines. One of these machines is the Puppet Master, simply known as puppet , and the three other computers, Alice , Bob , and Charlie , run the OpenStack installation. Specifically, the VMs, provided in this example by VirtualBox, do not have less than 1GB of RAM. As usual, the more RAM, the merrier.
If you have bare metal at hand, a setup of this kind can be built on real hardware, allowing you to test OpenStack under realistic conditions. The only restriction in such a scenario is that Charlie needs three network ports, whereas Bob and Alice need at least two each. This requirement is determined by the OpenStack network service, Neutron, and not by Kickstack.
Step 1: Puppet
To begin, you need to set up the Puppet infrastructure. The example is based on a classic Puppet architecture comprising a master server and clients that obtain their configuration from that master. For this setup, you need to ensure that the hosts can reach each other by means of a working DNS and that the hostnames of the machines are registered correctly in DNS. After the installation, it is advisable to edit the Puppet installation that exists below /etc/puppet/puppet.conf on Ubuntu. You will want to enable Puppet reports and storage of the Puppet information in a database. Enabling exported resources is also important in a Kickstack context. The configuration parameter required for this is storeconfigs=true . However, the Puppet developers suggest that new users might prefer to use PuppetDB, which produces the same effect and also supports exported resources.
After preparing the Puppet Master, the nodes follow, which also need a puppet.conf instructing them to connect with the Puppet Master. Next, almost all the OpenStack modules required for Kickstack can be found on PuppetForge (Figure 2). The exceptions are the modules for Neutron and Open vSwitch. The module for Glance also had to be installed manually, because the version available on PuppetForge had an annoying bug.
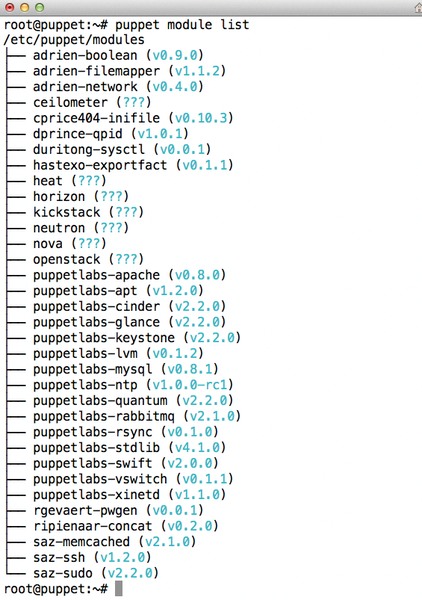 Figure 2: The module list for the Puppet Master makes it clear that Kickstack relies on the OpenStack Puppet modules.
Step 2: Kickstack
The current version of Kickstack is available directly from GitHub or PuppetForge. Once the module and its dependencies are installed, you can begin.
The previously described node roles need to be distributed in a meaningful way to the available nodes. The example here follows a conservative approached to the distribution: Charlie becomes the network node that runs all Neutron components except the Neutron API, Bob represents the computing node and owns the appropriate role, and all other roles are assigned to Alice, who handles the lion’s share of the work.
The following example assumes that the individual nodes have already been made part of the Puppet installation after installing Kickstack on the Puppet Master. In this case, they appear in the Puppet Dashboard under Nodes after the admin logs in.
Pressing Groups in the menubar at the top takes you to the only group that currently exists, named kickstack – nodes that take over tasks in the cloud in the context of Kickstack should be members of this group (Figure 3). Pressing this kickstack link followed by another click on Edit allows you to add nodes to the group.
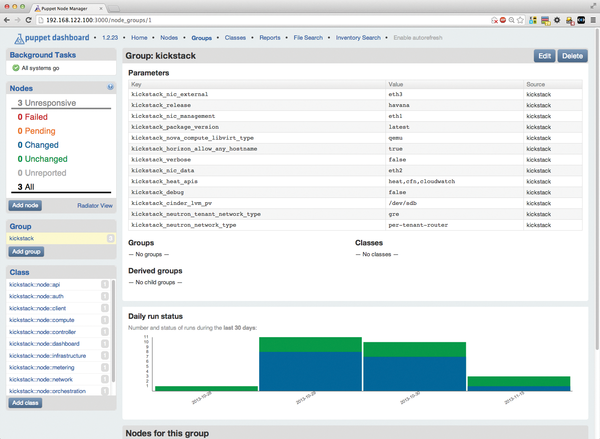 Figure 3: The Puppet Dashboard with an overview of the important configuration parameters of the kickstack group and the participating nodes.
The editing window for the group also provides access to the main settings related to the OpenStack Cloud; for example, if you want to use full virtualization within OpenStack (i.e., Qemu without KVM), then the value in kickstack_nova_compute_libvirt_type is correct. Also of great importance are the entries that specify which network types reside on which network interfaces. OpenStack distinguishes between
- kickstack_nic_management , the management network, which directly connects the individual services on the nodes (eth1 in this example),
- kickstack_nic_data , the data network, which routes the traffic between VMs running in the cloud (eth2 here), and
- kickstack_nic_external , the external network, which connects the virtual machines with the outside world (i.e., eth3 ).
If you are trying out Kickstack and OpenStack on virtual machines, it is a good idea to create the VM network interfaces so they match this scheme; if you are installing on bare metal, you might need to modify the parameters of the kickstack group. If the values cannot be modified uniformly for all nodes (e.g., because the network node uses a different NIC for the management network than the API node), you can also customize the parameters separately for each node in the next step.
The kickstack_cinder_lvm_pv parameter for the node that owns the Storage role (i.e., Alice in this example) is particularly important: Kickstack automatically converts the device stated here (/dev/sdb ) into a logical volume in LVM to make it usable for Cinder. Once the configuration of the Kickstack group is correct, you can continue with the roles.
Step 3: Assigning Roles
Pressing Nodes in the menubar of the Puppet Dashboard takes you directly to the individual entries of nodes that Puppet knows. Clicking on a node name and then on Edit takes you to the configuration dialog for that node.
The penultimate box at the bottom marks the classes to which a node belongs: You can use autocompletion to assign the appropriate roles here. For Charlie, this is kickstack::node::network , for Bob kickstack::node::compute ; all the other roles are assigned to Alice.
The end result is a series of calls to the Puppet agent on Alice, Bob, and Charlie. If the Puppet agents there are not running continuously in daemon mode, you might have to perform several Puppet runs consecutively to apply all the roles (remember, Puppet understands dependencies; in other words, it only performs those tasks in a Puppet run that are not prevented by an unfulfilled dependency).
After the final Puppet runs, you will see in the dashboard on the left-hand side that each role has been assigned once within the Kickstack class (Figure 4). OpenStack is already running: The OpenStack Dashboard (Figure 5) is accessible at http://<IP-of-dashboard-node>/horizon (e.g., on http://192.168.122.111/horizon for Alice). The credentials required for logging in can be found in the openstackrc file, which resides in /root on the node with the auth role. Kickstack leaves one task to the admin: creating networks in Neutron, which can be done manually with scripts, or retroactively via the Dashboard. The same is true for importing an image – CirrOS is recommended for testing.
 Figure 4: After assigning all node roles, you can view the results in a pane on the left in the Puppet Dashboard’s Class overview.
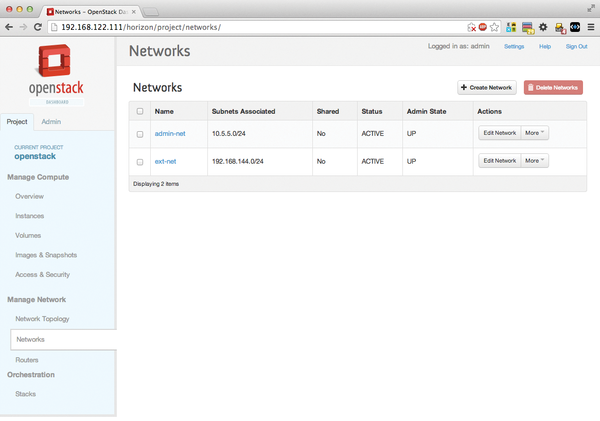 Figure 5: After installing OpenStack with Kickstack, you need to create a network for the admin tenant.
Conclusions
Kickstack is a welcome change for those who want try OpenStack but are wary of the time-consuming and complex installation. With Kickstack, you simply install Puppet and the required Kickstack modules. In fact, a basic Puppet setup with one master and several Puppet clients can be established relatively quickly. Additionally, configuring the individual nodes to create OpenStack machines is much more convenient in the built-in Puppet Dashboard than setting up the services manually (Figure 6). If you want to extend your OpenStack installation later to add more computers, you can do so at the push of a button in the GUI.
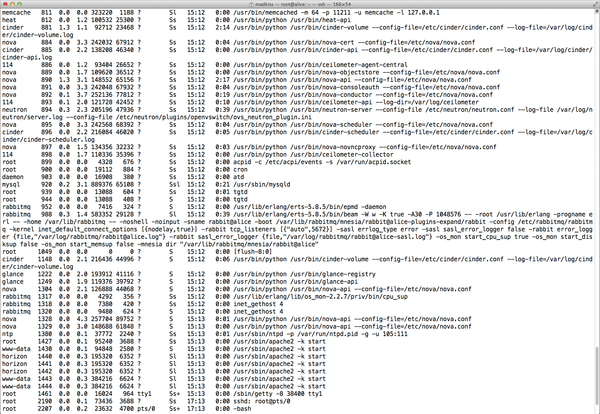 Figure 6: You can easily see the OpenStack services that originated with Kickstack.
However, this is not the end of the road for Kickstack in terms of desirable features: In particular, the solution still falls short when it comes to high availability. First, the OpenStack project has had to develop a concept of how it intended to implement high availability; second, typical HA tools such as Pacemaker are not very well integrated into Puppet right now.
| Design Decision: Puppet or Chef? |
|---|
| The question of whether to rely on Puppet or Chef has taken on the quality of a religious war. Similar heated debates are otherwise only seen surrounding admin topics such as Vi versus Emacs, Debian versus Ubuntu, and Java or no Java. In the case of Kickstack, Florian Haas chose Puppet. Packstack, the Red Hat counterpart to Kickstack, also relies on Puppet. Why do the OpenStack developers and companies who work with OpenStack rely on Puppet and neglect Chef? This can hardly be down to the fundamental design of the two solutions. Although Chef and Puppet take different approaches under the hood, they ultimately reach the same goal. Both systems rely on a client/server architecture, and both rely on their own syntax in terms of defining commands. Workflows differ somewhat, as well. For example, to resolve dependencies in Puppet, you define a corresponding entry in the manifest to stipulate that step A must be done before step B. In Chef, step A and step B need to be listed in the correct order in the Cookbook, otherwise Chef quits. This system of eventual consistency has its proponents and declared enemies, but in the OpenStack context, the differences are barely visible, so it cannot be the decisive issue that has lead to OpenStack auto-deployment environments that currently only exist in the form of Puppet solutions. The reason is ultimately much more trivial: All told, Puppet integrates better with OpenStack because Puppet modules for all core components can be found on the Internet, are regularly maintained, and thus ultimately already cover most of the required functions. Although modules exist for some of the core components in Chef, none of this code is official, and modules for important components, such as the Network Service Neutron, are missing. The the fact that extensions such as Packstack and Kickstack rely on Puppet, has very much to do with the fact that significantly more preliminary work has already been done in Puppet than in Chef. Don’t panic, though: If do not want to make friends with Puppet and prefer to rely on Chef instead, you can look forward to a remedy by SUSE in the foreseeable future. Along with some developers from Dell, SUSE is working hard on Crowbar, which builds on Chef and is also designated as a solution for automatic OpenStack deployment. Compared with Kickstack and Packstack, Crowbar even offers some additional components, such as a preconfigured Nagios. |
Info
[1] “OpenStack” by Martin Loschwitz, ADMIN , 2013, issue 17, pg. 28
The Author
Martin Gerhard Loschwitz is Principal Consultant at hastexo, where he is intensively involved with high-availability solutions. In his spare time, he maintains the Linux cluster stack for Debian GNU/Linux.
Related content
-
Simple OpenStack deployment with Kickstack
 Kickstack uses Puppet modules to automate the installation of OpenStack and facilitate maintenance.
 -
Getting started with OpenStack
 Selecting the correct OpenStack components for your use case and setting up the stack can be highly complex. This first article of a series prepares admins for practical OpenStack applications.
 -
Do You Know Juno?
 The OpenStack cloud platform plays a major role in the increasingly important cloud industry, so a new release is big news for cloud integrators and admins. The new version 2014.2 "Juno" release mostly cleans up and maintains the working model but adds a few innovations.
 -
Choosing between the leading open source configuration managers
 Puppet and Chef are competing open source tools for configuration management. Which tool is right for your network? Read on for some pros and cons.
 -
Ceph and OpenStack Join Forces

When building cloud environments, you need more than just a scalable infrastructure; you also need a high-performance storage component. We look at Ceph, a distributed object store and filesystem that pairs well in the cloud with OpenStack.
Subscribe to our ADMIN Newsletters
Subscribe to our Linux Newsletters
Find Linux and Open Source Jobs
Most Popular
Focus On Self-Hosting
• Self-Hosted Collaboration with Forgejo
• Self-Hosted PaaS with Coolify
• Build and Host Docker Images
• Self-Hosted Pritunl VPN Server with MFA
• Self-Hosted Chat Servers
Support Our Work
ADMIN content is made possible with support from readers like you. Please consider contributing when you've found an article to be beneficial.
